
Are you looking for a way to synchronize the files and folders on your OneDrive for Business account with your WordPress website? If yes, then you have come to the right place.
Here we will be looking into a feature-packed file manager plugin – WP File Download. It will let you organize and manage various files on your WordPress website, make them available for download to your website visitors, and enable 2-way synchronization between your WordPress website and different cloud storage platforms like Google Drive, Dropbox, and OneDrive.
We have prepared a quick feature-overview to show you how the plugin can be useful followed by an in-depth step by step guide on how you can use it to connect with your OneDrive for Business account.
Table of Content
- WP File Download – Plugin Overview
- WP File Download: Key Features
- WP File Download: Pricing
- WP File Download with OneDrive for Business Integration: A Detailed Walkthrough
- Step 1: Install WP File Download
- Step 2: WP File Download Setup Wizard
- Step 3: Create a Microsoft Azure App
- Step 4: Connecting to OneDrive
- Wrapping Up
WP File Download – Plugin Overview
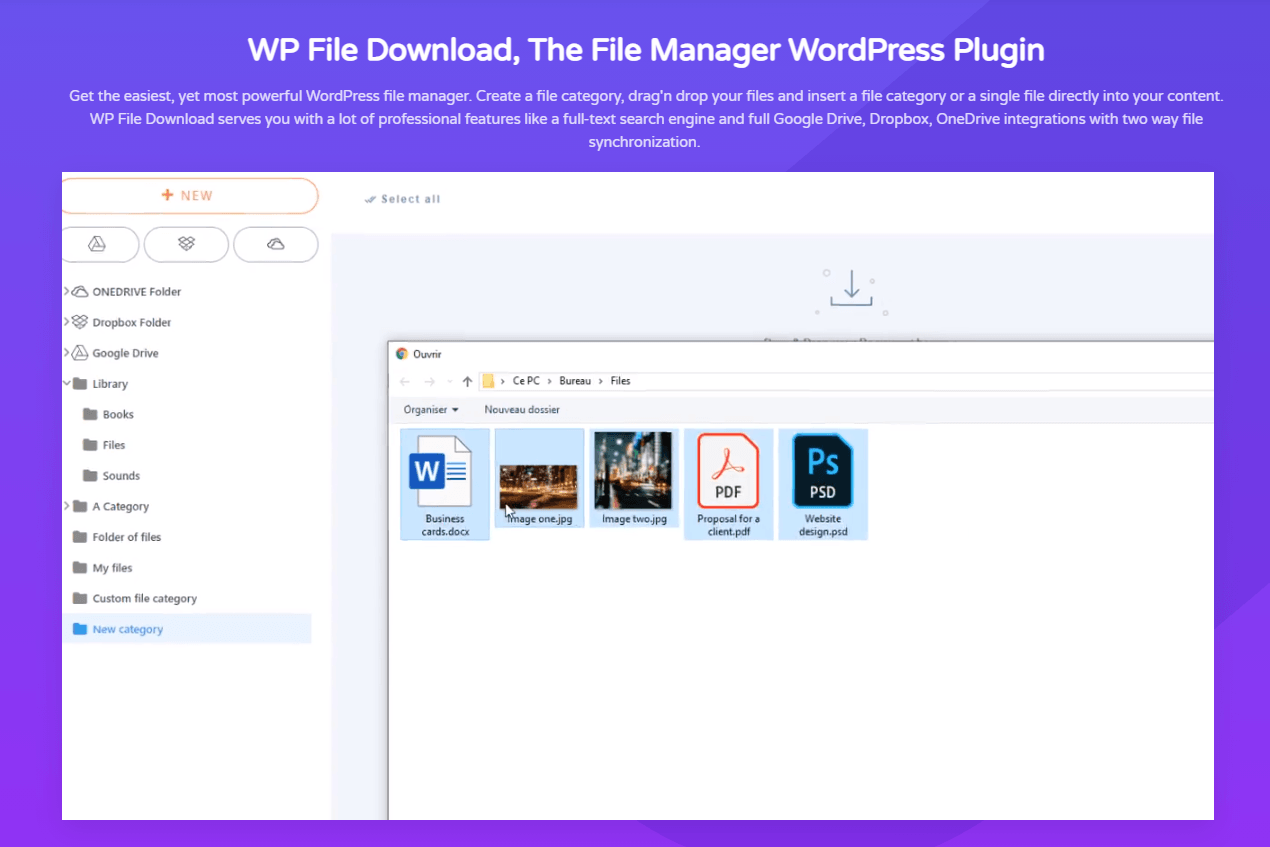
WP File Download is a premium WordPress file manager plugin by JoomUnited that is packed to the brim with advanced features to let you better manage and organize all the files and media on your WordPress website.
With the plugin installed, you will be able to create new file categories, drag’n drop files directly into your posts and pages, search for your files using a dedicated full-text search engine, and even supports 2-way file synchronization with all the popular cloud storage platforms like Google Drive, Dropbox, and OneDrive.
Here is a look at some of the awesome features that WP File Download brings to the table.
WP File Download: Key Features
- Offers a file manager as advanced as your desktop file browser. Supports drag’n drop functionality. You can use it to move around the files and change the order or levels of the file categories. All changes are saved spontaneously with Ajax.
- You have complete control over which users get to download (or even view) which files.
- A powerful and flexible file search engine with tons of advanced filters.
- A dedicated file versioning system. Lets you update your files and keep a backup of the old file version.
- Seamless WooCommerce integration allows you to monetize your website by offering file downloads.
- Comes with 4 different themes to let you customize the look and feel of your file listings. Themes can be applied per category of files. Option to create your own custom themes.
- Dedicated add-ons to let you synchronize your files with 3rd-party cloud storage platforms like Google Drive, Dropbox, and OneDrive.
And this is just the tip of the ice-berg. WP File Download comes with many more bells and whistles that you can check out here – WP File Download Complete Feature List.
WP File Download: Pricing
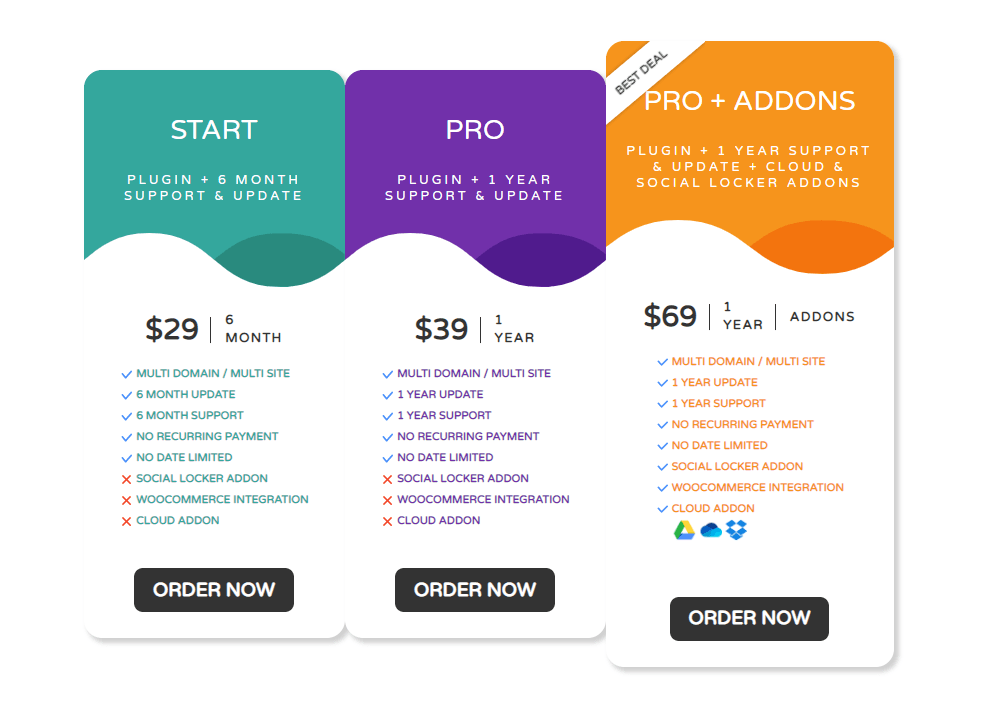
You can get the WP File Download plugin at a starting price for $29, which gives you a multi-site license and access to 6 months of technical support and continuous updates. Then there is the $39 Pro plan which will extend your access to technical support and updates to 1 year.
Both of the above plans give you access to the core plugin features excluding the add-ons.
If you wish to use this plugin to integrate your WordPress website with OneDrive for Business, you will need to get their $69 plan which adds in all the plugin add-ons which includes integration with WooCommerce, Google Drive, Dropbox, OneDrive personal, OneDrive for Business, and Social Locker.
JoomUnited also sells a discounted $179 WordPress Developer Bundle pack that will get you a one year license to WP File Download + addons, as well as 7 of their other awesome plugins.
WP File Download with OneDrive for Business Integration: A Detailed Walkthrough
By now you should have a clear understanding of what the WP File Download plugin brings to the table. So with that out of the way, let’s come back on track – how to use WP File Download to integrate OneDrive for Business with your WordPress website?
Well, here is a detailed step-by-step guide to help you out.
Step 1: Install WP File Download
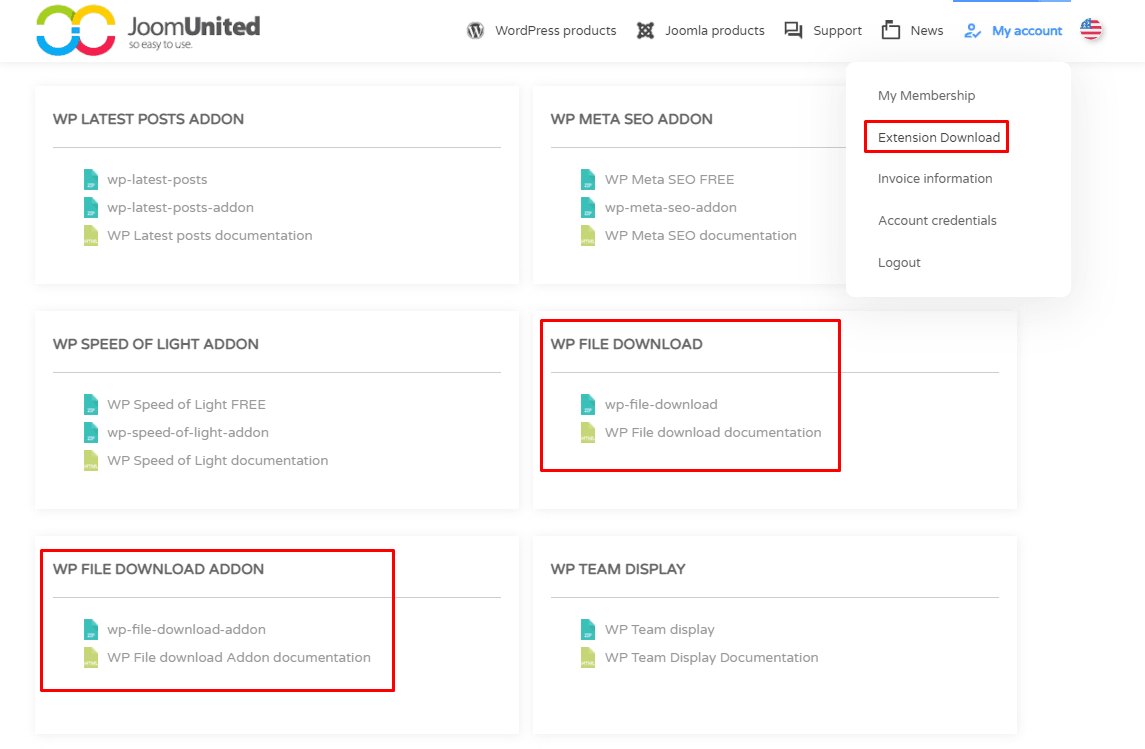
After purchasing the WP File Download plugin, log-in to your JoomUnited account, click on Extension Download, and then download WP File Download and WP File Download Addon to your desktop as shown in the image.
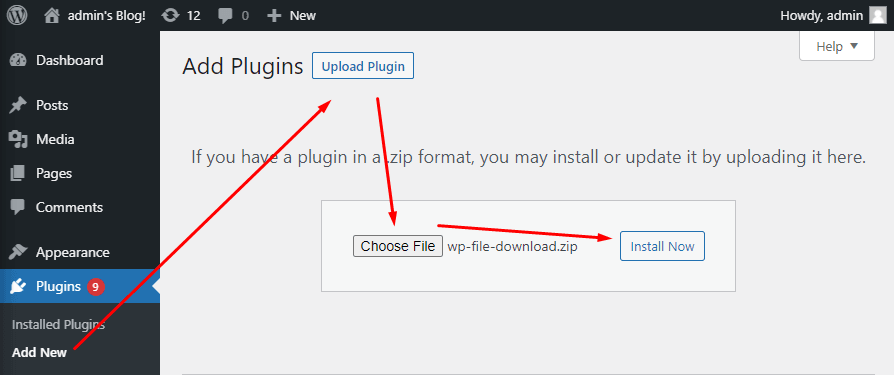
With the plugin and addon downloaded, login to your WordPress dashboard and make your way to Plugins > Add New via the left-hand sidebar. Next, click on the Upload Plugin button to the top left corner of the screen, and use the Choose File button to browse and select the wp-file-download.zip file.
Note: We need to install the main plugin first followed by the addon.
Next click on Install Now as shown in the image.
This will begin the plugin installation process which is going to take a few seconds to perhaps a couple of minutes. Once the plugin is installed, the following message should appear.
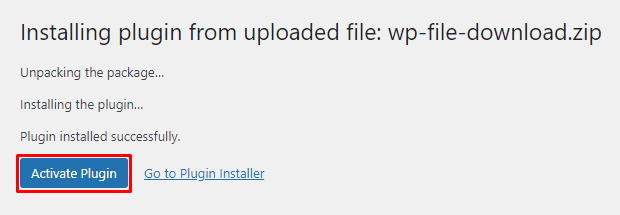
Click on Activate Plugin to complete the installation. This will automatically take you to the WP File Download setup wizard, as shown in the image below.
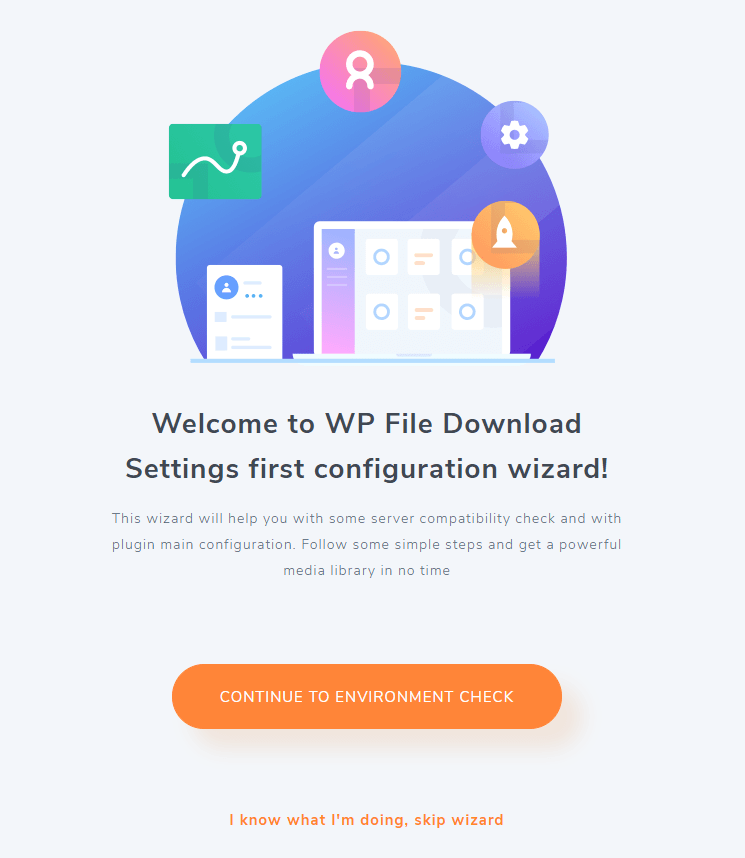
Note: It is advised that you don’t skip the setup wizard. It is designed to check the server compatibility to ensure you don’t stumble into any sort of issues down the road. Furthermore, It’s only a three-step process that takes a couple of minutes to complete.
Step 2: WP File Download Setup Wizard
Once you see this screen, click on the Continue To Environment Check button to start the wizard.
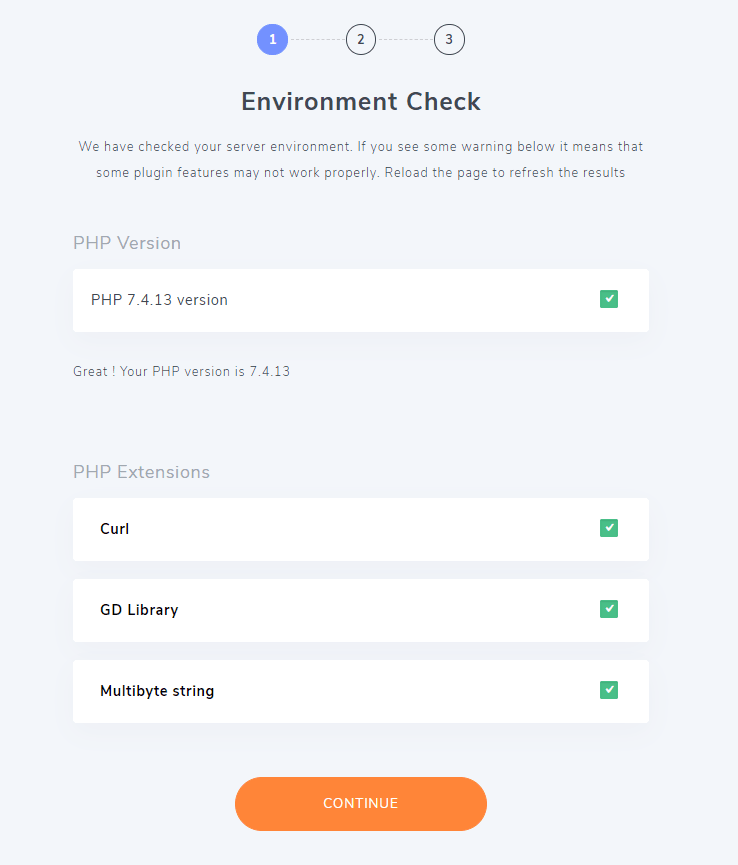
At first, the wizard will check your server environment to check if it meets all the plugin requirements – essentially the latest PHP version and some PHP extensions.
If everything is okay you will get a green tick mark as shown in the image.
Whereas, if some thing is missing, you will get a red cross mark. In that case, you will need to install the missing component in order for the plugin to work. You can either do this manually or contact your hosting service provider. That being said, almost all the best and reputable hosting service providers have these apps pre-installed, so you aren’t likely to face any issue.
Once you get the green signal, hit the Continue button and on to the next section – Theme Selection.
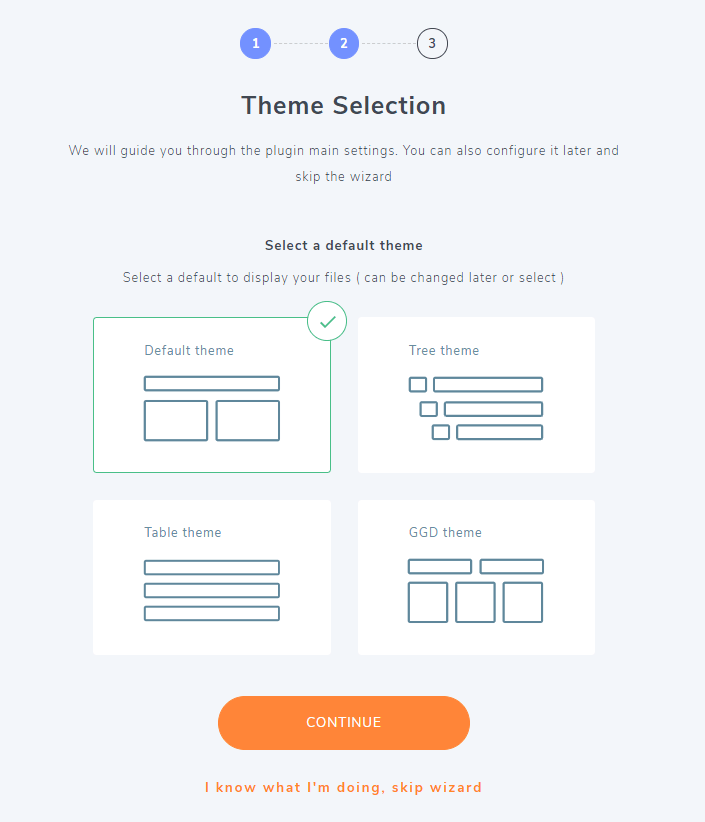
Here, you will need to choose a theme from the four available options – standard listing (default), Tree like, Table like, and one like the Google Drive layout.
The theme you pick defines how the files will appear to your visitors.
That being said, you can change the theme afterward. The plugin also comes with tons of design settings and options to give you complete control over each of the theme’s appearance and layout. As such, you can create your own custom theme to build a unique file browsing experience for your readers.
Once you are done picking a theme click the Continue button and you will be taken to the final section – the settings page.
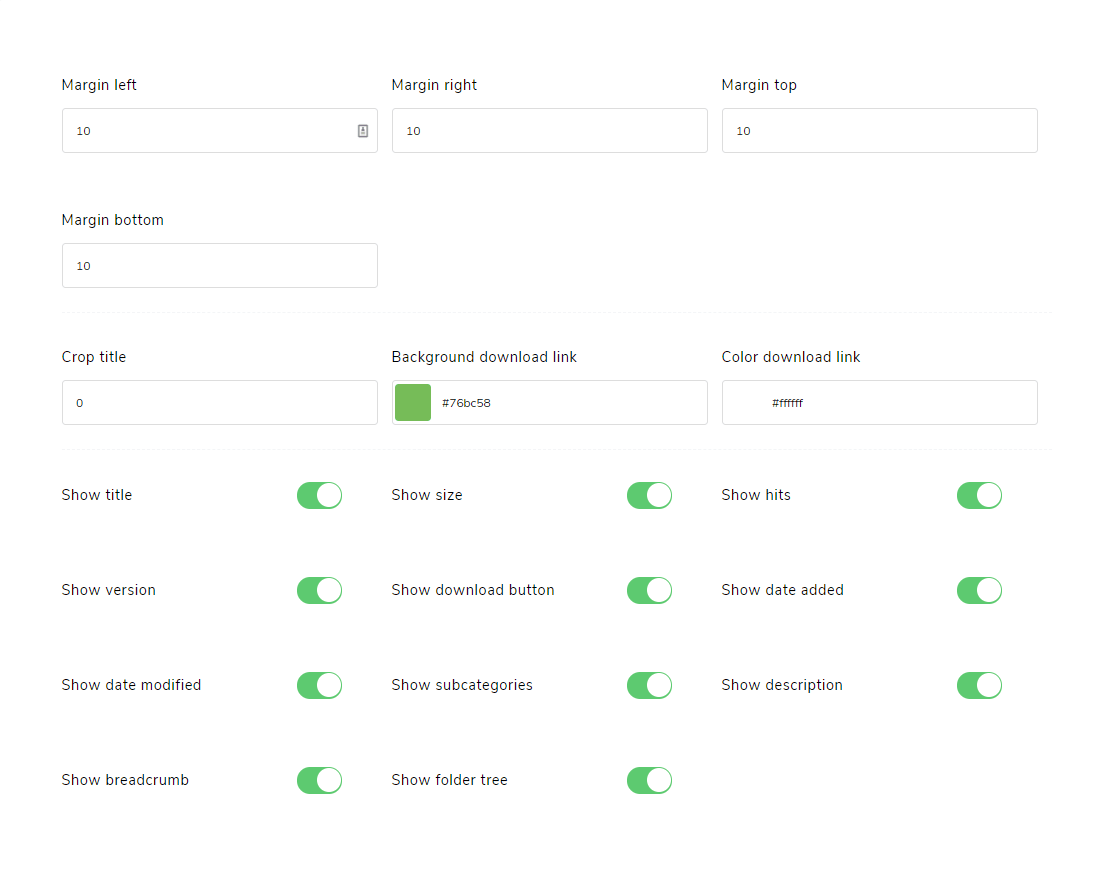
You can skip this step by leaving in the default values and clicking on Continue. All these settings are going to be available later on as well for you to tweak and customize the plugin according to your needs.
After clicking Continue, you will be taken to the new WP File Download section in your WordPress dashboard.

And voila! You have successfully installed and set up WP File Download. Now its time to install the wp-file-download-addon. To do this, you can follow the steps provided in step 1 again.
Once done, it’s now time to integrate it with OneDrive for Business.
Step 3: Create a Microsoft Azure App
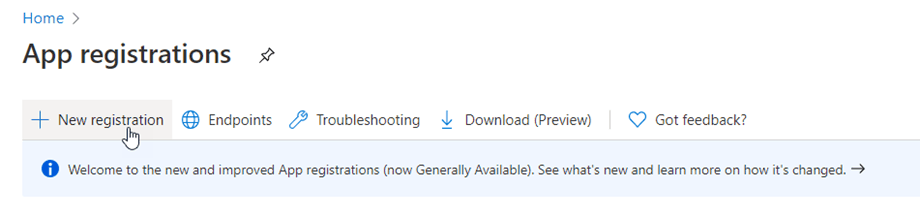
To integrate OneDrive for Business with your WordPress website, you will first need to create a Microsoft Azure App.
To do this, login to Microsoft Azure using your Microsoft account that’s connected to your OneDrive for Business. Then Click on the New registration button in the top toolbar as shown in the image.
This is going to bring up the following Register an application form:

Fill in the application name which is going to be used as a display name. Next select the Supported account type as – “Accounts in any organizational directory (Any Azure AD directory – Multitenant)” for connecting with your OneDrive for Business account, or “Accounts in any organizational directory (Any Azure AD directory – Multitenant) and personal Microsoft accounts (e.g. Skype, Xbox)” to connect with both of your OneDrive for Business and Personal accounts.
Finally fill in the Redirect URL with your website’s address in the given format – “https://www.domain-name.com/wp-admin/admin.php.”
Once you are done with this, click on the Register button and you will be taken to the following screen:
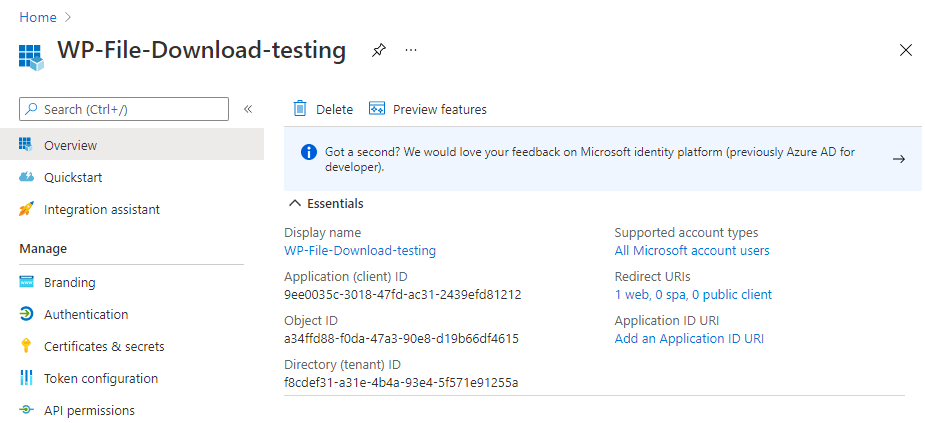
You now have the Application (Client) ID and Object ID for your app.
Now, head on over to the Certificates & secrets section from the left-hand sidebar and click on +New Client Secret. This is going to bring up a pop-up window where you need to type in a Description, set an Expires time, and click on Add as shown in the following imaage.
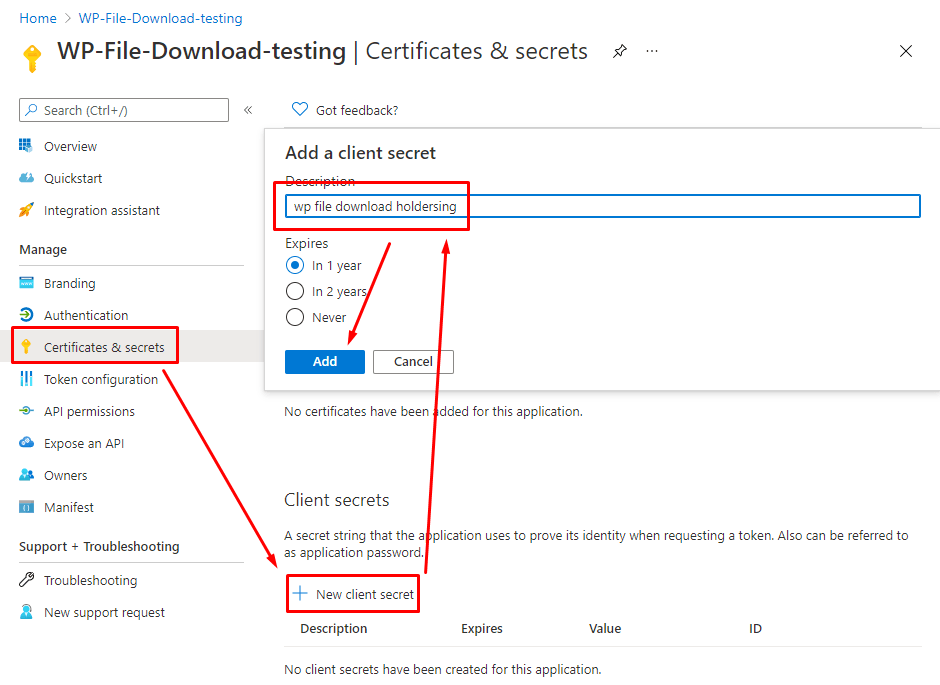
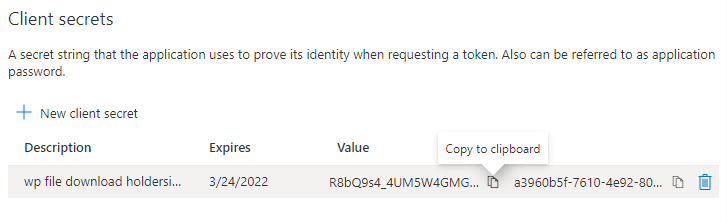
This will now generate a new Client Secret with a set Value which will function as a password for the new Azure app you just created. Make sure to save it to clipboard as we are going to need it later on.
Step 4: Connecting to OneDrive
It’s finally time for you to connect your OneDrive for Business with your WordPress website.
Go to your WordPress dashboard and from the left-hand sidebar go to WP File Download > Configuration > Cloud Connection > OneDrive Business.
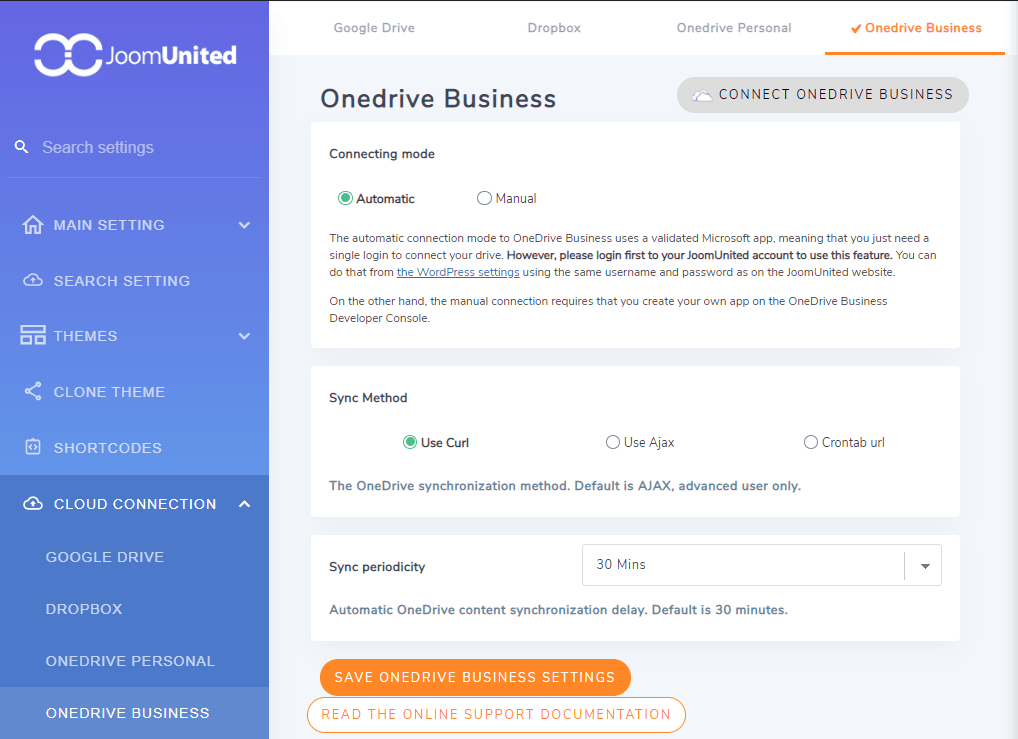
From here you have two connecting modes – Automatic and Manual.
We are going to use the Manual mode since all it requires is that we have our own app on the OneDrive Business Developer Console which we just created.
So click on Manual and you will be taken to the following screen where you have to enter your OneDrive Business Client ID and OneDrive Business Client Secret.
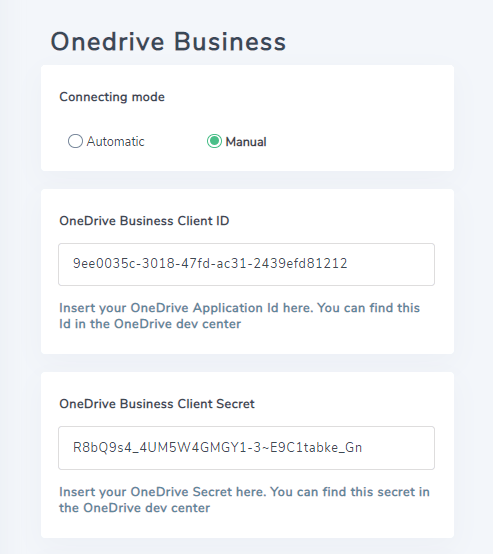
So just copy and paste that into their designated fields, scroll down, click on Save OneDrive Business Settings and finally on the Connect OneDrive Business button.
A new window will pop-up asking to validate the access authorization. Click on Yes and that’s it! You have successfully integrated OneDrive for Business with your WordPress website.
You can now create folders, sub-folders and even upload files to your OneDrive account, that everything will automatically synchronize to your WordPress website and vice versa.
Wrapping Up
So that was our quick tour of WP File Download – a powerful plugin to help you integrate your OneDrive for Business account with your WordPress website. We hope you found this guide useful and that it helped you in achieving a more productive workflow.
Now if you face any sort of issue trying to synchronize WP File Download with your OneDrive Business account, then don’t hesitate to reach out to us in the comments below. We will try our best to resolve your problems.


