
Are you looking out for conditional programming in Ninja Forms in WordPress then you have approached the right plugin? Ninja forms are one of the biggest pieces of code which provides you with an easy way to develop forms on WordPress. Its significant drag and drop features anyone can install the form and get it going for its website.
WordPress is one of the leading platforms that provide you with a fantastic opportunity to create attractive websites for your business. It’s not only that, but it also gives you thousands of plugins that make your life easier by providing you with different functionalities with drag and drop features.
- What is Ninja form, and why is it so popular?
- What is Conditional Logic?
- Step by step guide to set up conditional logic in Ninja Forms
- Step 1
- Step 2
- Wrap up
What is Ninja form, and why is it so popular?
Ninja Forms is free of cost form builder plugin available for WordPress that allows you to create any type of form for data collection. Whether it is simple to contact forms or event registrations, file uploads, payment or any complicated scenario, it is the right option for everyone when it comes to creating conditions on your WordPress website.
Ninja Forms unique features have led to its immense popularity in the market, and one of the proofs of this is that it has been downloaded over 11,000,000 times by clients. Moreover, millions of WordPress websites are using it for developing rare forms. So, let’s move on to the guideline through which you will be able to create conditional logic in Ninja forms on your website.
Here are some basic features of Ninja form because of which they have become so popular among website designers. So let’s have a look
- A user-friendly plugin that comes with form builder
- Highly beginner-friendly
- Create a beautiful and attractive website even if you are not a designer
- Can be developed even if you are not a developer. Easy drag and drop features
- Payment form options to integrate payment gateway on your website
- Numerous form options such as signup forms and lead generation forms
- Thousands of pre-built templates that will allow you to get started right away without any help of a developer
- Responsive websites are websites which provide you with the option to use the same design on different screen sizes without any customization. Ninja Forms also offers you responsive website plugins that fit in with different screen sizes.
- It provides different integration as compared to any other WordPress form builder plugin available on WordPress.
- It provides an add-on feature for the websites providing numerous opportunities for you to grow your business. Here are some of the addons that come along with Ninja forms providing a fantastic opportunity for you to increase your website.
- Layout & Styles
- Conditional Logic
- Multi-Part Forms
- File Uploads
- PDF Form Submissions
- Excel Export
- Save Progress
- User Management
- Front End Posting
- User Analytics
- Webhooks
After getting to know about these unique features, you surely don’t want to be left behind so download Ninja Forms and get going.
What is Conditional Logic?
Before we move on to step by step guideline, our users need to be on the same page. Therefore, we will be giving a light introduction to conditional logic. Conditional logic is functionality in programming that allows users to create and update dynamic elements. All the decisions are dependent upon the given input.
Let’s show you an example that will show you how conditional logics work in programming.
- Assume you have a form that takes information from the candidates about their education.
- The specialization dropdown will only be visible to candidates who will opt for PhD while others will only add their respective degrees.
- Here comes the conditional logic where the computer will decide whether to show a dropdown or a simple input field based on the user input.
Step by step guide to set up conditional logic in Ninja Forms
Here in this step by step guide, we will be following an example where we will be sending an email to the user based on a particular logic. It is effortless to set up conditional logic for sending emails to different users. So let’s get to the task!
To do so, we will be using our Conditional Logic extension. It is an extension that will add the ability to set up conditions across the form that you will develop. Adding criteria to send conditional email is one of the numerous things that you can do in conditional statements.
It is noteworthy to note that all the conditional statement in Ninja form 3.0 have moved to a centralizes control centre. The Advanced tab of the form builder is the place where you can find all these controls. The email actions, however, contain the logic operations conveniently cooked into the action window. Wait a minute, let it sink, and don’t get disappointed because we are moving ahead to show you how you can set up statements to send emails based on different conditions.
We have got a Quote request form made for you to allow you to enjoy the work related to the conditional logic.

Having a look at the form above we get to know that we have to send an email to the concerned department upon the user input of “What services may we assist you with?”. As per the user input, we will select the relevant email address of that particular department and inform them that someone is looking for a quote.
Moreover, we also have to implement the logic that if the question is left unanswered, then it will not send email to any department. So now we have two conditions to check first the department and then selection of the relevant email.
Step 1
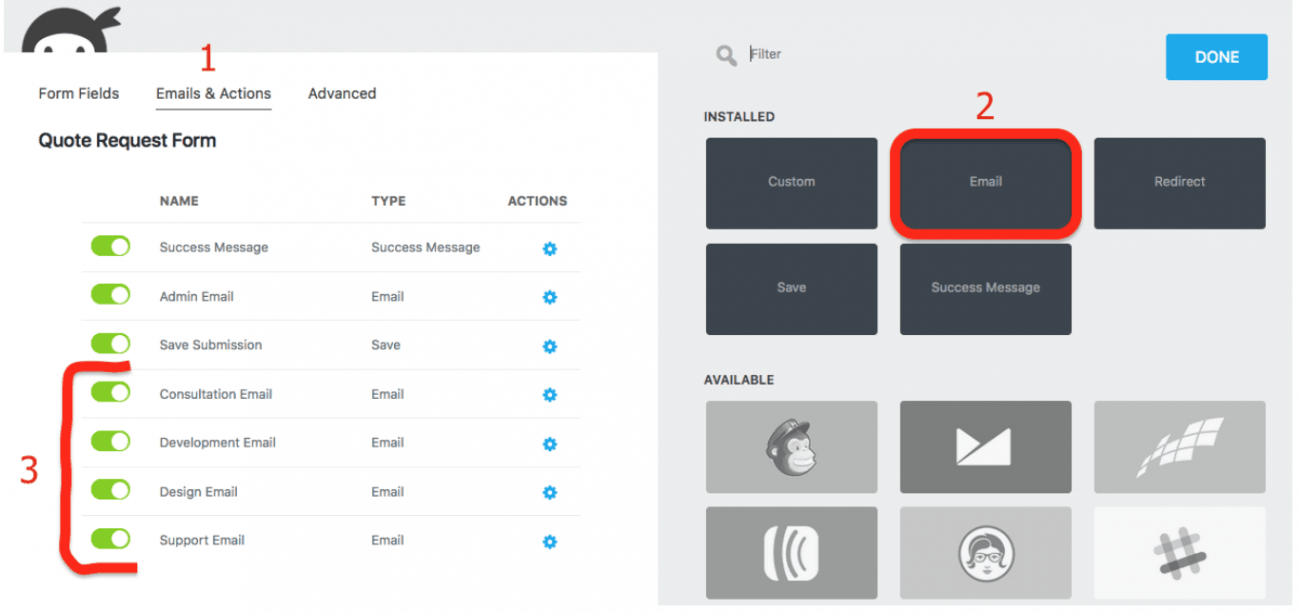
Here comes the first step, where you have to create email action for each department. Follow the steps below to make the emails, and then we can move ahead towards our logic building.
- Go to the form builder
- Hit the Emails in the Action tab.
- Add an email action for each department. The below screenshot shows how you can open the action menu window.
- Ensure that you give precise and understandable names to each action so that it is easy for you to locate the stories afterwards. Or if anyone after you comes over to change something can understand the steps easily.
Step 2
Now comes the real action where you need to add the conditional logic to ensure that the form acts according to the desired to be a behaviour to add the condition hit the first email action so that we could add a conditional statement.
Following is the screenshot that will show a slide action window where you will write your conditional logic to let the form act accordingly.
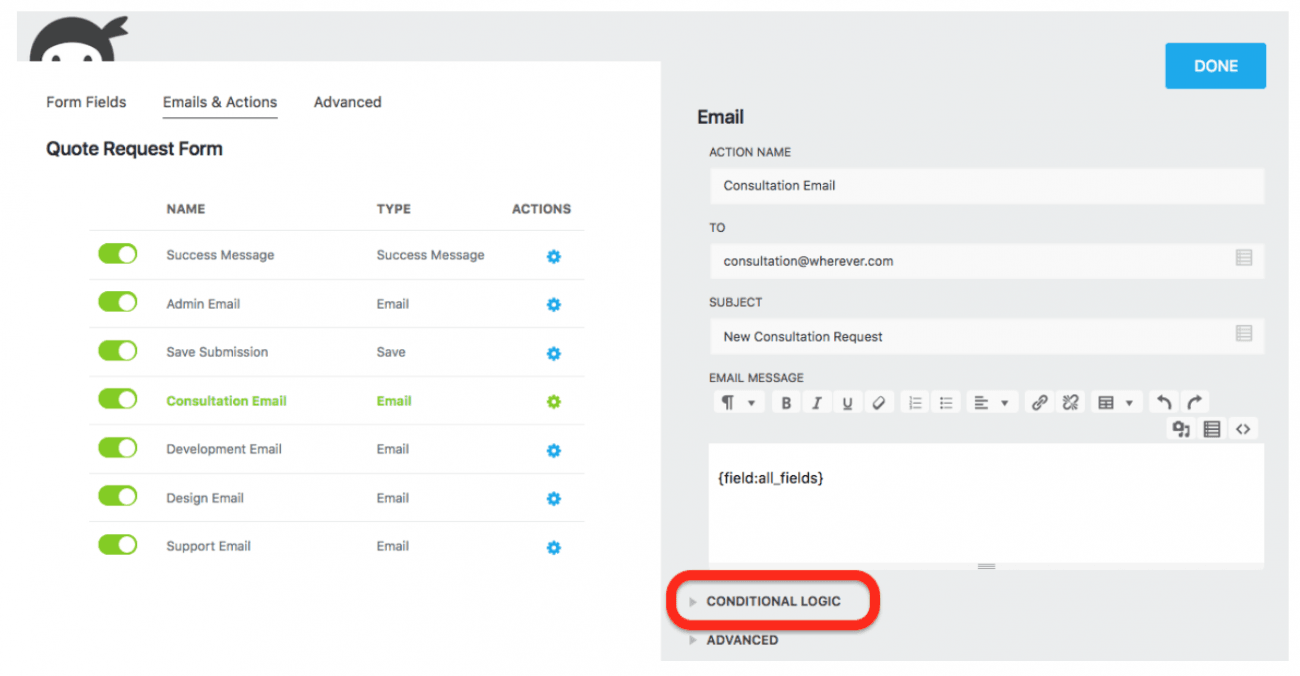
At first, you need to establish the email details that include the subject body and To email address for each of the action that you have created above. Once done with everything related to the email, we will be moving ahead to the conditional logic section.
The above screenshot highlights the conditional logic area where we will be setting up our custom logic. Once you open the conditional logic tab, you will see a form as shown below in the screenshot.

Here you can see there is a logic that has already set for this particular email. In this scenario, we want the email to sent when the user has selected the consultation option from the radio list option of “What Services May We Assist You With”.
It means that whenever the user selects the Consultation option from the radio list provided and submit the form, this email action will initiate. Whereas unless this condition fulfilled, this email action will not trigger.
To finish the logic its time to repeat the second and third step for the rest of the email sections. It is essential to set a condition statement for each action because if you don’t set up for other email actions, then it will not work for the rest of the conditions.
So what are you waiting for just follow the instructions and set up a condition form for yourself right away because we want you to have the best out of your website? However, websites are designed to provide you with only the details about the company.
Wrap up
Conditional logic is a great power that provides you with a fantastic opportunity to develop your website according to your needs. Ninja forms provide you with a lot more than what you have seen here. It is not limited to send emails; you can do a lot of more complex tasks with conditional logic. It also allows setting triggers in a form that will inform the relevant department about the dropping / rising of value from a certain threshold.


