

The way WordPress handles all the media files is basic to say the least. You get a messy interface where all your media files get stored and dumped.
Sure, there is a search function to help you find a specific file, but that’s only useful if you know what you are looking for. There’s also an option to filter through the different file types but that is also pretty basic.
So, wouldn’t it be great if WordPress used a more potent file manager system, similar to the one on your computer? You would be able to create folders and subfolders to properly organize all your files.
Well, now you can do exactly that by using the WP Media Folder plugin.
Table of Content
- Table of Content
- Why You Should Organize Your Files in Media Library Folders?
- WP Media Folder – WordPress Media Library Management Plugin
- Key Features:
- How to Store Your WordPress Media in Real Physical Media Folders Using WP Media Folder
- How to Install the WP Media Folder Plugin?
- How to Enable Physical Folders with WP Media Folder?
- How is the New Media Library Interface?
- How to Create a New Folder and Move Files Into It?
- How to Dynamically Replace Media Links in Your Posts and Pages?
- How to Sort and Filter through all the Files and Folders?
- Wrapping Up
Why You Should Organize Your Files in Media Library Folders?
Now, in case you didn’t know, WordPress automatically stores all the files you upload to the Media Library in the /wp-content/uploads/folder path. You can find it if you access your WordPress website’s backend.
You will also notice that everything is organized chronologically based on the year they were uploaded and contains subfolders for the months of upload.
However, the neat chronological organization of all the files is not available through the WordPress dashboard – well at least by default. Furthermore, only having the option to chronologically organize the files can be limiting for some users.
For example, let’s say you are a photographer. In that case, you might want to store and organize your images based on location, events, or topics. Similarly, if you are hosting a portfolio website, having all the media files organized based on clients and industry makes most sense.
Furthermore, besides the overall convenience and ease of use, having the liberty to organize your media files can potentially help with the SEO as well. You can now add keywords in your image file URLs making those URLs more meaningful and easier to search for.
So now that you see the advantages of storing your WordPress media in real physical media folders, let’s see how we can do so using the WP Media Folder plugin.
WP Media Folder – WordPress Media Library Management Plugin
WP Media Folder is a premium WordPress plugin developed by the folks at JoomUnited. As such, to use the plugin, you will need to buy it, either at $29 with 6 months’ support or at $39 with 1-year support.
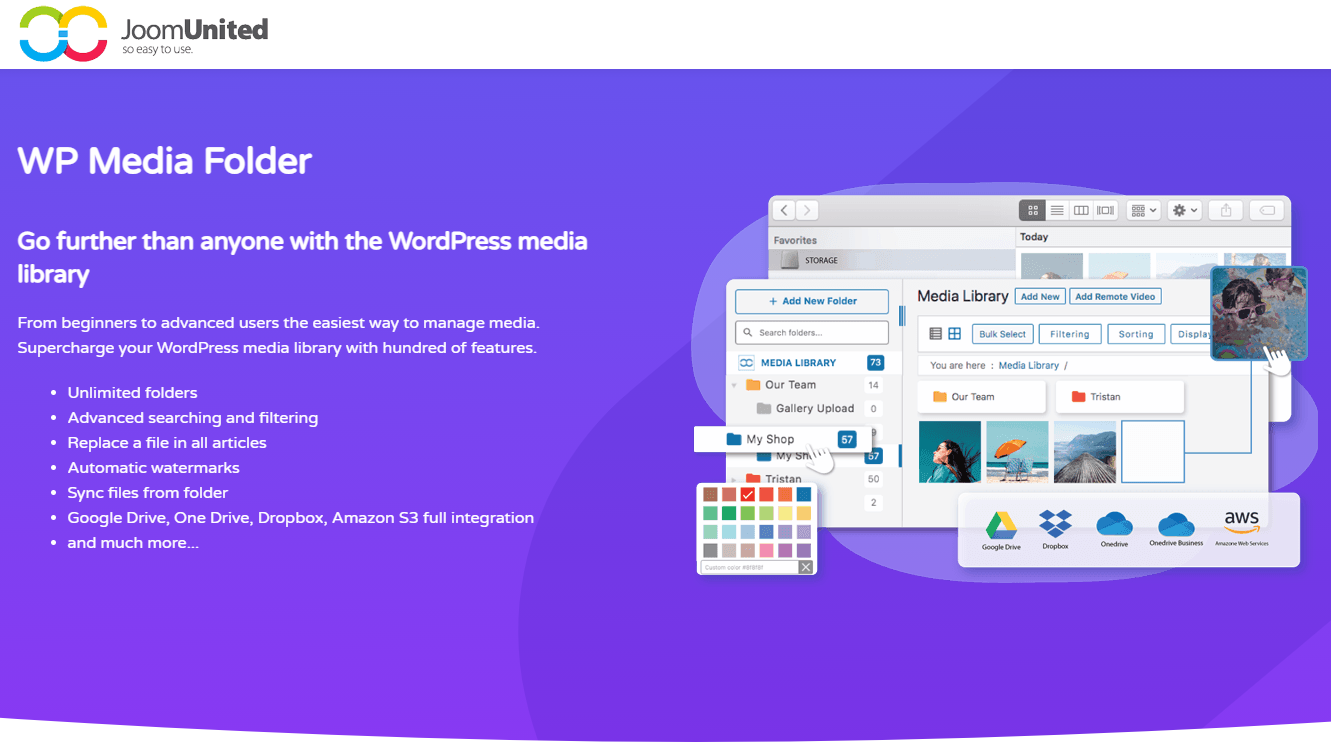
The plugin is super-lightweight and comes with tons of amazing features and functionalities that will supercharge the way you manage media on your WordPress website.
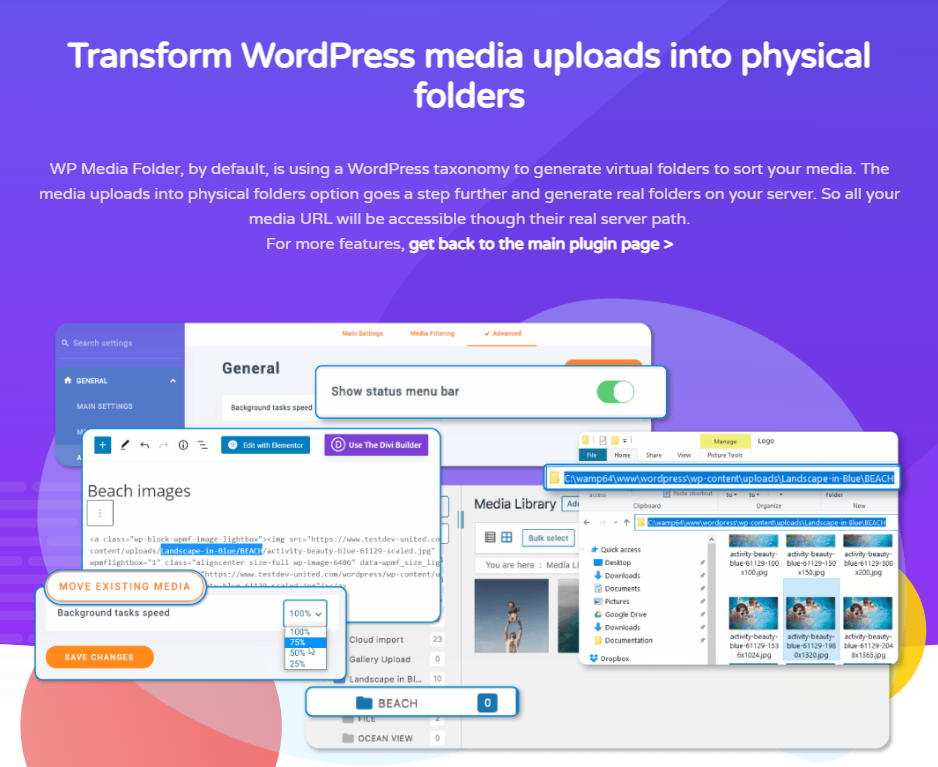
In function, it is using a WordPress taxonomy to create virtual folders to help you sort your media files.
Here’s a look at some of the main features that comes with the plugin.
Key Features:
- Create and manage unlimited folders and subfolders from your WordPress dashboard.
- Advanced searching and filtering options.
- Powerful WordPress Media access settings and options.
- Ability to quickly replace a file in all articles.
- Automatically add watermarks to all your media files.
- Integration with Google Drive, OneDrive, and Amazon S3.
- Compatible with Gutenberg.
- WooCommerce support.
- Sync all your files and folders between various cloud platforms.
Now, for the purpose of this read, we will be looking at the first feature – how to create and manage folders from your WordPress dashboard. However, if you wish to learn more about what you can do with this plugin, check out this list of helpful guides and tutorials using WP Media Folder.
How to Store Your WordPress Media in Real Physical Media Folders Using WP Media Folder
Now that you have a basic idea of the WP Media Folder plugin and all the features and functionalities it brings to the table, let’s quickly go over a step-by-step tutorial on how we can use it to store your WordPress media in real physical media folders.
How to Install the WP Media Folder Plugin?
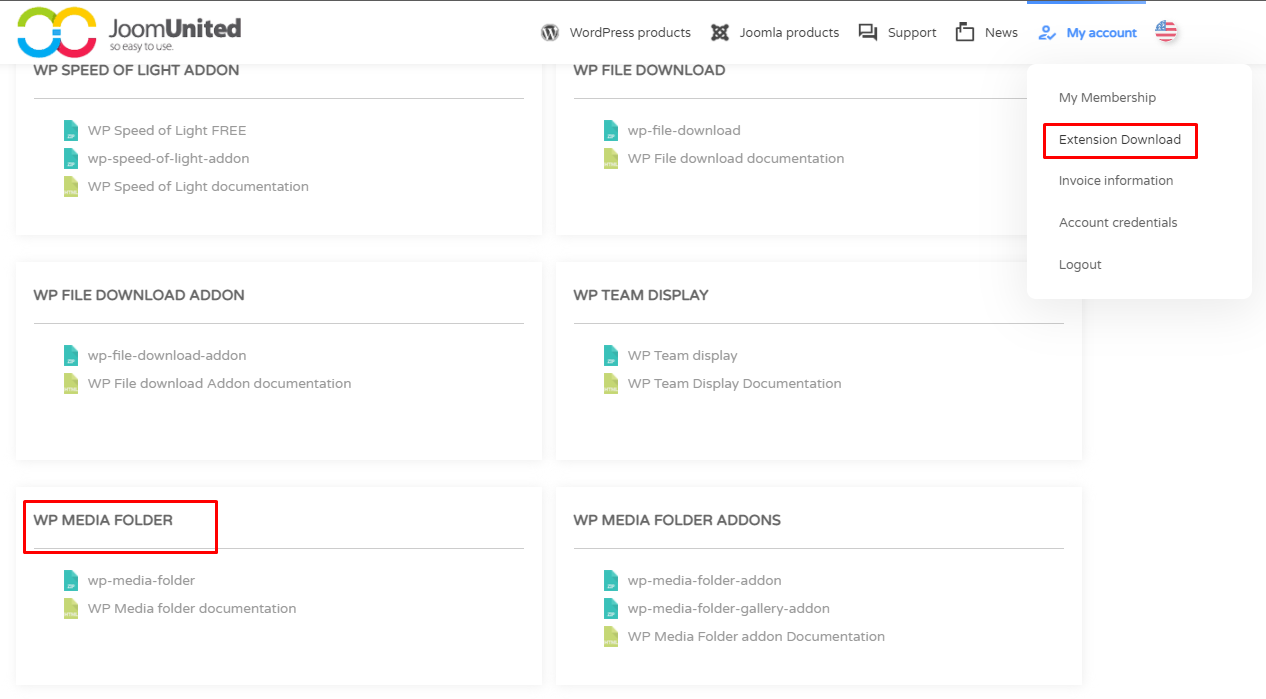
Once you have purchased the plugin, you will need to download it. To do this, head on over to your JoomUnited account, click on Extension Download, and then click on WP Media Folder to download it to your desktop.
With the plugin downloaded, head on over to your WordPress website’s backend.
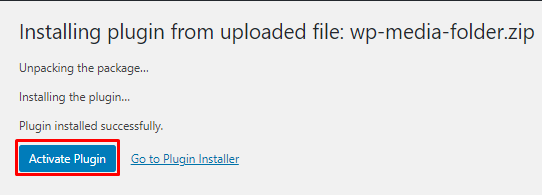
From here, go to Plugins > Add New > Upload Plugin and then choose the WP Media Folder .zip file you just downloaded. After selecting the plugin, click on Install Now as shown in the image below.
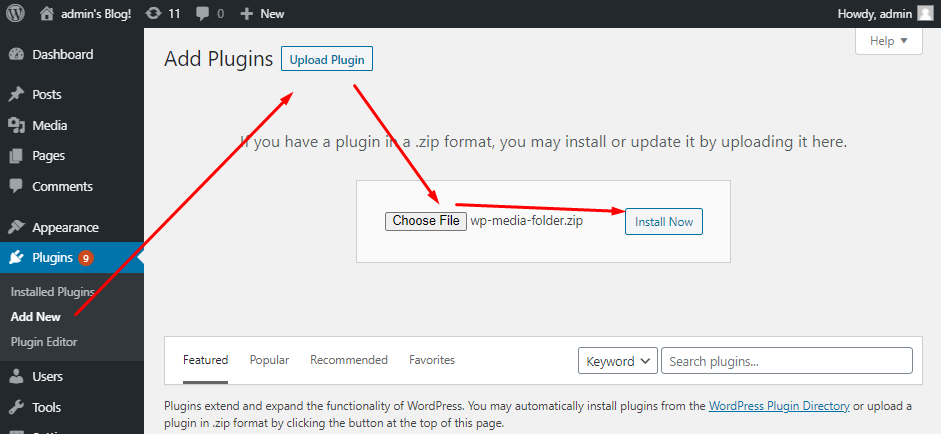
Next, all you need to do is wait for a couple of seconds till the plugin gets installed, and then click on the Activate Plugin button.
How to Enable Physical Folders with WP Media Folder?
With the plugin installed and activated, go to the WordPress Settings and you will find a new option – WP Media Folder. From here, navigate to the PHYSICAL FOLDERS tab and click on Enable Physical Folders as shown in the image below.
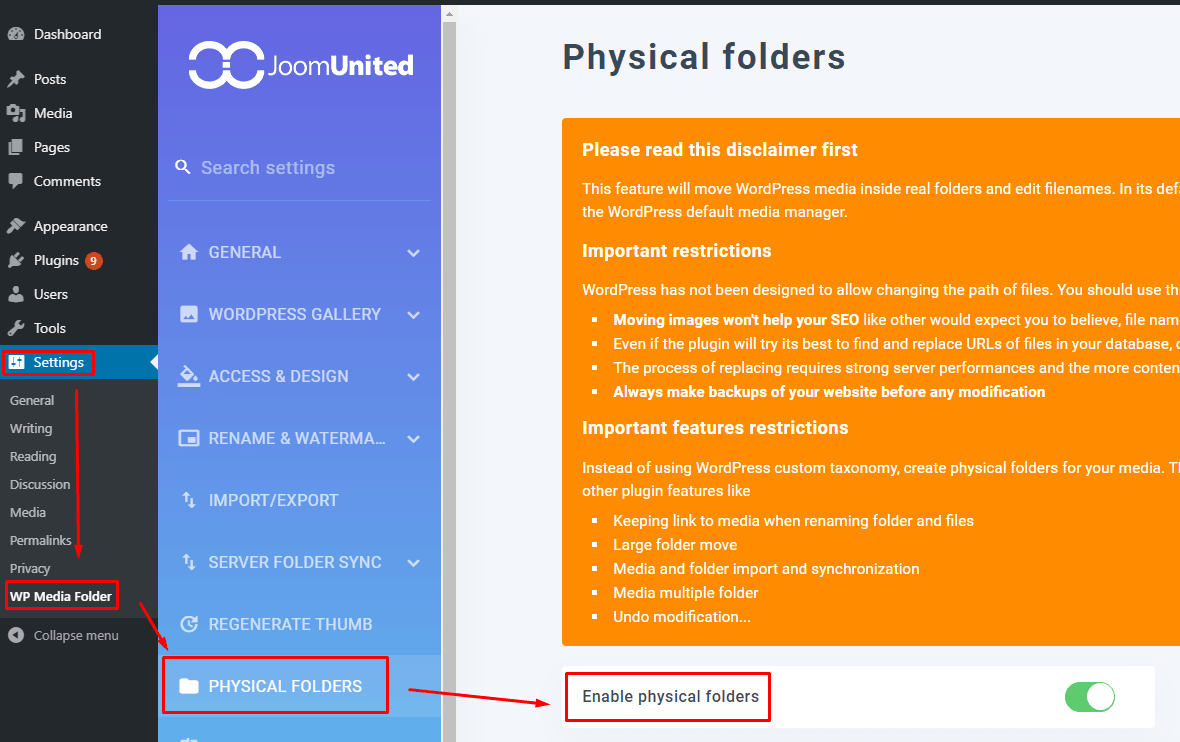
With the setting enabled, the plugin will now create real physical folders to store your media files.
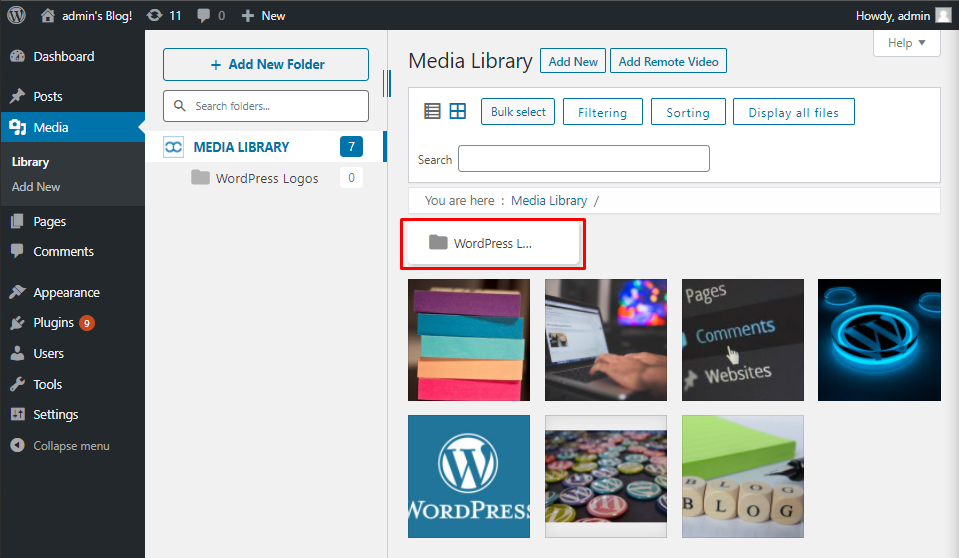
How is the New Media Library Interface?
Now that you have configured the plugin, head on over to the Media section from the left-hand sidebar, and you will notice that the entire WordPress Media Library has been completely overhauled.
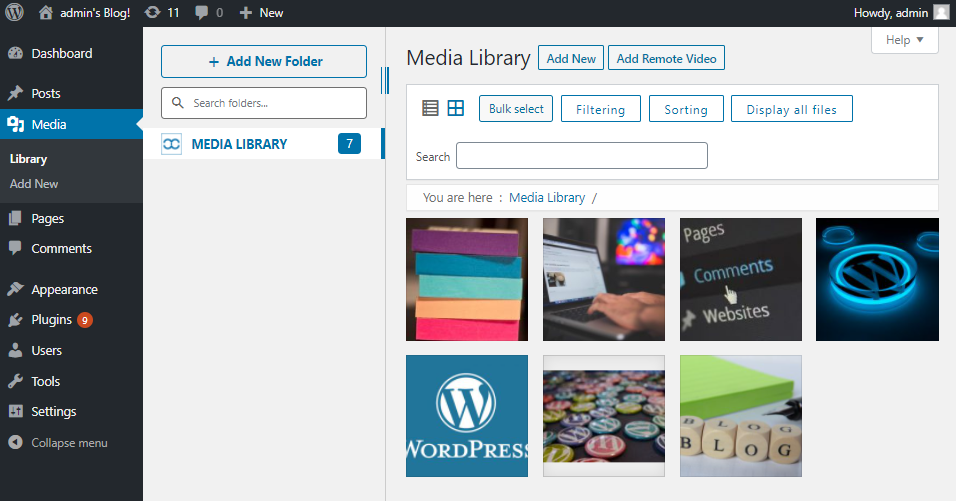
As you can see, the new interface is divided into two columns – kind of similar to the file manager on your Windows PC. The left-hand column is a quick view of all the folders (we will see this in more depth later on), and the right section showcases all the files contained inside the selected folder.
Also, if you pay more attention to the top bar, here is now options for:
- Add New Folder
- Add Remote Video
- Bulk Select
- Filtering
- Sorting
- Display all Files
We will take a more detailed look at these options in later sections.
How to Create a New Folder and Move Files Into It?
Creating a new folder is as simple as clicking the “+ Add New Folder” on top of the left-hand sidebar. This is going to bring up a pop-up Windows where you will have to enter a name for the folder and then click on “Create.” For the purpose of this tutorial, we will be creating a new folder to keep all our WordPress logos.
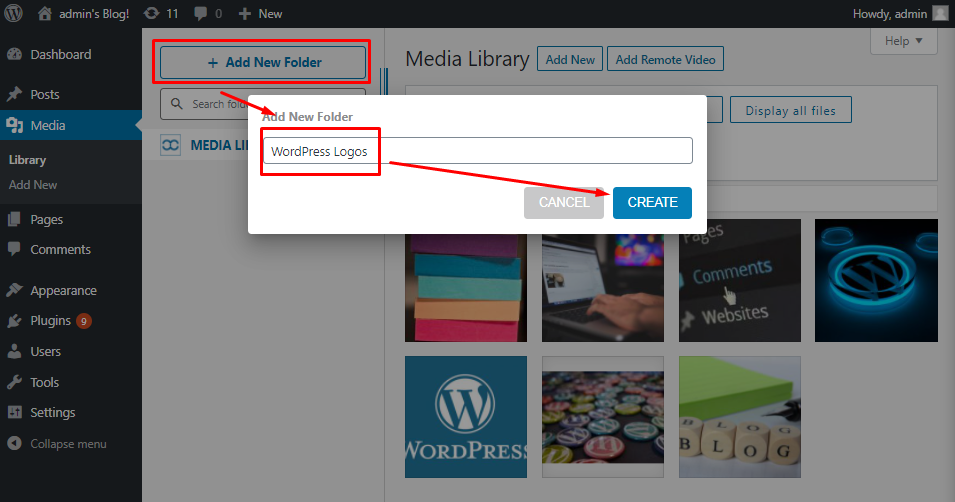
Notice how after creating the new folder, it appears inside the main “MEDIA LIBRARY” folder as a sub-folder along with all the images.
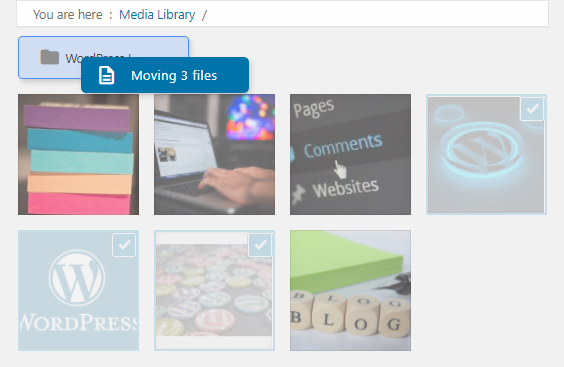
Now to move all the Windows Logo images into the folder, we can either drag and drop each one of them one by one. Or we can use the Bulk Select to select all the images at once and then move them to the folder.
But what if you wish to move the media files into multiple folders?
In that case, similar to before, you can Bulk Select all the files and right-click on any one of them to reveal this list of options:
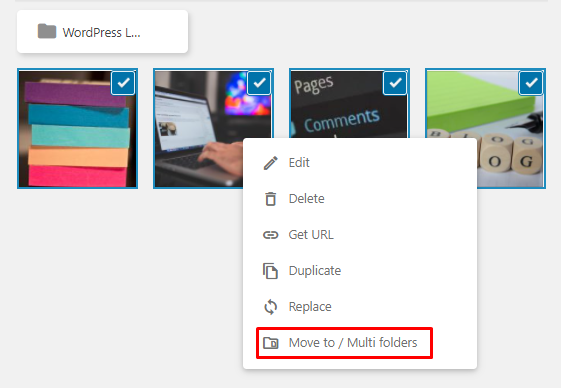
From here, just click on the “Move to / Multi Folders” option and select the folder where you wish to move the chosen media files. Simple right?
You might also notice that right clicking reveals a bunch of other options like – Edit, Delete, Get URL, Duplicate, and Replace. Most of the options are pretty self-explanatory.
It is also worth noting that if you are moving a large number of media files (in the hundreds), then it is handled as a background process with a status menu bar option showing you how many files have been copied.
How to Dynamically Replace Media Links in Your Posts and Pages?
Now you might be thinking – what if I move a pre-existing image that I’m using on a post/page to a newly created folder? What happens to the image on the post/page?
Well, no need to worry, as WP Media Folder will dynamically replace all the media links and image URLs of your media files that are in your content into your physical folders. Also, if and when you insert any images from a folder to your post or page, its URL will get automatically replaced so there’s no problem.
How to Sort and Filter through all the Files and Folders?
WP Media Folder really improves on the Sorting and Filtering options found with a Vanilla installation of WordPress.
As you can see from the image below, there are tons of more filtering options to help you quickly find the media file you are looking for.

You can filter through the media files based on:
- Media Types
- Date of Upload
- File Size in Resolution
- Weight in Kilobytes
There’s even an option to “Display all files.” This will show all the media files uploaded to your WordPress installation, not just the ones that are located on the specific virtual folder you are currently at.
Likewise, you will get access to tons of Sorting options as well.
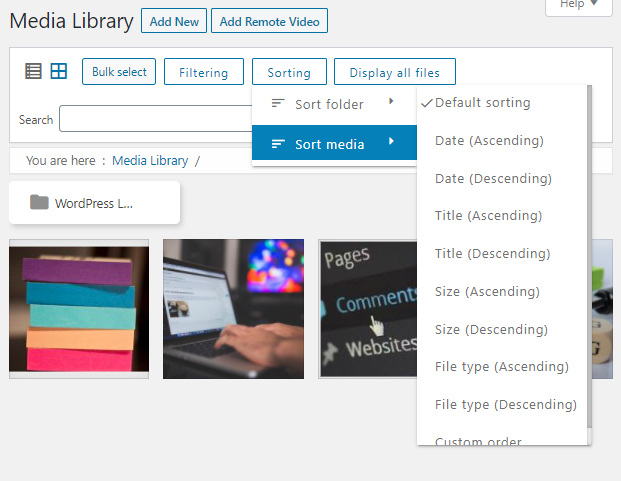
As you can see from the image, you can either choose to “sort by media” or “sort by folders”.
If you choose to sort by folders, then you will get to arrange the folders in an ascending or a descending order based on name or ID. There’s also an option to create a custom.
If you choose to sort by media, then you will get access to a few more parameters, namely – date, title, size, file type, and a custom order.
Wrapping Up
So that’s how you can create and store Your WordPress Media in real physical media folders using WP Media Folder. We hope you found this useful and that it helped you better manage your media files and organize your WordPress installation.
Now, if you have stumbled into any sort of problems or difficulty when trying to use the WP Media file plugin, then don’t hesitate to write to us in comments below. We will try our best to give you a quick response to resolve your issue.


Hola, ¿conoces algún plugins que maneje carpetas reales, no virtuales como este?
Hi, it’s possible with this plugin, that’s an option, check: https://www.joomunited.com/wordpress-products/wp-media-folder/transform-wordpress-media-uploads-into-physical-folders
Muchas gracias, lo voy a probar.
Muchas gracias, lo voy a probar.
Probé el plugin y debo decir que está bueno pero hay algo que lo tira por la borda si tienes muchas imágenes en el sitio, y es que genera tres nuevos tamaños de imágenes y a un tamaño enorme que hace una sobrecarga de archivos innecesarios, triplicando el espacio ocupado.
Yes, indeed images are moved along with their thumbnails and re-indexed in the database. The plugin needs to do that because otherwise you would be forced to use full-size image all the time, and you’ll have performance issues.