
Do you use the WordPress Bookly plugin to manage bookings and appointments on your website? Do you want to synchronize all the bookings and appointments taken using the plugin to automatically synchronize with your Google Calendar?
If yes, then you have come to the right place!
Here we have prepared a comprehensive in-depth tutorial on everything you need to know on how to set up Google Calendar integration with the WordPress Bookly plugin.
Disclaimer: You need to be using the premium Bookly Pro plugin and not the free Bookly plugin. The free version, albeit great for just setting up a basic booking system, lacks many of the advanced quality-of-life features like support for Google integration.
So without further ado, let’s get started:
Table of Content
- Different Google Calendar Sync Methods Available on Bookly
- One-Way Sync
- Two-Way Front-End Only
- Two-Way Sync
- Find Your Google Client ID and Client Secret
- Connect Google Calendar with Bookly Calendar
- How to Set-Up Two-Way Sync with Google Calendar
- How to Manually Sync Google Calendar with Bookly
- Wrapping Up
Different Google Calendar Sync Methods Available on Bookly
The Bookly Pro WordPress plugin presents you with three Google Calendar synchronization methods – one-way sync, two-way front-end only, and proper two-way sync.
Here is a look at what these methods do:
One-Way Sync
If you choose this Synchronization Method the plugin will automatically push all the new appointments including custom fields and any other tweaks made on Bookly Calendar straight to the connected Google Calendar, but not the other way around.
This is useful when you want your Google Calendar to stay updated with your Bookly Calendar, but also need to freely make adjustments to your Google Calendar without it affecting your Bookly Calendar.
Two-Way Front-End Only
With this Synchronization Method the plugin will automatically fetch event data from the connected Google Calendar and then remove the corresponding time slots from the Booking Calendar during the “Select Time Slot” step of making an appointment.
As such, by having this option enabled, you can rest assured that none of your Bookly appointments compete with your Google Calendar events.
That being said, do note that this method will not copy or display the Google Calendar events on the Bookly Calendar. To do that, you need the next sync method.
Note: It takes some time to sync the appointments between your Google Calendar and Bookly Calendar. As such, this option will increase the loading time for the “Select Time Slot” step. To remedy this problem, limit the number of fetched events related to this option.
Two-Way Sync
This is a proper 2 way synchronization method where all bookings created and updated in the Bookly Calendar automatically reflect on the connected Google Calendar and vice versa.
However, this feature isn’t supported on the default Bookly Pro plugin. For this, you need the additional addon – Advanced Google Calendar for Bookly. And that’s not all – you will also need to preconfigure Google Calendar before you enable this setting.
We have a detailed section on how to set-up Two-Way Sync in a later section.
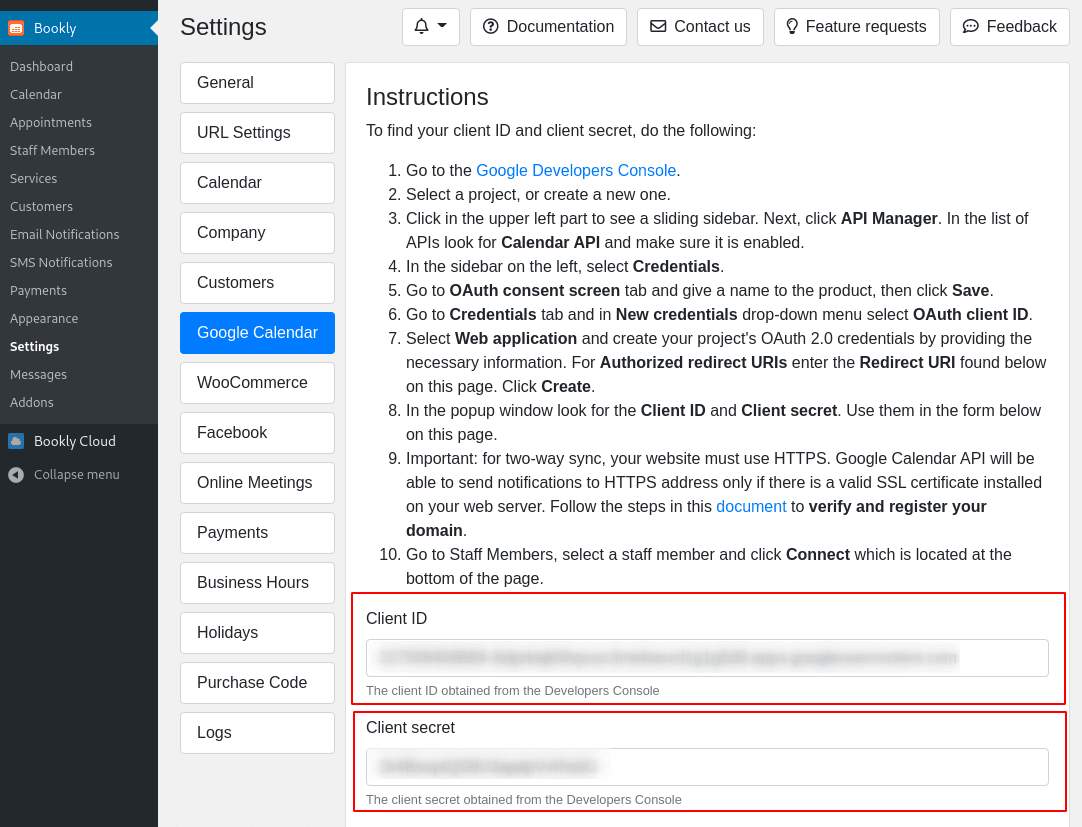
Find Your Google Client ID and Client Secret
The Bookly plugin requires you to enter your Google Client ID and Client Secret in order to integrate the Bookly Calendar with your Google Calendar.
To do this, you will need to head on over to the Google Developer Console and log in with your account. Once there, either select an existing project or create a new project.
If this is your first time using Google Developer Console, you will see an option to CREATE PROJECT as shown in the image below.

Click it and it will ask you to enter a “Project Name” and “Parent Organisation or Folder” for the project. Once done, click on “Create” and your new project will be created.
You will then get directed to the following screen:
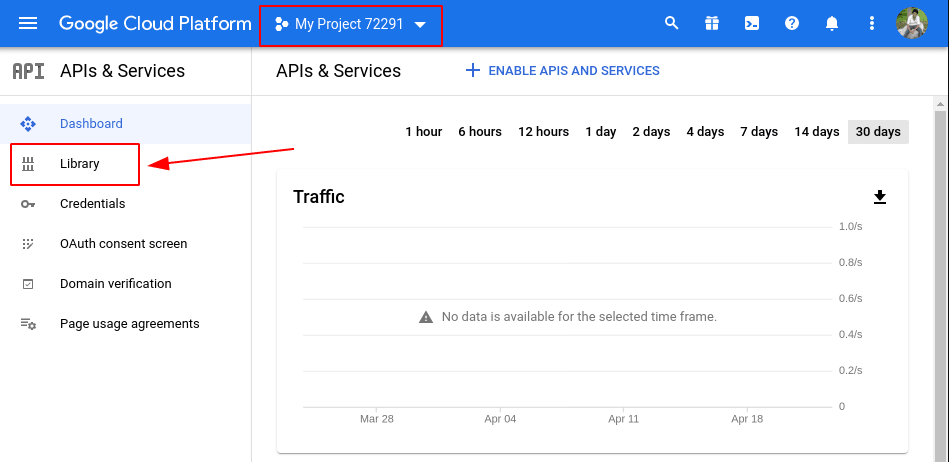
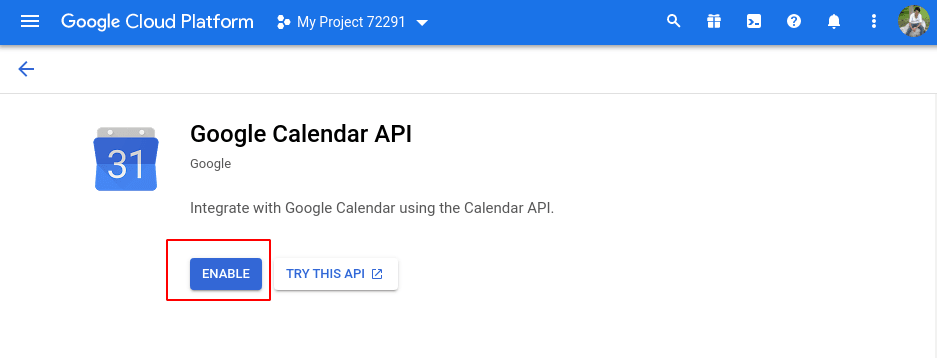
Next, you will need to make sure that the Google Calendar API is enabled. To do this, head on over to the Library section as directed in the image. Now type in “Calendar” in the search box as shown in the image and click on Google Calendar API as highlighted in the image.

This will take you to the following screen where you need to click on the “ENABLE” button and that’s it.
With the Google Calendar API enabled for your project, head back over to the APIs and Services page and now go to the “OAuth consent screen”.
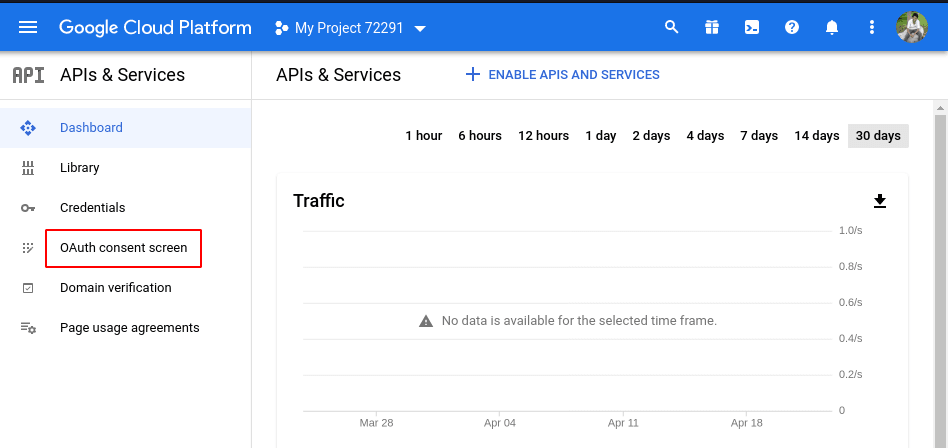
The following screen is going to prompt you to select your target user.
There are two options:
- Internal: Available to Users within your Organisation. (Only available to the users with a Workspace account.)
- External: Available to any user with a Google account.
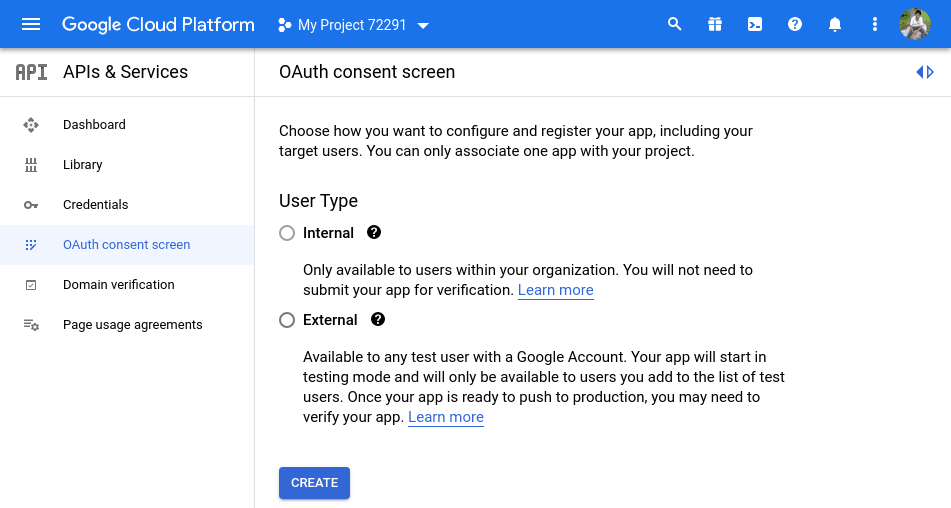
For this project, our target user type will be Internal (you can also select External if you don’t have Workspace account). After selecting that, click on CREATE. This is going to take you to the following screen:
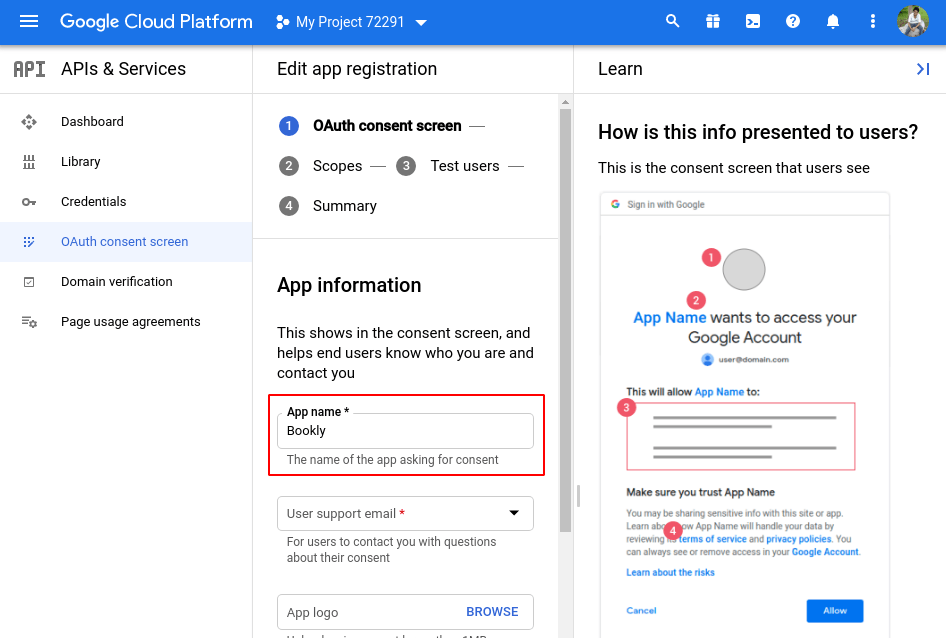
Just fill in the App name field, Email field, scroll down, and add an Authorised Domain by clicking the +ADD DOMAIN button. Once done, hit SAVE AND CONTINUE at the bottom of the page.
Now with that out of the way, use the left hand sidebar and head over to the Credentials section.
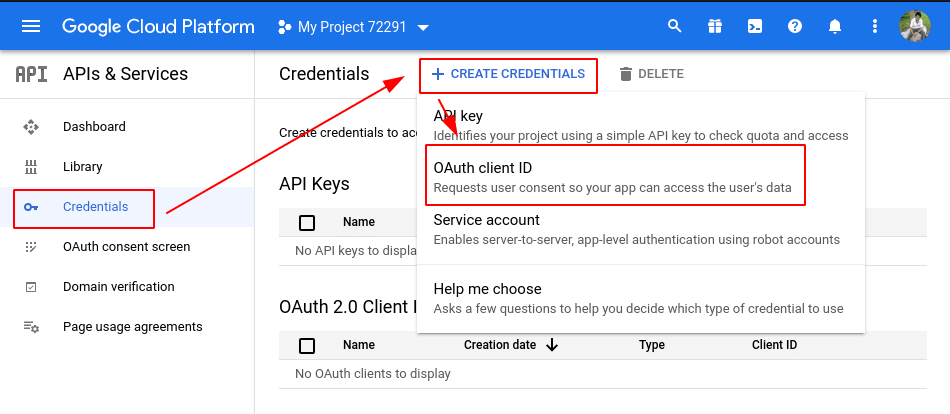
From here, click on the + CREATE CREDENTIALS button as shown in the image, and from the drop-down options click on OAuth client ID.
In the following screen, you will need to select an Application type from a drop-down menu.
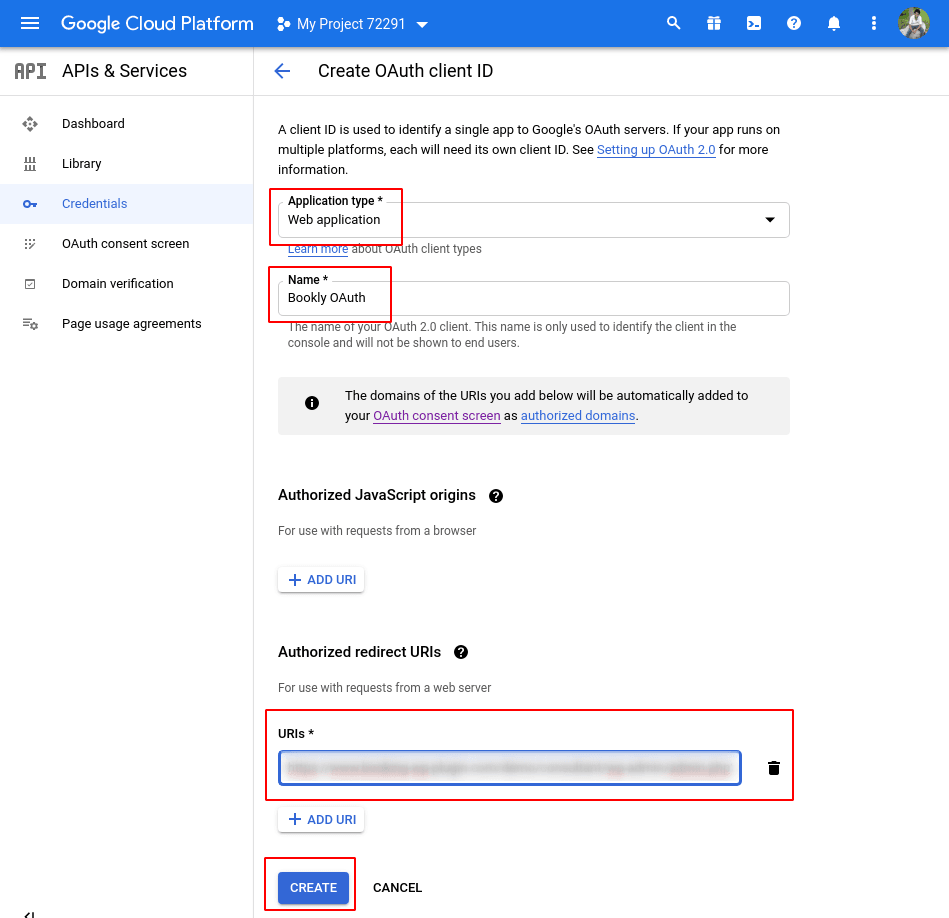
Pick “Web application” and then type in a name for the OAuth Client. And finally, scroll down and add an Authorized redirect URI.
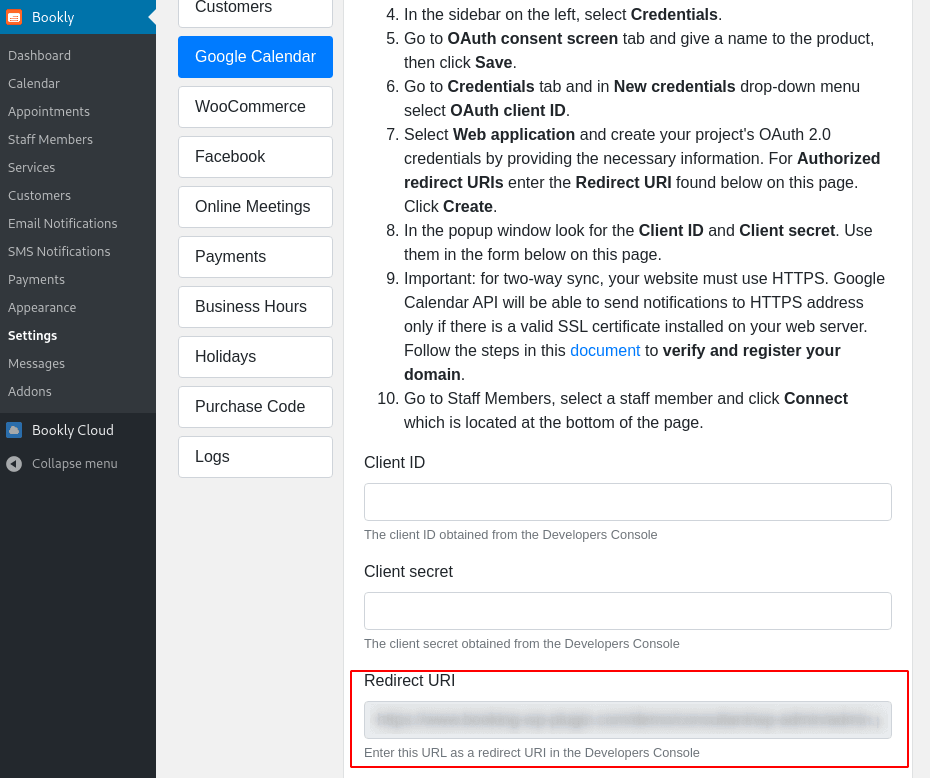
This should be the Redirect URI provided inside Bookly > Settings > Google Calendar section on your WordPress website.
After entering the Bookly Redirect URI into the Authorized Redirect URI section, click on Create and a pop-up window will appear showcasing your Client ID and Client Secret.
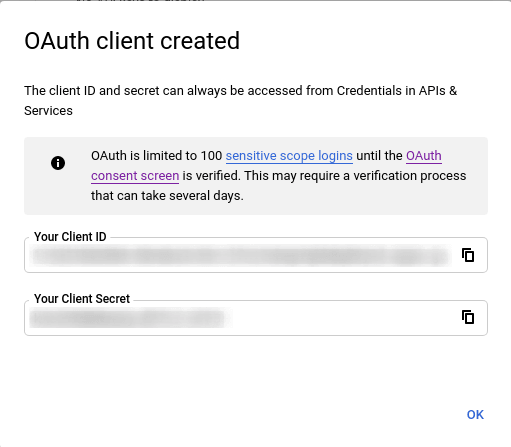
And that’s it, you have successfully created a Google Client ID and Client Secret. Now let’s head back to your WordPress website and integrate Google Calendar with your Bookly Calendar.
Note: “All Day” events created in Google Calendar are set to “Free” by default. As such, if you want that day to be unavailable on Bookly Calendar, remember to change the status to “Busy.” Or else, the Bookly Calendar will show the day available for appointments.
Connect Google Calendar with Bookly Calendar
Now that you have your Google Client ID and Client Secret, log in to your WordPress dashboard and head on over to Bookly > Settings > Google Calendar. Once there, scroll down, and enter the Client ID and Secret in its designated fields.

Once done, select the preferred Synchronization Mode.
As you can see from the image above, there are only two options to choose from – “One-Way” and “Two-Way Front-End Only”. Enabling the proper “Two-Way” Sync is a little tricky and so we have discussed it exclusively in a later section.
If you don’t need “Two-Way” Sync, then select one of the two available synchronization methods and scroll down.
In the subsequent section you will find the “Template for event title” and “Template for event description” sections.
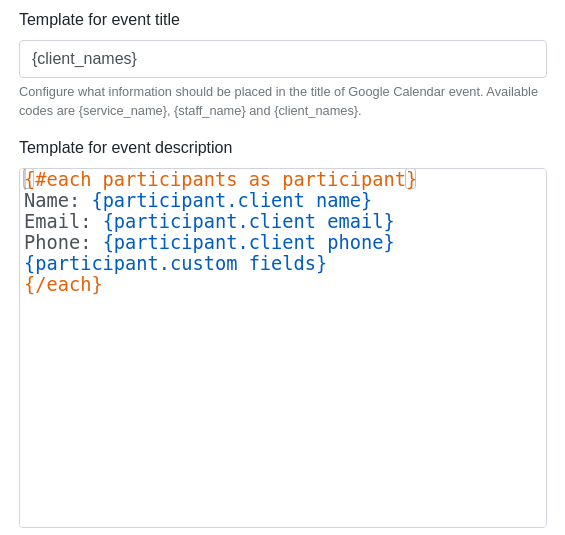
These options will let you configure what appears as the event title and event description for the Google Calendar event that’s synced from Bookly Calendar.
Here is an in-depth guide showing you what codes to use to customize the Google Calendar entries.
Once that’s done hit the Save button and Google Calendar will be integrated with your Bookly Calendar. All that remains now is to connect to your Google Calendar.
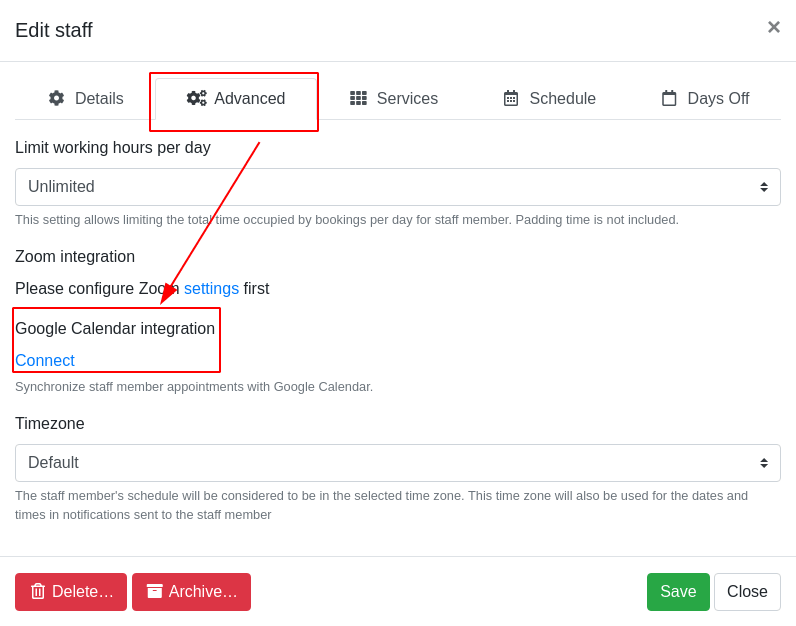
To do this, head over to your Bookly > Staff Members from the left-hand sidebar. From here, pick a Staff Member whose appointments you want to sync with Google Calendar and click on the Edit button.
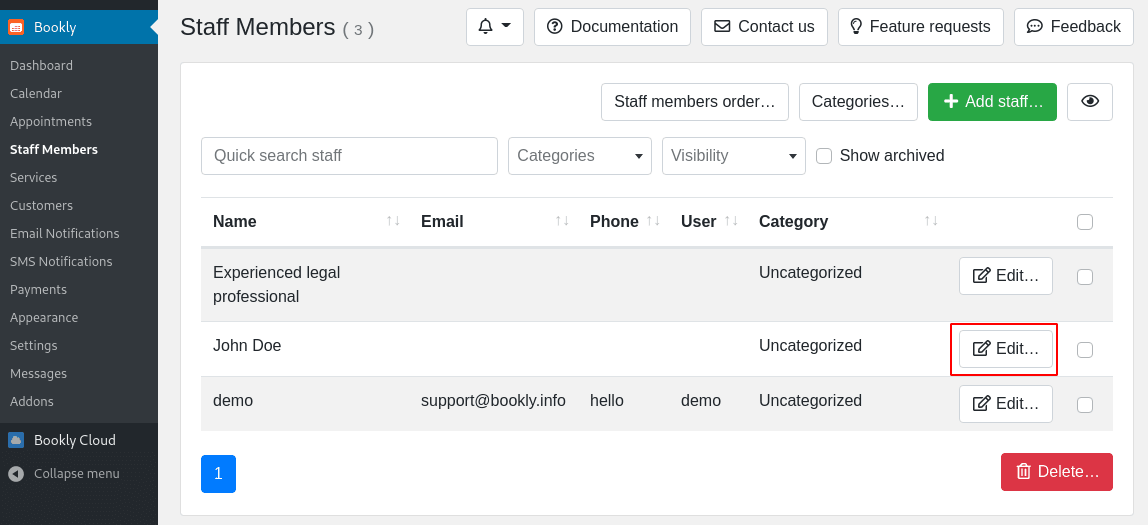
This is going to bring up a pop-up window. From here, go to the Advanced tab and click on the Connect button under the Google Calendar integration area to synchronize the staff member appointments with Google Calendar.
And that’s it! You now know how to connect your Bookly Calendar with your Google Calendar and synchronize appointments. The only catch is that you need to manually connect all your staff member’s appointments to the Google Calendar, one at a time.
Now with that settled, let’s talk about how to set up Two-Way Sync with Bookly and Google Calendar.
How to Set-Up Two-Way Sync with Google Calendar
The “One-Way” sync and “Two-Way Front-End Only” sync options are available straight with the Bookly Pro WordPress plugin, and we just covered how you can set up and use those features.
Now, if you wish to set up “Two-Way” synchronization between Bookly and Google Calendar then you will need the premium Bookly Advanced Google Calendar add-on.
Note: This is an add-on for the Bookly Pro plugin. As such, you will need to have the Bookly Pro plugin installed on your WordPress and then on top of that install this add-on.
Now, with the add-on installed, you should now see the “Two-way” sync option available inside Bookly > Settings > Google Calendar, which previously was not the case.
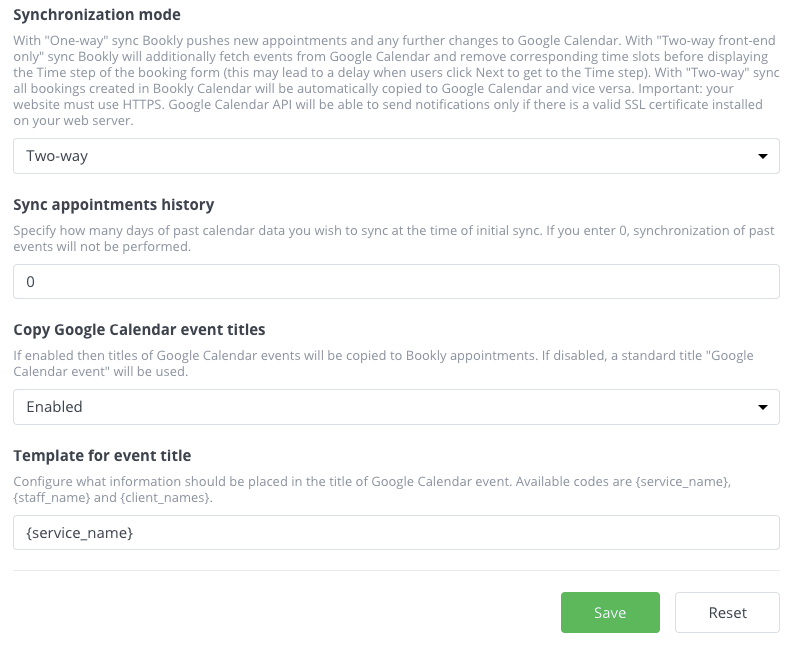
Also, right below it you have the “Sync appointments history” field where you can specify the number of days of past calendar data you want synced between the two calendars.
For the default value – “0”, no past events will be synchronized.
Now, with that being said, enabling two-way sync won’t be as simple as selecting the option and hitting the “Save” button.
To ensure that all Calendar events are efficiently synchronized, it is advised that you follow the official Google Calendar API Sync guide.
Also, you will need to verify and register your domain on the Google Search Console before you get two-way calendar sync to work.
Here’s Google’s official guide on how to verify your site ownership.
Once your site’s domain name is verified, you will need to register it as an allowed domain for your project – the project whose client ID and client secret are connected to your Bookly plugin.
To do this, go to the Domain Verification page in the API Console and click on “Add domain”. Now just fill out the form, and again click the “Add domain” button.
Provided your domain passed its verification process, you can now select it to start receiving push notifications and thereby establish two-way sync between your Google Calendar and Bookly.
How to Manually Sync Google Calendar with Bookly
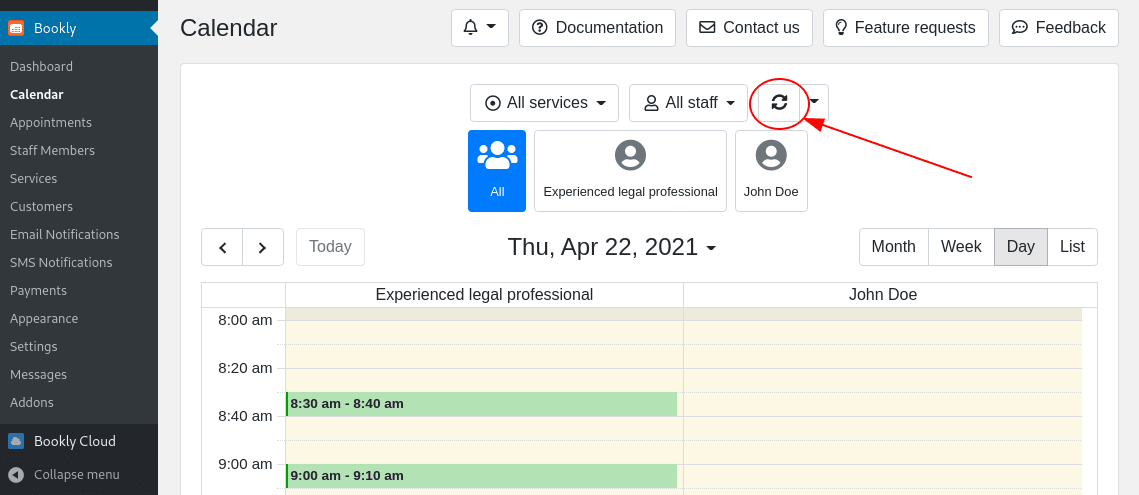
By default, the Bookly plugin syncs events with Google Calendar after a set interval of time. If you wish to Sync events right now, then you can head over to Bookly > Calendar from your WordPress dashboard and click the “Sync” button as shown in the image:
Wrapping Up
As you can see, integrating Google Calendar with Bookly only takes a couple of clicks. The real issue is setting up your Google APIs and getting your OAuth details.
We hope that this tutorial has helped to walk you through the process and you were able to successfully integrate Google Calendar with your Bookly plugin. And in case you ran into some issues, feel free to let us know in the comments. We will try our best to resolve the issue asap.


Hallo – hierzu hätte ich eine denke ich nicht unwichtige Frage: werden durch die Synchronisation auch datenschutzrelevante Daten übertragen? oder wird nur die Belegung im Kalender übernommen
vielen Dank und liebe Grüsse
Hi, all the privacy data are managed by Google because it’s the source of the event, like if you embed a youtube video on your website. Cheers,
Hello! I hope you are doing well, I want to know if this plugin also allows adding the generated appointment to the end customer’s calendar.
Hi, Yes sure the details are sent by email and can be imported into a customer calendar (on gmail that’s automatic)
Bonjour,
est-ce que l’intégraton d’un google meet peut être automatisé?
Merci
Yes it has been implemented in Bookly Pro: https://support.booking-wp-plugin.com/hc/en-us/articles/360013355499-Online-Meetings-Zoom-Google-Meet-
Bonjour,
J’ai actuellement mis en place mon google calendar avec bookly et tout fonctionnait parfaitement jusqu’à présent.
Mais depuis quelques jours, la connexion avec google s’est interrompue toute seule, me donnant cette erreur :
“Google Calendar: Error refreshing the OAuth2 token, message: ‘{ “error”: “disabled_client”, “error_description”: “The OAuth client was disabled.” }'”
Est-ce que vous auriez une solution pour empêcher les interruptions comme celles ci ? Car devoir recommencer la création d’un projet à chaque fois ne sera pas une solution viable sur le long terme…
Hello, the error seems due to a change in the Google API. You should check if a plugin update exists.
Buenas tardes,
alguien podría recomendarme algún desarrollador que pueda contratar para terminar de integrar Bookly con mi página web? Sigo todos los pasos para poder conectarlo con Google Calendar (he comprado todo lo necesario) y estoy teniendo problemas ya que no consigo “acceso a terceros” y por consiguiente no me da la opción de integrar.
Buenos días,
Tengo problemas con la verificación de la app, no sé muy bien qué tengo que hacer para poder verificar la app.
Buenos días,
Cuando hay que poner un dominio autorizado, ¿debemos poner el de Bookly o el de la web dónde va a estar instalada esta aplicación?
Gracias!
Hi, I think this is related to the Google App authorization.
Bonjour,
j’ai bien suivi pas à pas votre tuto (merci beaucoup) mais quand je suis à la dernière étape sur l’onglet “avancé” de “staff” et que je clique sur “google calendar synchronisation”, j’ai un message d’erreur comme quoi mon app n’est pas validé par Google “Google n’a pas validé cette application. L’application demande l’accès à des informations sensibles de votre compte Google. Nous vous recommandons de ne pas utiliser cette application tant que le développeur ne l’aura pas soumise pour validation auprès de Google.”. Ce qui est d’autant plus surprenant que sur Google cloud j’ai bien un message “État de validation – Validation non requise”.
Pouvez-vous m’aider ?
Merci
Hi, I think you need to check all authorization when you make the connection. Google Calendar may have added new ones since this post was made!
Ikzelf krijg bij de laatste stap een melding en het lukt me dus niet om mezelf als medewerker te koppelen aan de agenda
Fout 403: access_denied
The developer hasn’t given you access to this app. It’s currently being tested and it hasn’t been verified by Google. If you think you should have access, contact the developer (*******@gmail).
Iemand hiervoor een oplossing?
Yes that’s because you’re not an admin of the agenda created. To synchronize data you need an admin access, the setup has to be done from Google Calendar
Hola!
He estado leyendo el artículo y me parece fantástico.
Tengo una consulta, estoy realizando una web de un salón de belleza con sistema de reservas.
Me gustaría integrarlo con google calendar por lo que puede que Bookly sea una de las opciones.
La idea es crear varios calendarios para cada servicio pues la peluquería del salón si que tendría una apertura normal, pero los profesionales que acudirán a dar sus servicios irían algunos días concretos y horas concretas.
¿Solo con crear varios calendarios en google calendar? o también ¿haría falta contratar Google Workspace? ¿O solo con el pluggin de Bookly?
¿Como funciona?
Gracias.
Hi, I think using different calendar in Bookly is the best solution or synchronize several calendars from Google can be an option