
Are you looking for the best solution to install Facebook comments on your site? Do you think installing and setting up Facebook comments in WordPress will help you boost engagement?
You are absolutely right! Facebook is one of the biggest social network and the most preferable marketing channel anyone can rely on. So, installing and setting up Facebook comments in WordPress will get you connected to a vast social network and improve the integrity of your site too!
Hence, if you are tempted to install and set up Facebook comments to your WordPress site; this article is just for you. Within this article, we will help you easily and quickly add Facebook comments to your WordPress site.
Want to get started?
- Benefits Of Adding Facebook Comments To Your WordPress Site
- Add Facebook Comments To WordPress Site Using WpDevArt Facebook Comments Plugin
- Step 1: Install the plugin
- Step 2: Create a Facebook App ID
- Step 3: Configure The Plugin
- Add Facebook Comments To WordPress Site Using Lazy Social Comments Plugin
- Step 1: Install And Activate The Plugin
- Step 2: Configure The Plugin
- Step 3: Enable Moderate Comment Option
- Final Thoughts
But before heading on, let’s look at the benefits of setting up Facebook comments to your WordPress site.
Benefits and Cons Of Adding Facebook Comments To Your WordPress Site
Do you want to switch from default WordPress comments to Facebook comments? Well, everyone would love to switch because it automatically helps you increase your site’s visibility. Thereby, you will be automatically getting linked to huge additional traffic to your site. That’s not all!
Adding and setting up Facebook comments in WordPress will:
- Enforce spammers to stay away from your site; since there is no SEO backlink attached to the Facebook comments.
- Users will avoid leaving spam comments; since their comments will direct to their Facebook profile. Thereby, it will remove the anonymity factor too.
- Users are encouraged to comment because it is an easy process; no extra signup steps are required by anyone.
- Facebook comments increase the credibility of the post. Since everyone relies on and trusts the comments of true visitors.
Now, do you want to add Facebook comments to your WordPress site? The simple process below is your lifesaver. We are enlisting the two best Facebook comment plugins:
- WpDevArt Social Comments Plugin
- Lazy Social Comments Plugin
Cons of Facebook Comments
Facebook comments may bring multiple benefits to your site. However, there are also some disadvantages of Facebook comments.
For instance, not all users would want to comment through their Facebook profile as they do not want their name or profile picture to show up in the comments section. These types of users want anonymity, and currently, Facebook Comments do not provide that option.
There is another big disadvantage that comes with Facebook Comments. As a webmaster, you cannot store or back up your WordPress site comments, similar to other comments plugin such as Disqus.
Infact, websites that have used other comments plugin do not have the luxury to use the old comments if they shift to Facebook comments.
So, what’s the solution for this? There are many ways you can activate both Facebook and other commenting systems on your website. This way, users can choose where they want to comment and share their thoughts. However, running two commenting systems on your site can be resource-hungry and not an easy way to install or manage.
Add Facebook Comments To WordPress Site Using WpDevArt Facebook Comments Plugin
Adding setting and installing Facebook comments to the WordPress site is very easy. You just need a reliable, robust WordPress plugin; and you will achieve your target in no time. WordPress is bombarded with the Facebook comments plugin; there are free and pro versions available. You can choose any, but, using WpDevArt Social Comments Plugin you can easily show your visitors Facebook comments on your site in no time. It is a credible tool that will help you improve traffic and social optimization. Another remarkable feature of this plugin is that it is easy to use, user-friendly tool that has attained more than 30,000 active installations. That’s not all; it is backed up by numerous features that are worth noting.
Now, without further delay, we will help you install WpDevArt Social Comments Plugin.
Step 1: Install the plugin
- Go to the WordPress Plugin Repository > click Install the plugin
- Go to the WordPress Plugin Repository > click Dashboard
- You will be directed to bombarded WordPress plugins
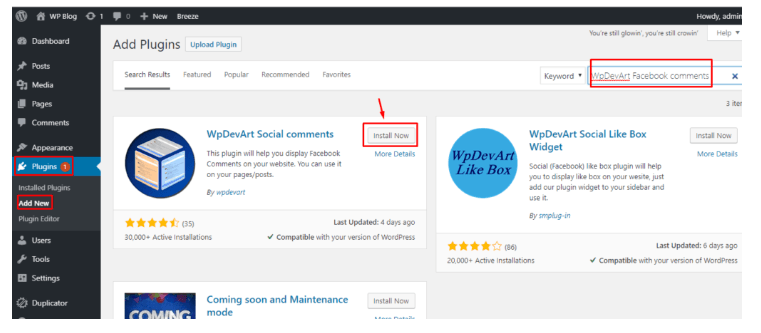
- Go to Plugins> Add New> Search WpDevArt Facebook Comments in the Search Bar
- Click Install Now
Now you need to Activate the plugin. Once you activate the plugin, a new tab will appear in your dashboard “FB Comments” as below:
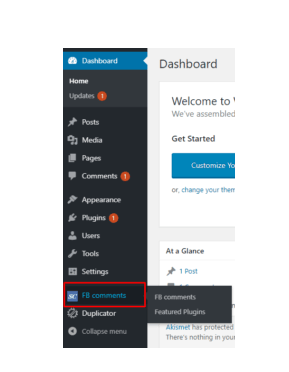
Yes, that was all! Now let’s get to the next step and create an app ID.
Step 2: Create a Facebook App ID
If you want to enable Facebook comments on your site; then you need an application ID. If you already have a Facebook ID, head on to the next step if you don’t then create one NOW.
Go to Facebook For Developers Page and get yourself registered for the Facebook developers account.
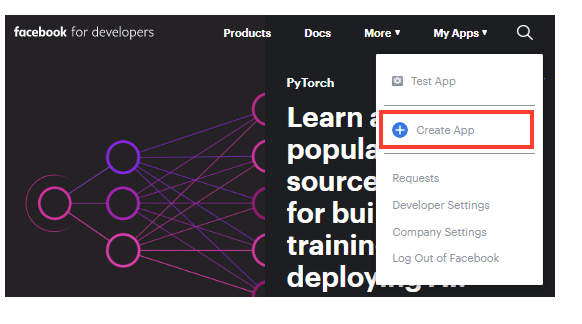
- Log on to Facebook for developers page > Click on My Apps Link
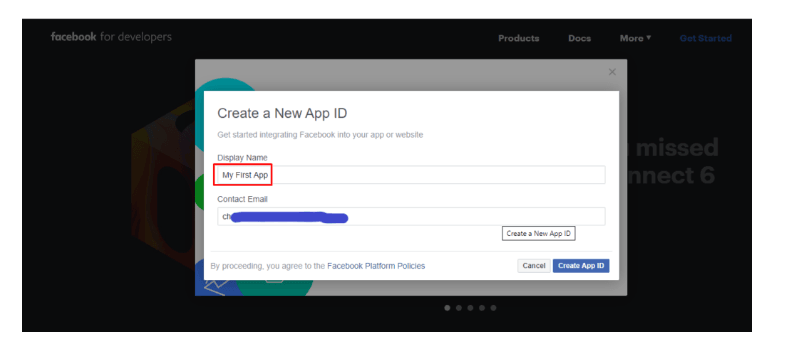
- In the drop down menu click on Create App option
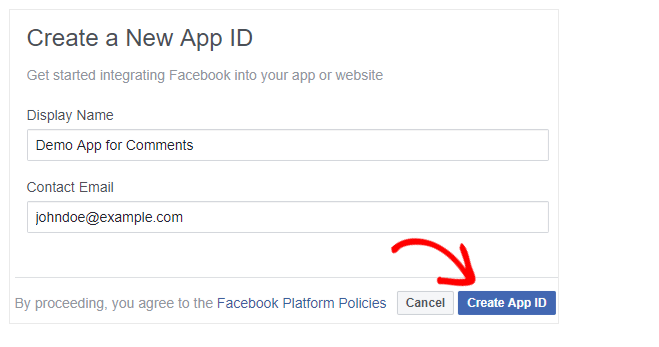
To proceed further, you have to fill in the display name and contact email information
- Click the Create App ID button
Now you will be directed to a popup box window where you will be required to enter CAPTCHA letters
- Fill in the CAPTCHA letters and click Submit
Congrats! You have successfully created an App ID for yourself.
That’s not all, Facebook has created you an App ID but it needs to know how you would use the app. So let it know too.
- On the left sidebar click on Settings> Basic Link
- Click on + Add Platform
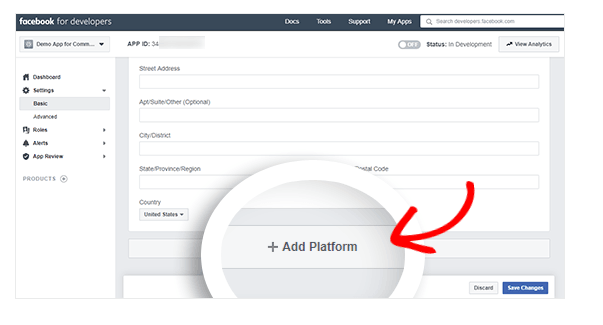
A popup window will appear. Among all other options; select Website
- Don’t forget to click the Save All Changes button to save your settings.
Now Copy Your App ID and set the status ON.
Step 3: Configure The Plugin
Now it’s time to configure your plugin.
Go to your WordPress dashboard and click on FB comments.
Now fill in all the Facebook comments details; starting from App ID. You are directed to a wide range of options; chose the one that suits you best. You are advised to type your title, select your color scheme, title text color, font size, font family, title position, and various other options.
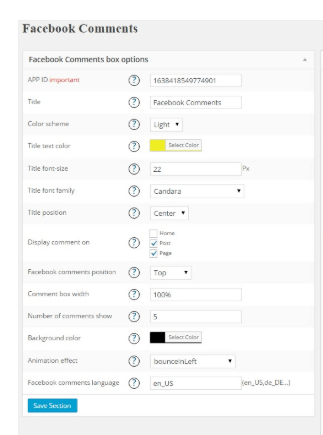
Once you have selected all the options; don’t forget to press the Save Selection button.
Yes! That was all; you have successfully configured Facebook comments to your WordPress site. Now let’s give it a test. If you have followed all the steps above properly; there is no chance of anything going wrong. So give it a shot and give your first test post.
Remember, it is a test post so even if you make some blunder you can edit and even delete the post. It’s a try so bring it on with a BANG!
If you are not satisfied with the above plugin solution, try our next recommended Facebook comment plugin; Lazy FB comment plugin in the next section.
Add Facebook Comments To WordPress Site Using Lazy Social Comments Plugin
Lazy Social Comments plugin is another remarkable plugin that will help you add Facebook comments to your WordPress site easily. Most importantly, it is a super light-weight plugin that is not only free to use but also works perfectly with the latest version of WordPress.
Now let’s get to the main point and install the plugin with the following easy steps;
Step 1: Install And Activate The Plugin
- Go to the WordPress Repository and search Lazy Social Comments Plugin in the dashboard
- Click Install> Activate the plugin

Step 2: Configure The Plugin
Once you have successfully activated the plugin; now its time to configure it.
- Go to the Setting > Lazy Social Comments
- Fill in all the details
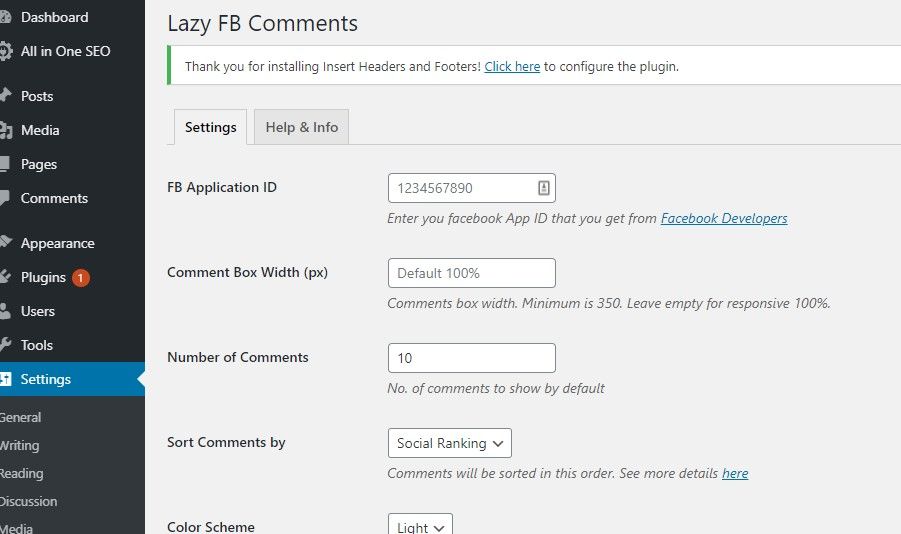
Remember; you need an FB application ID for the lazy FB comments plugin too. We have already helped you complete the procedure to create a Facebook app and application ID in the above section. So, by now you must have successfully created it with ease.
So, it time to fill in the rest of the details: Comment box width option, number of comments, sort comments by, color scheme, language, load comments, comments div class and button text option.
- Now click the Save All Changes button and enjoy Facebook comments on your site.
Lazy FB Comments offers Moderate Comment Option; it is not only enthralling users but comes up with some extra cheese. Want to know more about it?
Step 3: Enable Moderate Comment Option
Being the admin of the Facebook app, you will receive notifications for every new comment being made. Thereby, you can also moderate comments on the plugin setting’s page; you can set moderating rules on Facebook. Follow the process below:
- Go to Setting Link on Facebook for developers
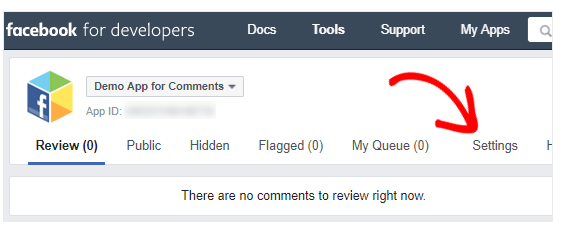
- Now click on the Moderating Rules tab
You will be directed to the following window:
Now you can decide the maximum character limit of the comments, set the limit to close the comments thread automatically. You can also enable an aggressive spam filtering option and review comments with a link option.
- Most importantly, Facebook allows its users to enlist moderators. Click on the moderator’s tab and add the person who would be using the text box
- Once you are done; click the save button.
Overcoming the Facebook Comment Count
The lazy FB Comments plugin is excellent. However, it does comes with one drawback. As it becomes the default comment section, the plugin outputs its own Facebook-version for the comment section in comparison to the WordPress comment count.
If you are using a custom theme, you will find the Facebook-version comment count not a good fit. However, there is a way to overcome this.
All you need to do is make some changes to your theme. To do so, you need to go to your WordPress hosting account using an FTP client. You can use FileZilla – a free to use FTP client to connect with the server-side. Once you are there, you ended up going to the theme you are using and then opening up the single.php file.
Once opened, you need to find the code that shows the comment count. Once you found that, replace the code with the code that is shown below.
<fb:comments-count href="<?php echo get_permalink($post->ID); ?>"></fb:comments-count> Comments
This code snippet is used to display the comment count. Finally, upload the file back to the backend, and you are ready to go!
Final Thoughts
WordPress is bombarded with WordPress plugins; with the help of a few clicks, you can easily create a virtual commenting zone where visitors can share their thoughts. We all are fully aware that Facebook comments stand out among other social media platforms; it helps you get connected to your friends and a lot of other people. It increases your social network and opens up opportunities to increase engagement too. You attain exposure, a platform where you can attract millions of visitors enforcing them to become your customers.
Thereby, helping you create goodwill, a credible reputation under real and genuine visitors. On Facebook, people comment on real identity. Moreover, this company itself entrusts and keeps the record of all spammers. So, it immediately bans any account that is suspected of abuse or spam of any kind. No one can even try to fool the Facebook Company into setting a fake account; so starting spam efforts are truly useless. So, if you want to enable a commenting solution for your site; Facebook comments is a must go. It will not only reduce troll count but also help eliminate spam.
Within this article we have enlisted the best two Facebook comments plugins; WpDevArt Social Comments Plugin and Lazy Social Comments Plugin. They both are free and robust; however, if you want to avail of their further features you can also try their pro version too.
We hope this article helped you install and set up Facebook comments on your site. if you have any queries, comment in the section below and we help you resolve all your queries.
Do let us know which Facebook comment plugin did you love best?


Trenger å vite om innlegget
Takk
Так, Facebook краще, ніж Disqus, бо вона трохи з недоліками.
Funkar bäst: Disqus tycker jag:)
How to install facebook plugin on my site https://welcomeukraine.today/ ?
I need right instruction.
Please give me an answer as quick as possible.
Hi, you just need to install the mentioned plugin, the plugin author can even do it for you.
teşekkür ederim bu makale iyi ve anlaşılması kolay. Daha önce bilmediğim bilgiler ver. Bu arada, başka bilgilerim de var, belki içgörü katabilir.
Depois que instalei os comentários do Facebook em meu site ele ficou lento . Tem algo que a gente possa fazer para melhorar?
Social network integration slows down websites, that’s a fact, and it’s difficult to control because it’s loading from Facebook servers.
Maybe some plugins like WP Speed of Light can help: https://www.joomunited.com/wordpress-products/wp-speed-of-light
Google yada gmail ile yorum yapma özelliğii yok mu acaba? Sonuçta herkesin fb yok yada isminin görünmesini istemeyebilir.
Hi, yes that’s possible but it would require you use another WordPress plugin