

Most of the people sell their products and services online. But they have limited products or services to sell, so they seek a mediocre solution to receive their payments rather than setting up a full-grown e-commerce website.
For those who are seeking alternative e-commerce websites, the Gravity Forms plugin offers a simplified and intelligible payment solution that enables you to receive successful transactions and happy customers.
Moreover, the Gravity forms plugin helps you craft WordPress payments form where the visitors can easily purchase your products or services and make a payment right away, especially if you are starting your WooCommerce site or your blog and choose to set up your eCommerce store later.
Implementing a WordPress payment form within your website doesn’t require any coding knowledge, and you can easily collect the customer’s information and accept the payments as well. The process is so simple that the customers won’t abandon the form right in the midway because of the complexity of form requirements.
WordPress comes with multiple ranges of contact form plugin so the customers could contact you quickly; however, if you are looking out for some contact form with an online payment solution, then you should choose Gravity Form plugin that comes with all famous online payment platform add-ons with WooCommerce integration.
- What payment gateways options do Gravity form offer
- PayPal Payments Standard
- PayPal payments Pro
- 2CheckOut
- Authorize.net
- Stripe
- How to integrate PayPal Payment Gateway with Gravity form
- Step1: Connect Gravity Forms with the PayPal
- Step 2: create the Membership form
- Fields of a standard payment forms
- Configuration of your Form Fields
- Step 3: Connect your form with the PayPal
- Step 4: Adding your Membership form to a page
- Final Thoughts
What payment gateways options do Gravity form offer

Now you can easily create a WordPress payment form with Gravity forms by selecting the right payment gateway. Here are the payment gateways options available with the gravity forms. However, if you want to buy any of these Add-ons, then you have to buy the Elite or Pro plan, which offers all of these payment gateways.
PayPal Payments Standard
This is the most efficient and fast setup with seamless WordPress integration to get your recurring payments, subscriptions, and one-time transactions. It also comes with Gravity forms Donation fields that allow its users to enable PayPal donations.
PayPal payments Pro

This Gravity forms Add-on comes with only Elite license and includes all of the features as that of the standard version, but only PayPal pro account holder can use this Add-on.
2CheckOut

2Checkout has worldwide payment supports. That allows people across 200 countries to receive their payments by using WordPress forms. Moreover, it supports more than 100 types of currencies and provides support for more than 45 payment methods. The users can receive subscription payments as well as multiple or single product payments.
Authorize.net

The Authorize. A net is a good option for receiving credit card payment along with additional data that you need from your customers without involving any third party to complete the transaction.
Stripe

The stripe add-on comes with multiple advanced features such as the collection of payment information with the Stripe Credit Card field and Stripe Payment Option with the best security and PCI agreement that enables the users to customize their Checkout forms with their branding.
So, once you acquire the best payment Add-on that super-fit your business needs, the next would be its installation procedure.
How to integrate PayPal Payment Gateway with Gravity form
You have to install the following components to start the procedure;
- Gravity Form Plugin
- Gravity Form PayPal payment standard Add-on
- WordPress with the most recent version
- FTP Access
The Gravity form is not a free plugin, and you have to buy the plugin with the Elite or Pro license to proceed.
Step1: Connect Gravity Forms with the PayPal
To receive payment information like the status of order completed, you have to integrate Gravity forms with PayPal so that it could send notifications regarding any kind of payments received or made.
Follow this step
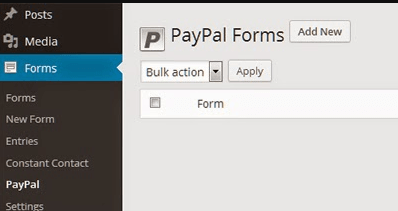
Go to> Forms menu> setting tab > sub-menu PayPal:
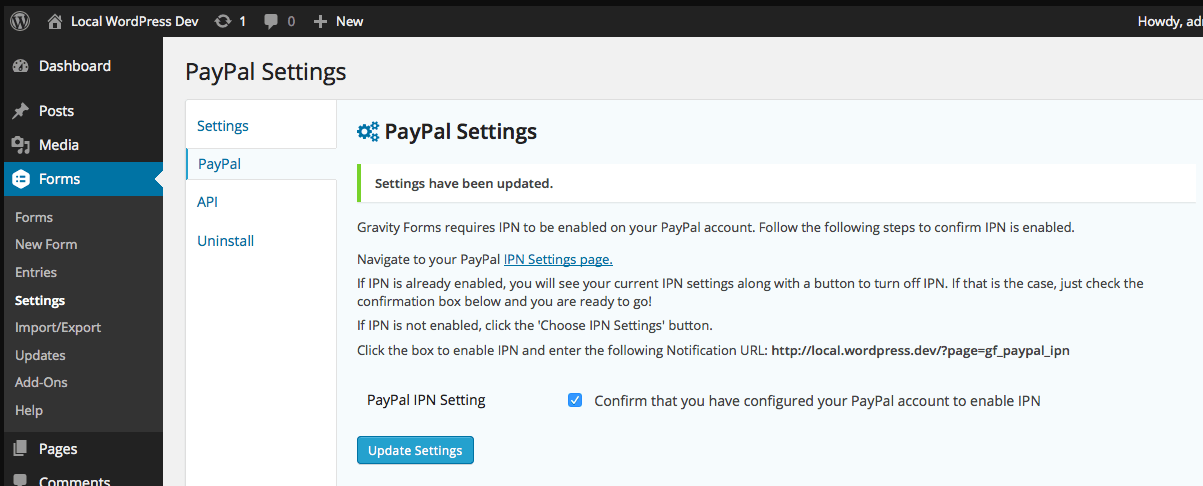
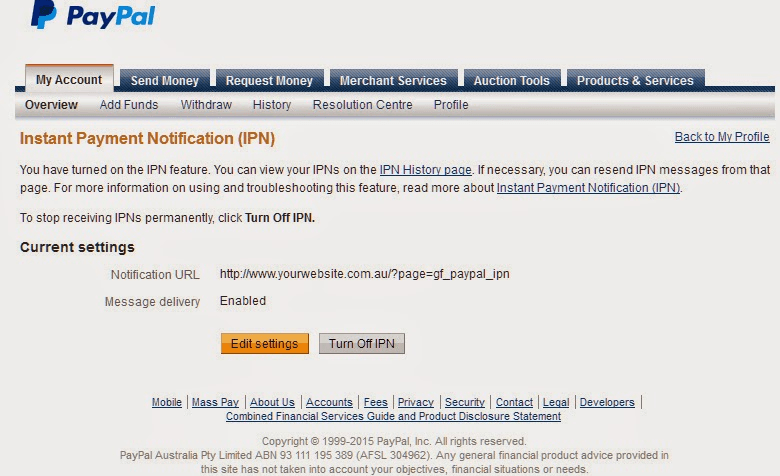
Now copy the URL given in the window and place it in the PayPal account. once you login to the Paypal account same as window will popup and enable the IPN processing by logging in.
After confirming your IPN settings on Paypal, then go back to the setting area of your website and checkmark the checkbox by confirming that you have entered your IPN correctly.
Step 2: create the Membership form
Once you are done with the setting procedure, now head back towards the setting section of your website and open the ‘Forms’ menu to compose the membership form. Now simply click the “New form” tab, and a new form window will appear where you can name the form and the brief description about the form save it.
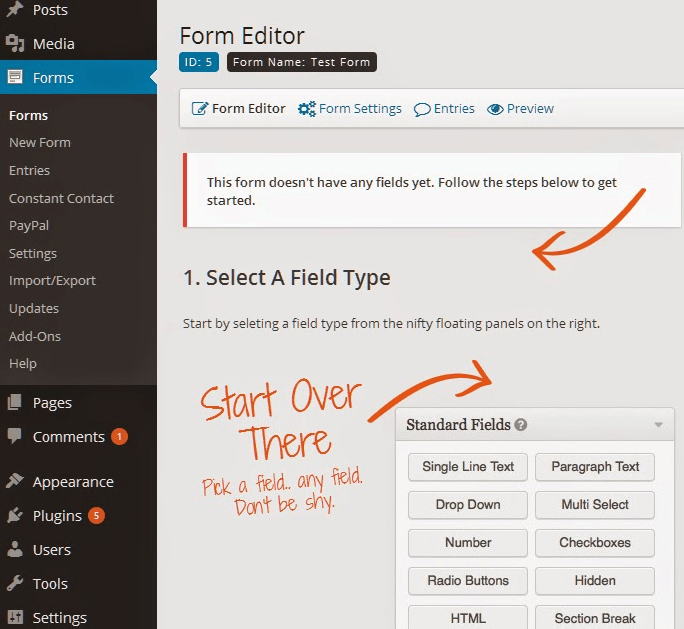
As it is visible in the picture that Gravity form has two sections, the left side consists of elements that you are using currently in your form, and the right side shows a list of elements that can be added in your form.
Fields of a standard payment forms
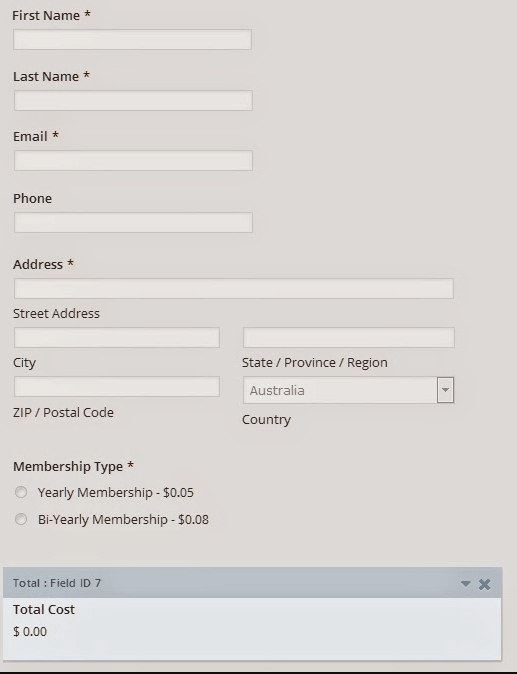
The standard payment forms have the following field options. You can add whatever you feel appropriate for your form.
- First Name (Standard Field)
- Last Name (Standard Field)
- Email (Advanced Fields- Email)
- Phone (Advanced Field)
- Address( Advanced Field)
- Membership type (pricing fields or product pricing)
Total Cost ( pricing field with Total )
Once you have selected the required field now, you can customize these fields as per your need.
Configuration of your Form Fields
The form fields you have selected can be configured with multiple options. The dropdown menu can be set with various options. You can mark fields as “Required” to proceed.
A standard Payment form with standard fields can be as follows;
Step 3: Connect your form with the PayPal
After setting up your Gravity form and combining it with the PayPal account, you need to connect your created form to PayPal.
To check the settings
Go to> settings> Forms >Form settings
Under this setting section, you will find your PayPal form that you have created.
When you add a new payment form, you will be asked to enter theses information
- PayPal Email Address: in this field enter the address where you want to receive the payments
- Mode: select if the form is for test or production
- Transaction Type: you can select “product and service.”
- Gravity form: go for the form that you have just created and associate it with the payment.
- Once you are done with the selection, you will be asked to add additional information related to the PayPal integration.
Step 4: Adding your Membership form to a page
After completing the procedure successfully, you should try to add it to any of your website pages to test it.
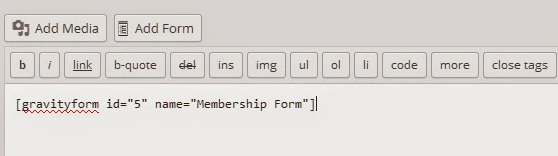
Go to the backend of your website and check for the ‘Pages’ menu. now create a new page, and a new button would be appearing on the visual editor this button will help you in connecting your page with the form by using the shortcode.
When you are done with creating a PayPal integrated gravity form, you can use this form to collect payments from the users.
To get the membership, the users will enter all the required information in the form, then process the payment procedure with PayPal and pay for their services and then return to your website.
You can use additional hooks and filters to perform extra functions and actions.
Final Thoughts
If you own an online store where you want to manage and sell multiple products and services, then it’s better to use full-fledge WooCommerce or webshop system. However, if you have planned to sell handful products or services or just initiating your online selling services than rather than maintaining and configuring an entire WooCommerce store, it is sensible to use a small collection of simple forms, and gravity forms comes with Elite options of multiple payment gateways which can be integrated with your forms and receive the payments from all around the world. Moreover, the default Gravity forms pricing fields’ options are also a great choice to select multiple pricing fields. Although your payments are controlled by the third party and processed safely; however, you should also protect your website by using HTTPS to safeguard your website from spam and malware.
The smart Gravity form integration with any of the payment gateways like PayPal, Stripe, Authorize.net is no more a challenging task. You can simply purchase the required Add-on and go to the detailed documentation where the gravity form provides you ample information on how to configure the gravity forms options once you are done with the procedure test and setup carefully the form settings before going live.


