
If you are running an online store using WooCommerce then you will find that managing it can be difficult. For instance, you need to handle customers differently.
However, you can use a booking system for your WooCommerce site to improve the user experience. In this article, we will look at how to set up a WordPress paid booking system with WooCommerce. For the purpose of simplicity, we are going to use the Bookly plugin.
Bookly is one of the most popular WordPress appointment booking plugins. It lets you add a booking system to your site. Also, it can be applied to any business type.
But before we do so, let’s go ahead and learn more about booking systems and how it can benefit your site.
Table of content
- Table of content
- What is an Online Booking System?
- How Bookly Can Help You In Setting Up the Online Booking system?
- Benefits of using Booking System on Your WooCommerce Site
- 1. Open 24 hours every day
- 2. Improved Savings
- 3. No need to hire more people
- 4. You can manage everything from the backend
- Setting Up WordPress paid booking system bookly and WooCommerce
- Step 1: Installing WooCommerce and Bookly
- Step 2: Configuring WooCommerce
- Step 3: Setting up Paid Booking System Using Bookly
- Step 4: Adding the Booking System To the Product
- Step 5: Setting up payment options
- Conclusion
What is an Online Booking System?
Online booking systems enable businesses to provide customers a way to check the availability of their product or service or activity that you are offering. The customer can use the booking system to set up the time and date.
The booking system opens a plethora of options for your business as customers can easily set up appointments using the system. So, what does that mean to you? Well, it simplifies the booking process by automating it. The customer can easily book an appointment without the need to dial numbers or talk to reps for a long period of time.
As a business, you should invest in a booking system that enables you to build the trust of the consumer by easing out the whole process.
How Bookly Can Help You In Setting Up the Online Booking system?
As we mentioned, we are going to use Bookly for setting up a paid booking system on your Woocommerce site.
Bookly is an advanced WordPress appointment booking plugin that caters to all the different business types. Right now, it has over 4.5 ratings on WordPress’s official plugin site.
As we are going to set up the booking system in WooCommerce, we need the Bookly Pro version. The Pro version is priced nicely at $89 per site for a lifetime warranty.
With the Pro version, you also get access to more payment options which is simply not available in the free version. The free version only gives you access to the local payment option. With the paid version, you can set up different payment gateways including Paypal, Mollie, 2Checkout, Stripe, and much more.
Another thing that makes Bookly an excellent choice is its documentation. You can work around the plugin easily and if you get stuck, you can use its excellent documentation and instructions mentioned within the plugin options.
Benefits of using Booking System on Your WooCommerce Site
Before we go on with the tutorial, let’s first understand its benefits first.
1. Open 24 hours every day
The number one benefit that you get by adding a booking system on your site remains online all the time. This means that you do not have to present all the time for the booking to take place. You could be working on some other project or relaxing watching your favorite TV show.
The all-time availability also relaxes employees as they can focus on other important tasks.
2. Improved Savings
As booking systems are a one-time setup thing, you save money in the long run. First of all, you do not have to hire someone to take care of the reservation. Also, you do not have to worry about payments as well — as the booking plugins come with payment integration options as well.
So, if a customer books an appointment, he can directly pay while doing so. The payment systems are flexible to provide cancellations as well — and that can be set either automatically or through contact with your business.
3. No need to hire more people
With a booking plugin, you automate a lot of stuff. This means that you do not have to hire people to handle the booking process. Also, you do not have to worry about the human error as everything is automated — from noting down the details of the appointment to processing payments.
4. You can manage everything from the backend
With a booking system, you get a one-stop solution. This means that you can manage all your bookings from the backend. For instance, you can check the schedule, manage them or even cancel them if you need to do so. The backend also lets you send confirmation emails to customers once you have accepted a booking.
Lastly, the booking plugin dashboard gives you analytics and performance.
Multiple businesses can use booking set up to enhance their business including:
- Doctor’s appointments
- Online education courses
- Interview and Counsellings
- Personal Services
- Entertainment Services
Setting Up WordPress paid booking system bookly and WooCommerce
Step 1: Installing WooCommerce and Bookly
The first step is to install WooCommerce. You can easily install it by going to your WordPress dashboard and then choosing Plugins and Add New.
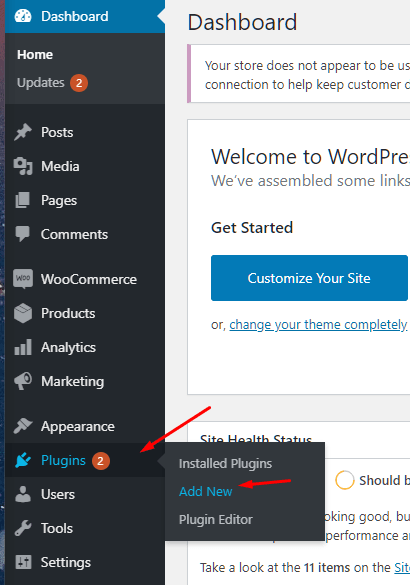
Once there, you need to either search for the WooCommerce plugin or use the Upload plugin option to upload it yourself.
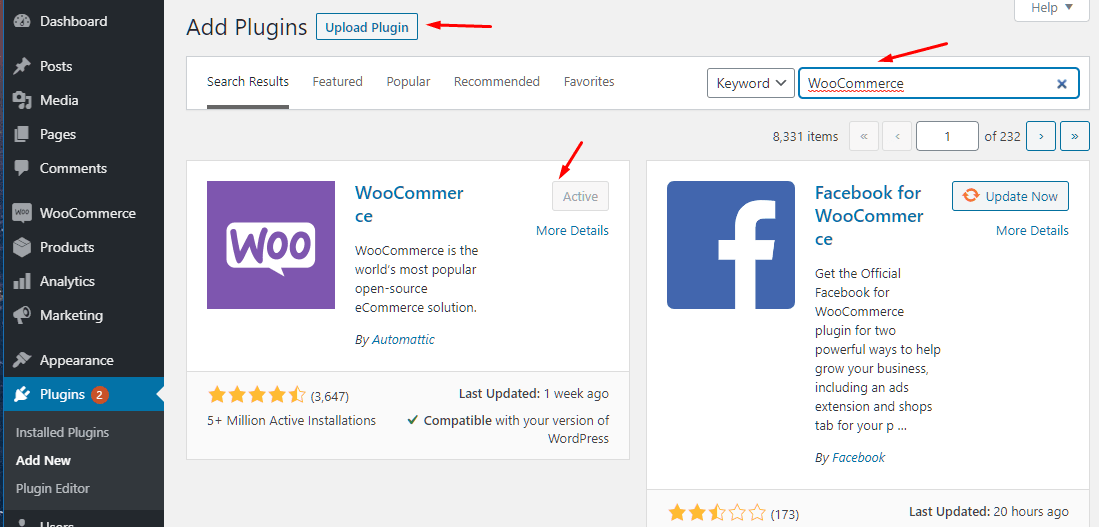
In the above image, you can see WooCommerce active as we already have it installed on our side.
Next, you need to get the Bookly plugin. As already mentioned, you need the PRO version which you can get by visiting their site and buying a license.
Once you do so, you will be able to download the plugin to your local computer. Just like you installed WooCommerce, you need to go to Plugins >> Add New >> Upload Plugin to install and active the Bookly Pro plugin on your site.
Step 2: Configuring WooCommerce
Before you go forward and configure the booking plugin, it is important that you set your WooCommerce site correctly. To use the booking system, you need at least one product description.
You also need to make sure that the product that you created can be added to the cart as it needs to be selected while configuring the WooCommerce section of the Bookly plugin.
To create a product, all you need to do is go to Products >> Add New. Once done, we are now ready to move to set up the booking system.
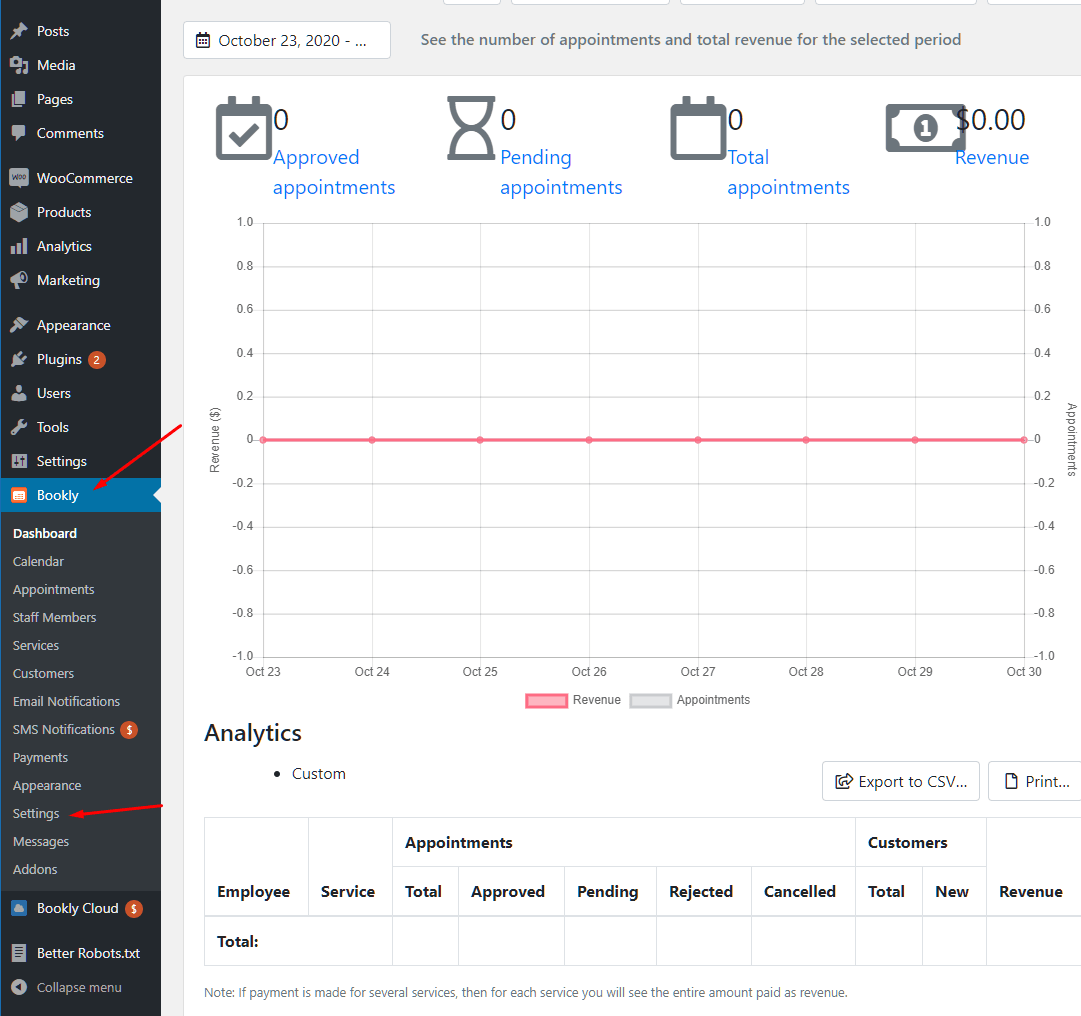
Step 3: Setting up Paid Booking System Using Bookly
With your product/service page setup, it is now time to create a booking system for it. To do so, you need to go to Bookly >> Settings as shown in the image below.
Once in the setting, you will see a lot of settings options. You do not have to get overwhelmed by it as we only need to tweak the WooCommerce settings section for the plugin. To do so, you need to change to the WooCommerce settings tab first.
This will result in another page of options open up. The setting page for WooCommerce is as below.
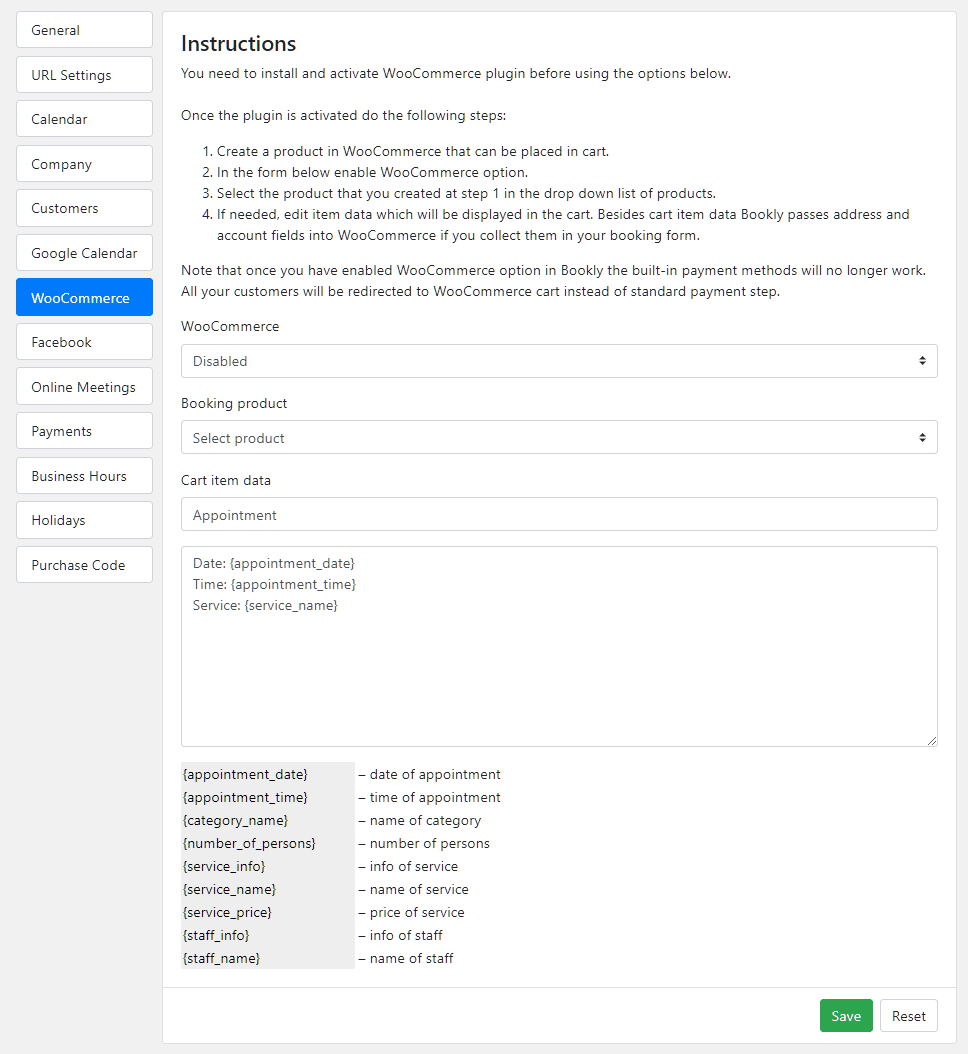
Here, you will see the instructions at the top. We have already covered that section as we created a product and made sure that it can be added to the cart.
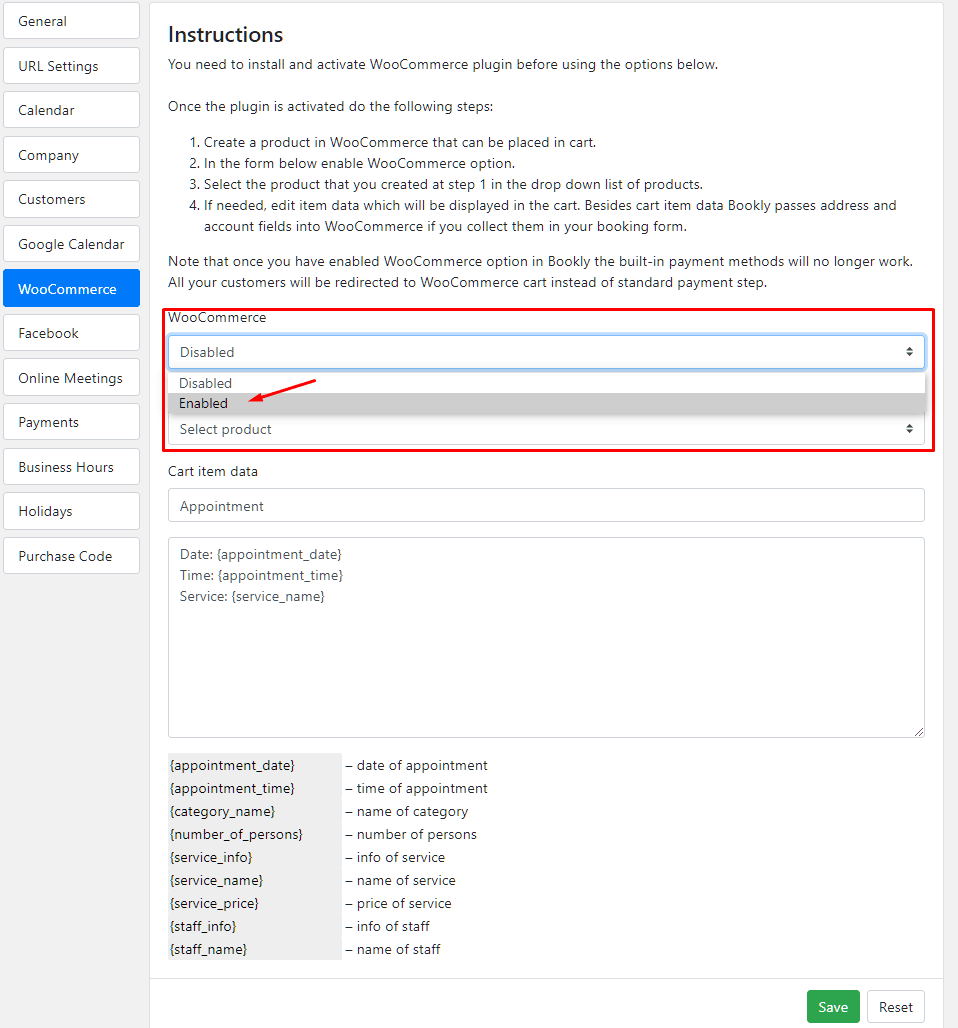
The first step here is to enable WooCommerce. You can do it by choosing the enabled option under the WooCommerce option.
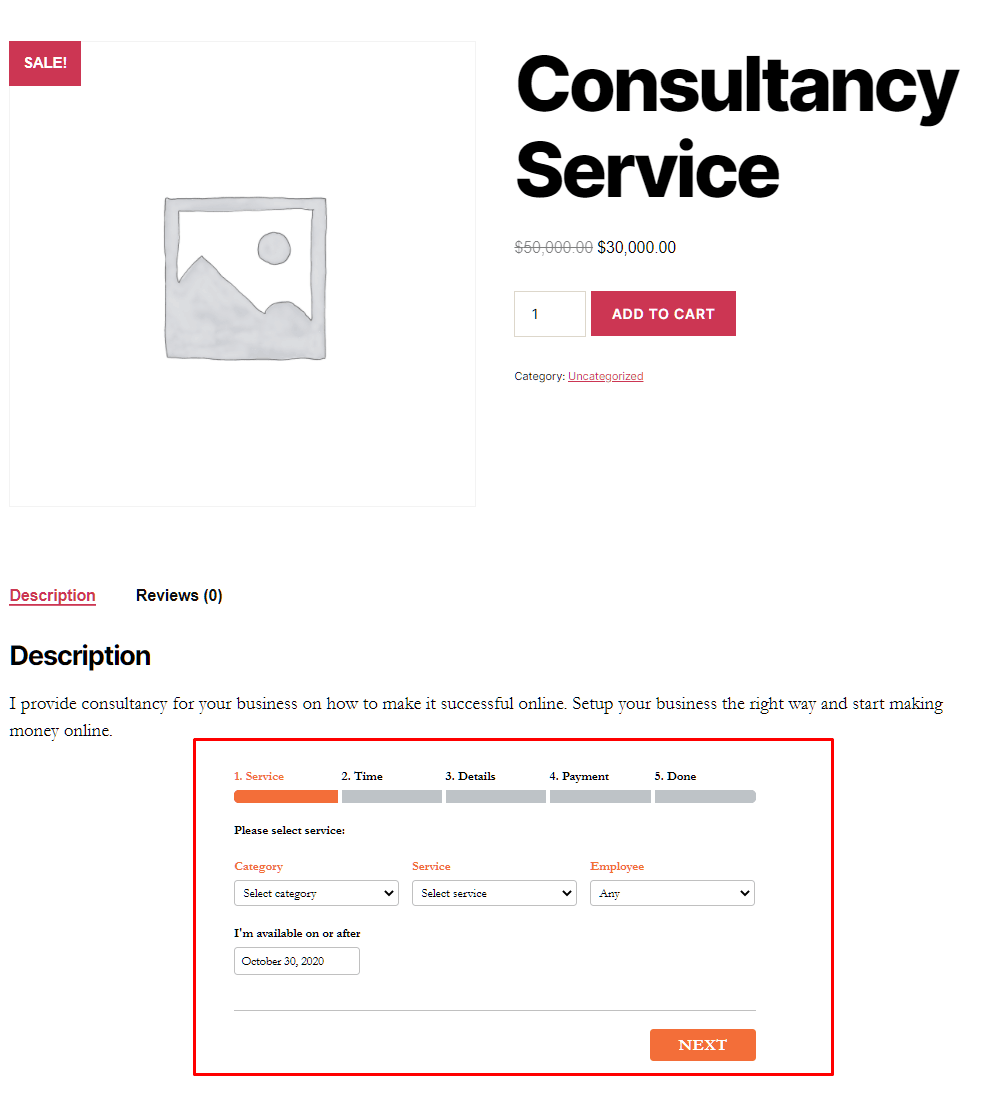
Next, you need to choose the booking product on which you want the booking system to work. In our case, we created a dummy consultancy service product page. You can choose any product of your choice — the only condition being that you need to make sure that it is published and can be added to the cart.

Now, you can edit the cart item data. This data is collected when the order is placed and stored along with the account and address account fields.
The plugin tells you the data options that you can add which you will find just below the Cart item data.

To save the setting, you need to press the Save button present in the bottom right.
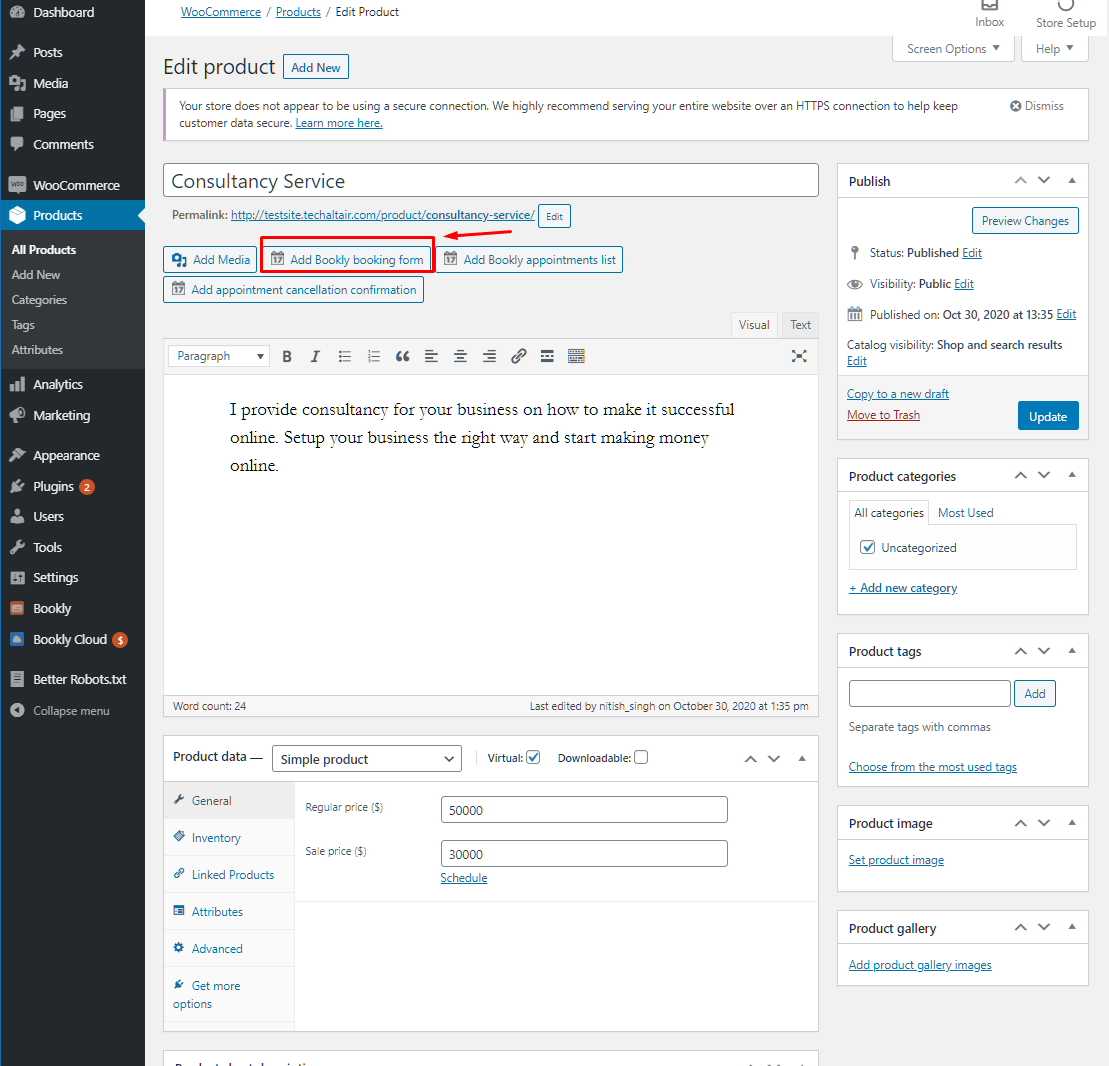
Step 4: Adding the Booking System To the Product
Lastly, you need to add the booking system to the product/service. To do so, open up the product page and then click on the “Add Bookly booking form.”
It will open up the form settings. Here, you can select category, service, and default values. You can also enable date, weekdays, and time range.
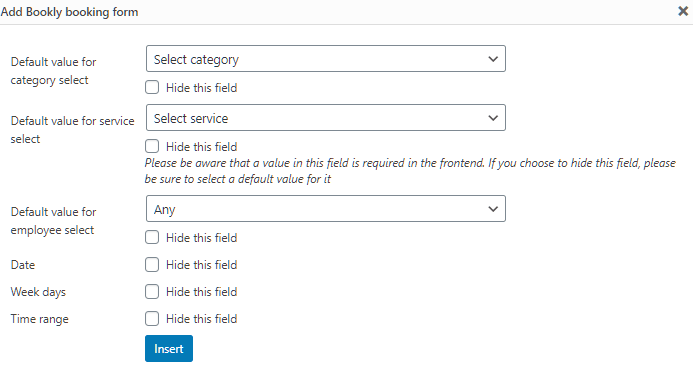
Click on Insert to add it to your page. Also, you need to update the page for the changes to be saved.
If you now visit your product/service page, you will now see the booking widget added!
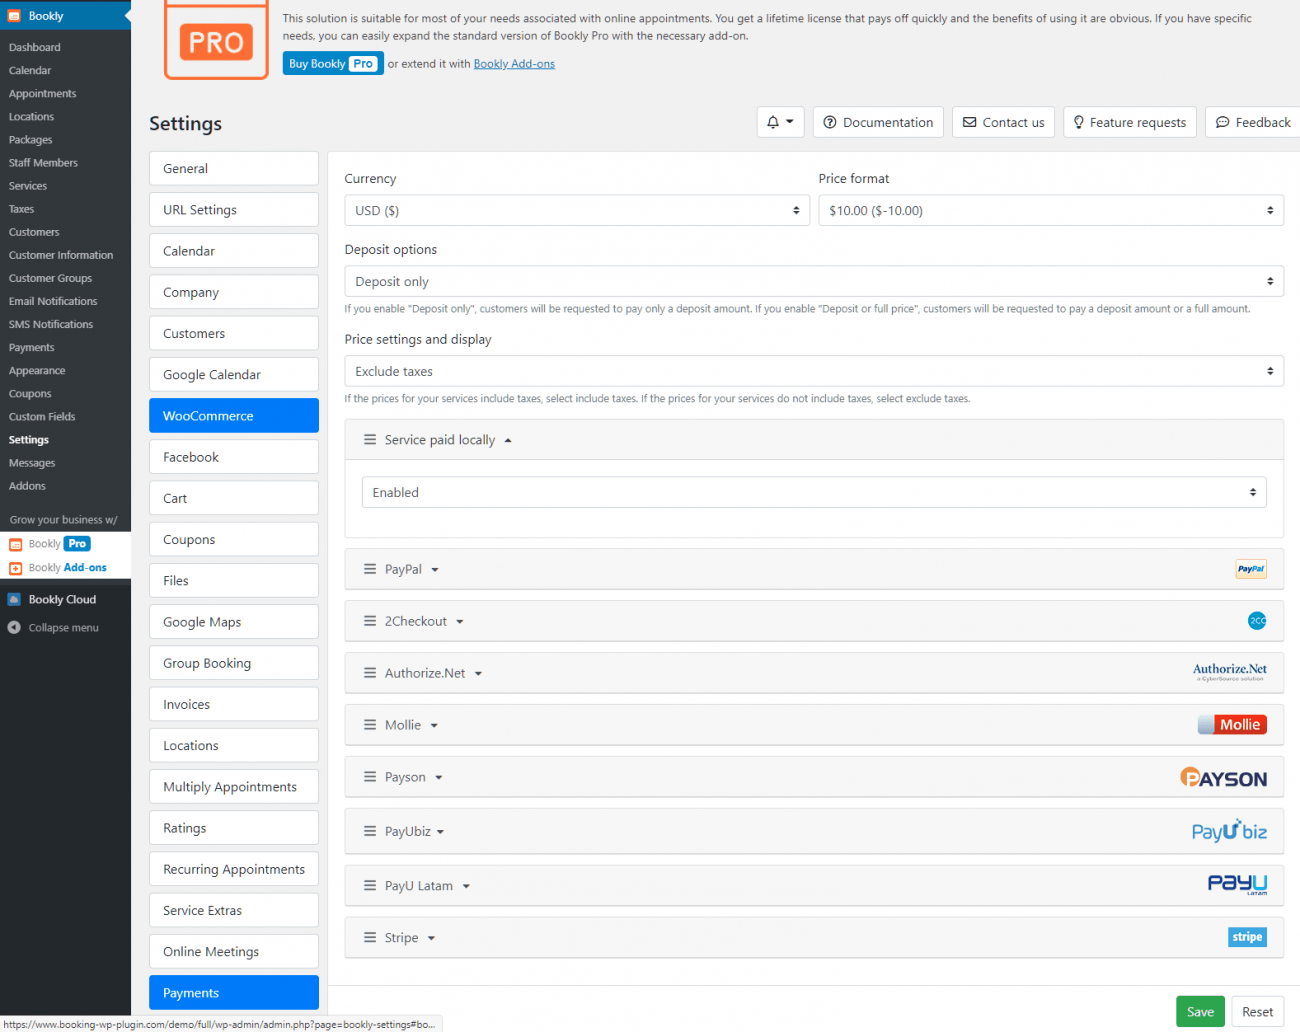
Step 5: Setting up payment options
Setting up payment options with Bookly is also easy. All you need to do is go to Bookly >> Settings >> Payments.
There, you will find a lot of options. Choose the one that fits your needs.
Conclusion
Adding a paid booking system can benefit your WooCommerce business immensely. We went through the whole process of how to do it. So, when are you going to add a WordPress paid booking system? Comment below and let us know.


Hola, estoy crando un sitio de reservas para mi cliente, me gustaría saber si hay alguna forma de administrar el calendario de bookly desde el front end, estuve revisando algunos add-ons y me encontré con “Bookly Staff Cabinet”, pero no estoy seguro de que esta me funcione, me gustaría agregar una página que sea exclusivamente para administrar el calendario sin necesidad de que mi cliente entre al panel de administración de wordpress.
Muchas gracias por tus publicaciones, son de mucha ayuda.
Hi, I don’t know that extension, looks like it would work for you. As an option, you can setup the WordPress admin with a single access to the booking plugin (using user roles).
Hola, la pasarela de pago de Bookly puede ser la misma que en Woocommerce? es decir, los métodos que tengo en Woocommerce pueden estar en el Checkout de Bookly?
Yes, absolutely!
Hola Tristán y gracias por tu post, pero sinceramente me parece muy mala la integración de Bookly Pro y WooCommerce si es tal y como muestras en este post… Veo que es muy confuso para el usuario, porque en el producto de WooCommerce se muestra el botón de “añadir al carrito” y abajo en la descripción el sistema de reserva de Bookly Pro!?? ¿entonces hay dos maneras diferentes de comprar el producto o servicio? ¿Qué pasa si el usuario le da a “añadir al carrito”?. Estoy pensando en comprar Bookly Pro para integrarlo con WooCommerce en la web de un cliente pero no lo veo claro…
¿Podrías decirme qué piensas o si hay otra forma de configurar Bookly Pro con WooCommerce?
Muchas gracias de antemano. Un saludo, Carlos
Hola! yes, it’s pretty straightforward, when the user click on add to cart, a Bookly event place is added to the cart with the price attached to it.
Hola buenas, tengo una web con bookly y woocommerce, se reserva una cita con un precio fijo y varia la fecha y hora escogida por el cliente a traves del form de bookly, lo q me pasa es q no veo como haer para que el cliente si desea una vez logeado en la pagina cancele esa cita y se le reembolse el dinero.. me puede ayudar por favor, gracias
Preciso colocar o agendamento do Bookly somente para o dia seguinte, sem possibilidade de marcar para o mesmo dia. obrigado