

If you want to create a membership website where people sign up to avail of special features, then you should better create a dedicated login and registration page. This will allow you to make your website feel much more professional, ask for additional user information during the sign-up procedure, and much more.
And so, we have put together a detailed tutorial to help you create a custom login and registration page using the Elementor page builder plugin.

Elementor is by far one of the most popular and feature-packed page builder plugins for WordPress. The free version of the plugin comes with tons of blocks and widgets for basic site construction. Whereas a pro version of the plugin exists offering more advanced widgets and blocks.
Now, the form builder widget that comes with Elementor is locked inside its pro version. However, instead of getting Elementor Pro for building your registration form, we recommend going for the Ultimate Addon for Elementor (UAE) plugin instead as it comes with lots of powerful blocks and widgets compared to Elementor Pro.
Table of Content
- Benefits of Creating Custom Registration Page
- 1. Personalize User Registration Pages
- 2. Collect All Required Information From a Single Form
- 3. Customize User Experience
- 4. Fighting Spam and Enhancing Security
- 5. Perfectly for your Brand Style
- How to Create a Custom User Registration Form Using Elementor?
- Step 1: Create a User Registration Form Using the UAE (Ultimate Addon for Elementor) Plugin
- Step 2: Configure Your Form Settings
- New User Role
- Pick After Registration Actions
- Step 3: Add the User Registration Form to Your Website
- Conclusion:
Benefits of Creating Custom Registration Page
In terms of functionality alone, there is no issue in using a generic-looking registration page on your website. But if you do this, then you will miss out on the tons of advantages that come with a registration page tailor-made for your website.
here is a look at some of the key benefits of creating a custom registration page to give you an idea:
1. Personalize User Registration Pages
With the help of custom registration pages, you can build registration forms with custom fields, and design them as per your requirements. You can style the forms to suit your needs and requirements so that they resonate with your business idea and your website.
The User Registration Form widget can be used for the following:
- An elegant solution for becoming a member of an online store
- A custom WordPress registration form to reflect your business
- A secure form for forums and e-learning websites
- A customized registration form for membership websites
2. Collect All Required Information From a Single Form
If there is a particular piece of information that you want to collect from your members, you can make that a part of your registration form.
So, it is not only a user name and password which a user can pick, and that’s all. You can add more form fields such as name, email address, contact details and so on. You can build comprehensive forms elegantly with the help of custom fields in which you can make part of your registration form.
3. Customize User Experience
You can provide a customized user experience to your members. This can be redirecting users to a specific page, helping them auto-login into their accounts, or sending an email into their inbox.
4. Fighting Spam and Enhancing Security
With the addition of Honeypot and ReCaptcha, you can fight spammers and prevent fake registrations.
5. Perfectly for your Brand Style
A registration form should look just like the other pages of your website. With custom registration forms, you can build forms that resonate with your business.
How to Create a Custom User Registration Form Using Elementor?
Now that you have a basic understanding of how a custom user registration form can help you business, here’s a comprehensive step-by-step guide on how to use Elementor and the UAE addon to help you create your own custom user login experience.
Here is a three-step guide about how you can create a User Registration Form for your website.
Note: Before you proceed any further, make sure that you have enabled the Membership option by heading over to Dashboard > Settings > General > Membership: Enabled.
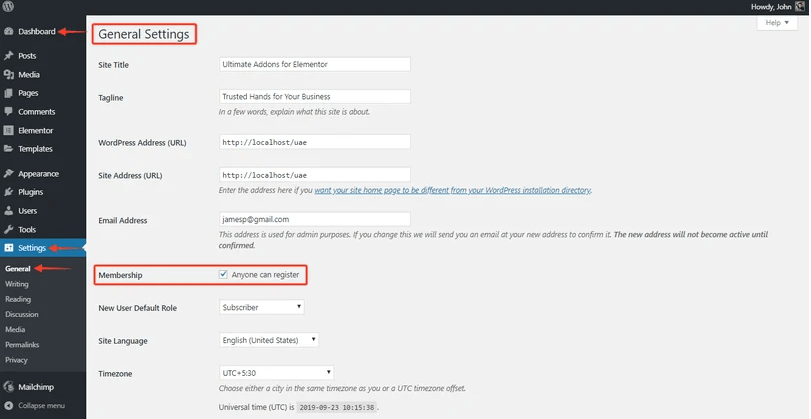
Enabling Membership option will allow any user to register on your website.
Step 1: Create a User Registration Form Using the UAE (Ultimate Addon for Elementor) Plugin
For making a custom User Registration Form, make sure that you have the updated version of UAE plugin, with the activated block.
Once you have ensured the pre-requisites of creating a login page, you need to create or add a New Page. And edit the page where you want to attach the User Registration Form.
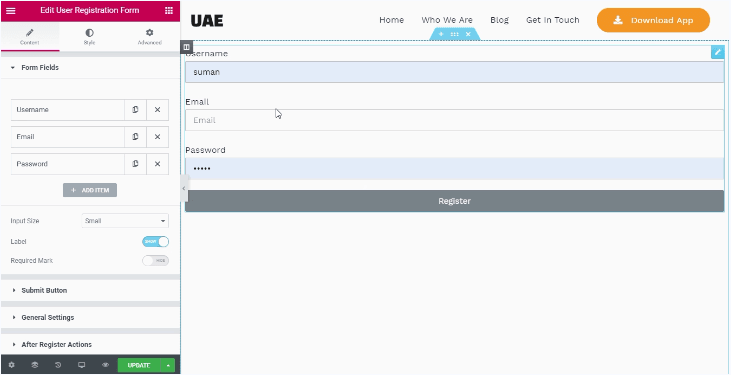
If you drag and drop the widget, you can see the default Form Fields.
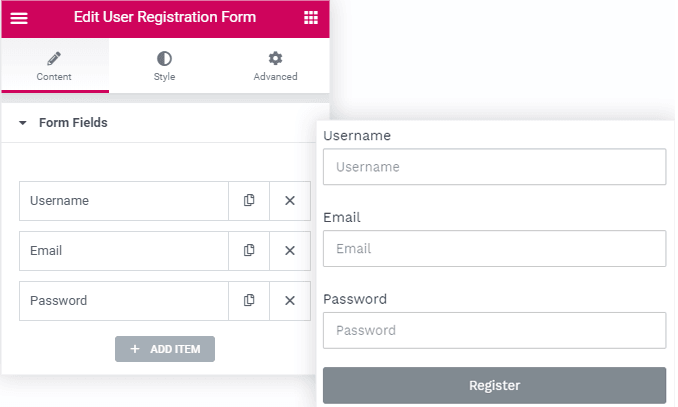
You can play around with the fields- you can remove a field that you don’t require, or add other fields such as Username, First Name, etc.
There is an option to manage the required and Column Width on individual form fields.
You can also manage the Input Size, and the labels of fields (whether you want to display them or hide them), or the Required Mark.
Step 2: Configure Your Form Settings
After covering the basics, you can configure the form settings by visiting the General Settings section. You can perform the following functions from here:
- New User Role
- Pick ‘After Registration Actions’
Here is a detailed account of the both:
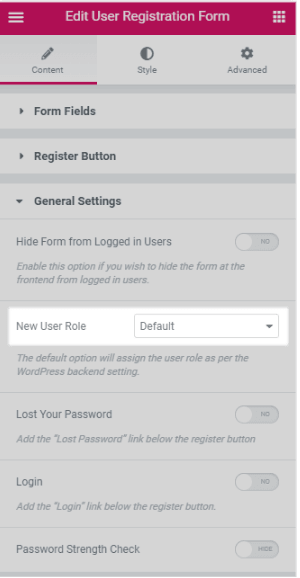
New User Role
If you have a membership site that requires a user to register him on your website, then by default, you are assigning the ‘User Role’ as Subscriber.
You can set a default User Role for your members, and the assigned role will be set for all the new users when they register on your website.
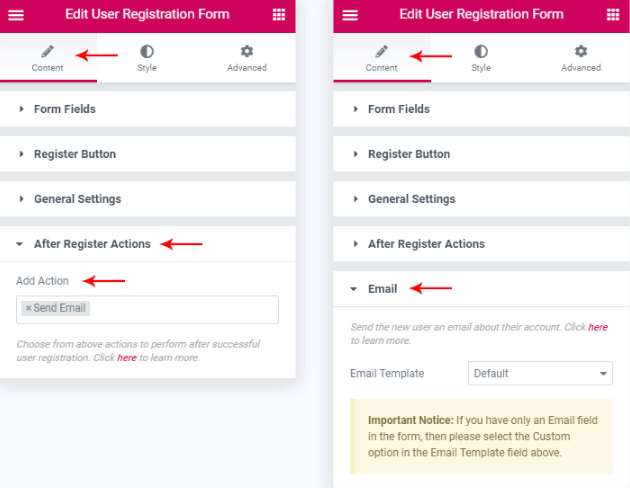
Pick After Registration Actions
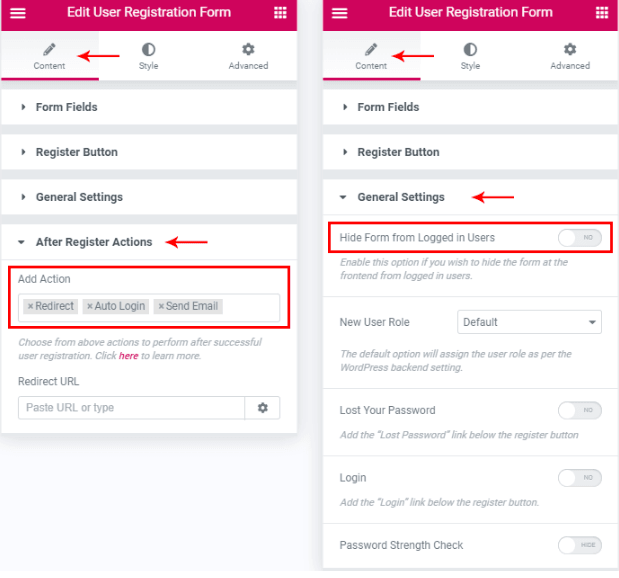
A user can select the following Actions which he can perform after registering himself on a membership site, using the User Registration Form widget:
- Auto-login: with this option, you can allow the user to login to your website automatically. After providing the credentials for the first time, the user will not have to login again because he will be logged into the website automatically after the successful registration.
- Redirect after Register: with this option, you can redirect the users to a welcome page or a login page- after a successful registration. You can set a redirect page by pasting the desired Page’s URL in the URL field under this option.
- Send an email: when the user registers him on your website successfully, this option will send an email to him confirming his registration. The content of the email is customizable, and you can make these emails personal for more warmth. But if you want to send the same email to all of your users, you can also do that by exploring this option.
- Hide after Register: Sometimes, you might want to hide the user registration form after he has successfully registered on your site. With the ‘Hide After Register’ option, you can hide the registration form while leading them to a login page or simply a display of ‘Successful’ message after providing them a link to visit the login page to get access to the website. You can find this option under the General Settings section in the Content tab of the widget.
Moving on, you can design and style the user registration form using the Style tab of the widget.
After doing this, you are done with the creation and configuration process for the User Registration Form widget. The form is all set to go live on the Live Website.
Step 3: Add the User Registration Form to Your Website
This part is pretty basic and simple. You can directly drag and drop to add this widget, just like any other Elementor widget. You can also save the section containing the widget and fetch the Saved Section in the required Registration page.
Below we have elaborated a few more ways to help add any widget in the Elementor editor.
e.g. for User Registration Form on a WooCommerce Page
If you want to create a custom WooCommerce page i-e My Account Page, under the name as Custom Account Page, you can simply:
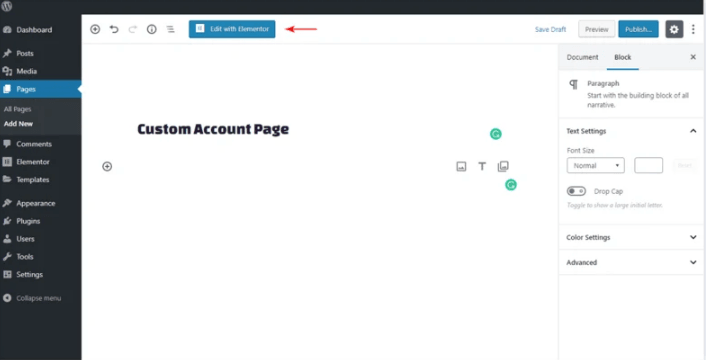
With a click on the ‘Edit with Elementor button,’ and you will land to the Elementor editor.
We can create another registration form just like this, and Save it for using on the Custom Account Page by following the same abovementioned steps.
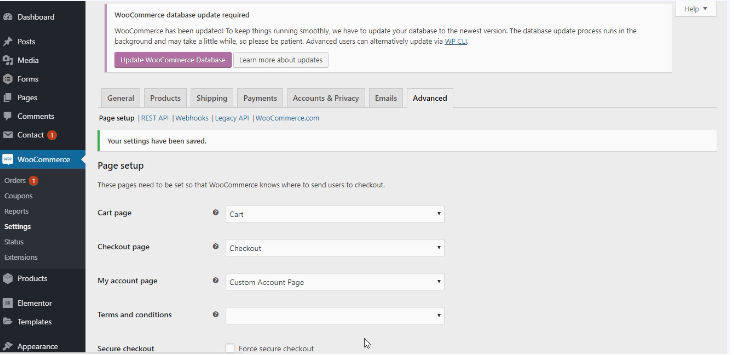
Lastly, for setting the page as ‘My Account Page,’ go to the WordPress Dashboard. And follow the following path under WooCommerce option:
WooCommerce > Settings > Advanced > Page Setup > My Account Page> My Account Page> select Custom Account Page
You can see the page containing UAE’s User Registration Form widget on the WooCommerce Account page.
Conclusion:
You can create a stylish registration form, with option preference of your choice, for your website using Elementor and UAE.
By following the steps given in this article, you are can register users using the User Registration Form widget of UAE. It is a simple and elegant solution for creating a stylish user registration form for your new users.


