
Amazon S3 is a part of many products of Amazon Web Services and serves as a storage solution. It is used by a big website that requires a storage place for large files, such as software, games, videos, pdfs, audio files, downloads, etc., and additional backups. Amazon is ideal for a storage place and backups because of its reliability and its very low storage costs. Huge portals like Netflix, Airbnb, SmugMug, Nasdaq, etc. rely on S3 for storing copious amounts of data at a low cost.
Why Amazon S3?
Amazon S3 deals with bulk storage specifically. With this storage option, it is guaranteed that the storage cost will be a lot lesser than your WordPress host. Residing media to AWS is not only cost-effective but practically free for the first year (up to 5 GB storage). Since the large media files are called from Amazon, this takes offload from your WordPress site, resulting a faster load times. S3 not only saves files such as games, PDFs, videos, audios but also assets like CSS, JavaScript, etc.
- Why Amazon S3?
- How to set up the WordPress S3 integration?
- WP Media Folder and WP Offload media plugin
- How to integrate WordPress with Amazon S3: a step-by-step guide
- Step 1: Install and activate WP Media Folder and WP Offload media plugin
- Step 2: Create a new bucket at Amazon S3
- Step 3: Set Bucket Policy
- Step 4: Create an IAM user and policy
- Step 5: Add access keys to the wp-config.php file
- Step 6: Select S3 bucket in WP Media Folder and WP Offload media
- Step 7: Configure Offload S3 settings (optional)
- Benefits of using Amazon S3 for WordPress site
- Conclusion
We call Amazon S3 storage place a “bucket.” It is a collection of files that you keep somewhere else so that the load on the website can be reduced for better performance.
How to set up the WordPress S3 integration?
To integrate WordPress with Amazon S3, you need:
- An Amazon Web Services account – this is free to sign up for.
- A public Amazon S3 bucket – this is free for your first year (up to 5GB).
- A WordPress S3 plugin – this will automatically copy the files you upload to WordPress to your S3 bucket.
WP Media Folder and WP Offload media plugin
For integrating S3 with WordPress, we recommend WP Media Folder and WP Offload Media plugin. This plugin automatically copies files from your WordPress site to the Amazon S3 bucket as you upload them to the media library. You can also configure adding a CDN, like Amazon CloudFront, MaxCDN, or KeyCDN. And if you decide to get Assets addon, then WP Offload Media Plugin can identify assets (CSS, JS, images, etc.) used by your site, and fetch them from the CDN you have chosen.
How to integrate WordPress with Amazon S3: a step-by-step guide
Before we start the process, it is recommended that you back up your site to deal with any undesirable situation.
Step 1: Install and activate WP Media Folder and WP Offload media plugin
Before starting the integration process, it is a good idea to make sure that you have installed and activated the plugin on your site.
While activating the plugin, you will be prompted to Define your AWS keys. (This is what we are going to do in the next steps- generating AWS keys)
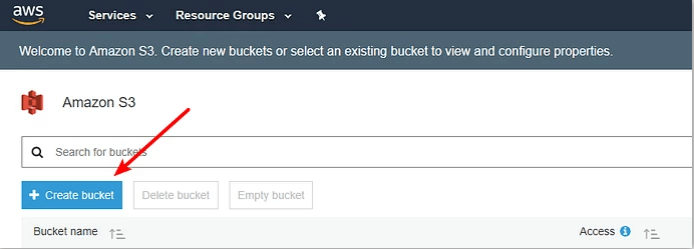
Step 2: Create a new bucket at Amazon S3
After you have created a free Amazon Web Services account, navigate to the Amazon S3 section from your AWS dashboard. From the S3 interface, click on the ” Create bucket” button.
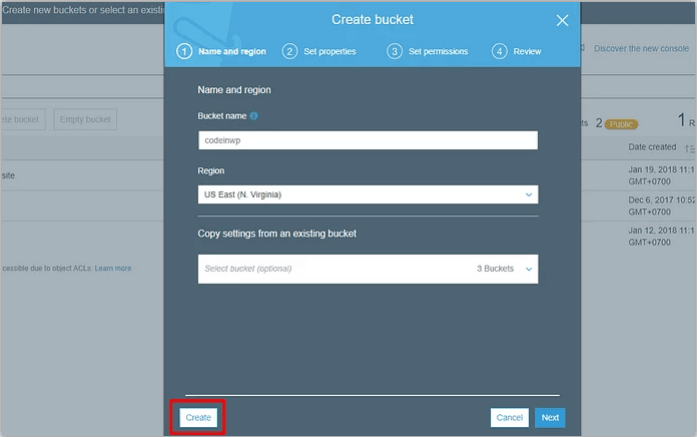
Fill in these details on the popup interface:
- A bucket name
- Select a Region (close to your target audience, especially if you’re not planning to use a CDN)
- Click “Create”
Step 3: Set Bucket Policy
For the smooth functioning of the website, make your S3 bucket public by setting a bucket policy. From your S3 interface, click on your bucket:
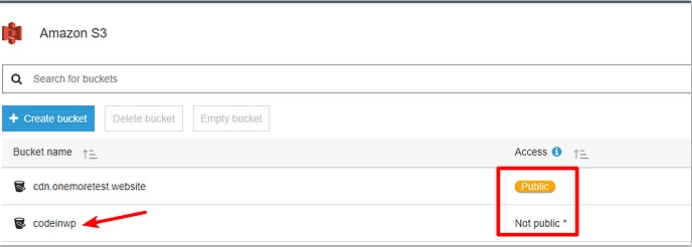
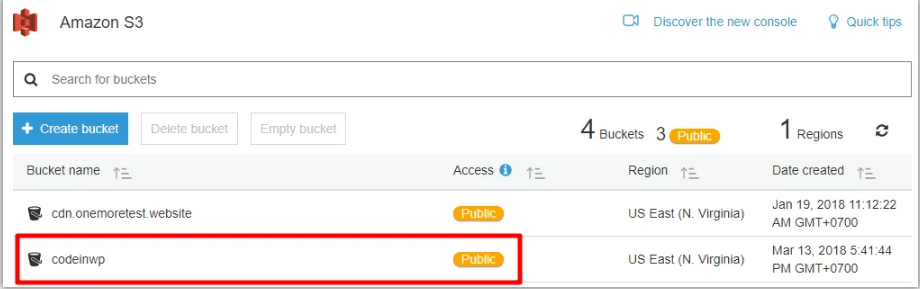
The newly created ‘codeinwp’ bucket is marked as Not public, but you need a Public indicator for this bucket.
Click on the Permissions tab > select ‘Bucket Policy‘:
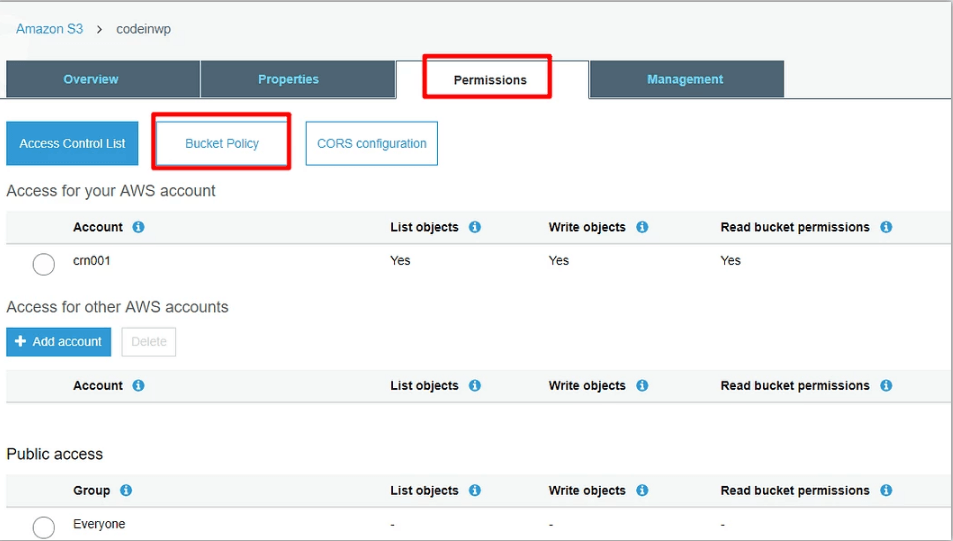
You can see a JSON code editor. Paste the following snippet in the editor and save your changes.
{
“Version”: “2008-10-17”,
“Statement”: [
{
“Sid”: “AllowPublicRead”,
“Effect”: “Allow”,
“Principal”: {
“AWS”: “*”
},
“Action”: “s3:GetObject”,
“Resource”: “arn:aws:s3:::codeinwp/*”
}
]
}Note: Your bucket name should match with the name used in the code snippet. If you have named your bucket ‘XYZ,’ make sure to replace codeinwp with ‘XYZ.’
- ‘Save’ the changes
After you save the changes, the bucket will be marked as Public in the Amazon S3 dashboard:
Step 4: Create an IAM user and policy
Creating an IAM user allows the plugin to manage your S3 bucket. This is a MUST if you want the plugin to automatically copy files uploaded to WordPress.
This step is a complicated one, so we are going to break it down to a lot of simple steps for a better understanding.
After finishing this process, you will have AWS keys- that the plugin asks for.
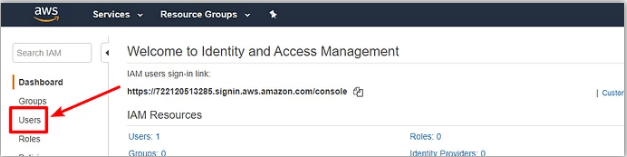
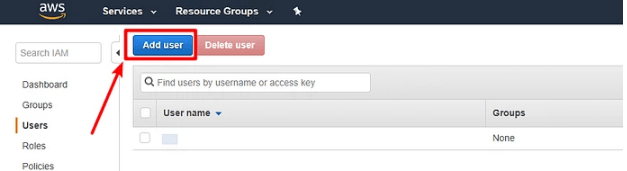
To create your IAM user, head to the IAM area in your AWS account. Select the Users tab:
click on Add user at the top:
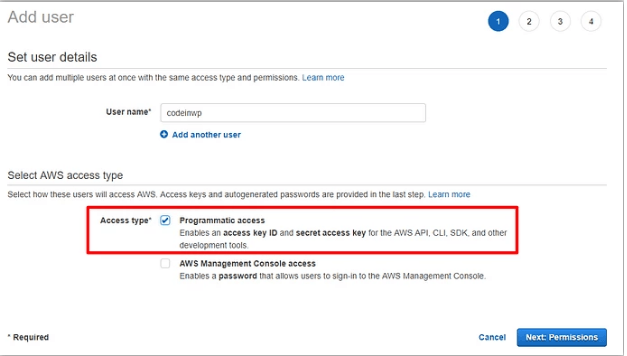
In the ‘Add user’ interface, provide a name for the user. Don’t forget to select Programmatic access under Access type. And, click Next: Permissions:
From
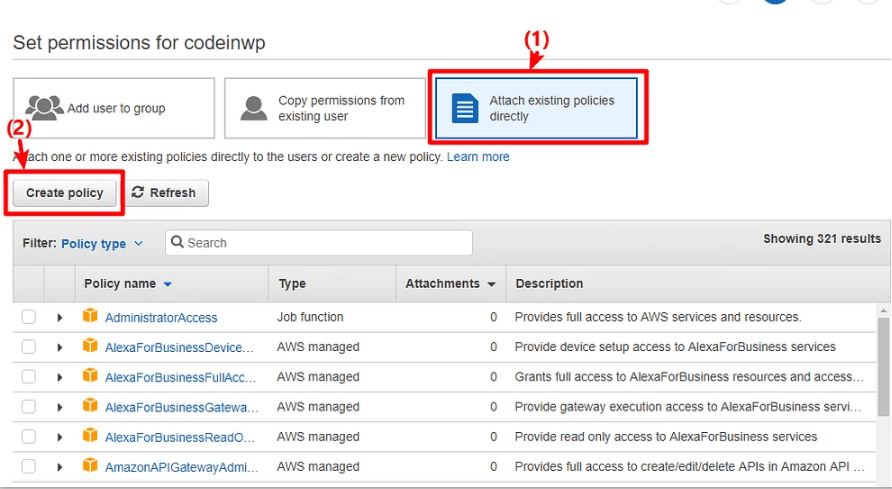
the next window, select the Attach existing policies directly tab, and then select Create policy:
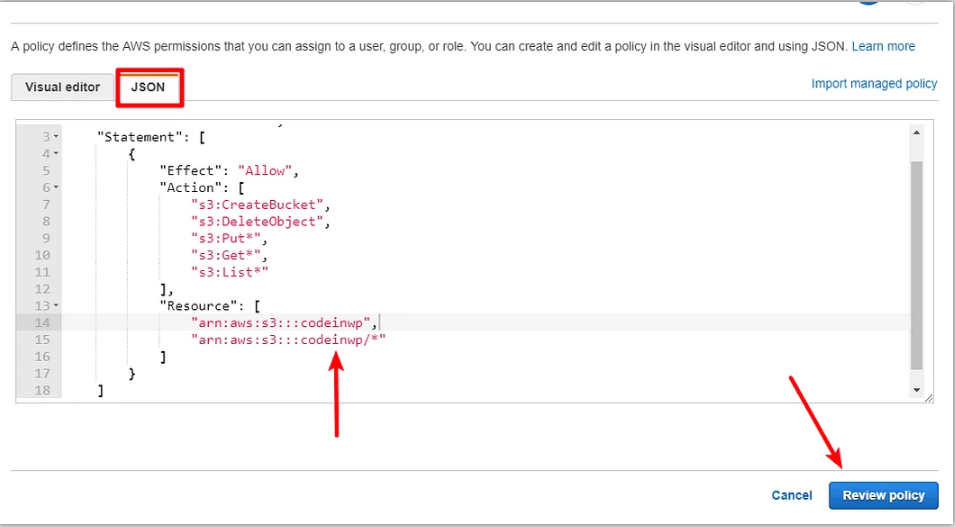
That will lead to a new window. In the new window, go to the JSON tab and paste this code snippet:
{
“Version”: “2012-10-17”,
“Statement”: [
{
“Effect”: “Allow”,
“Action”: [
“s3:CreateBucket”,
“s3:DeleteObject”,
“s3:Put*”,
“s3:Get*”,
“s3:List*”
],
“Resource”: [
“arn:aws:s3:::codeinwp”,
“arn:aws:s3:::codeinwp/*”
]
}
]
}
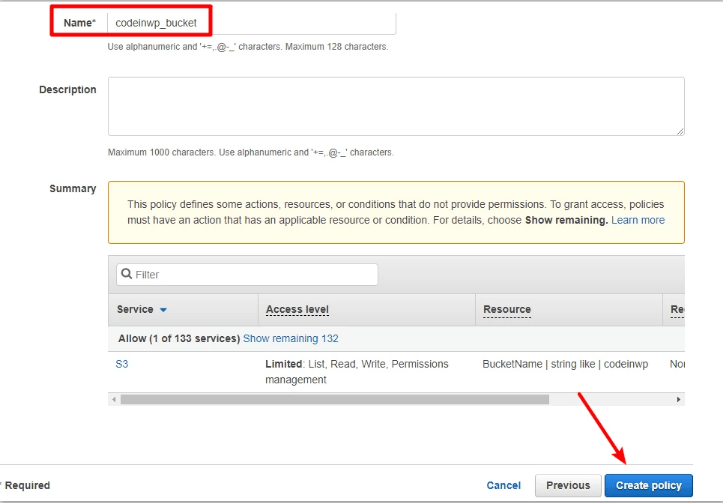
Make sure to replace the two instances of codeinwp with the actual name (XYZ) of your Amazon S3 bucket. After this, click Review policy at the bottom:
On the next screen, provide a name and then click Create policy:
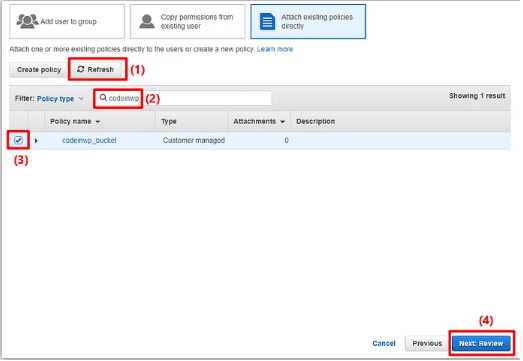
Now, go back to the IAM Add User tab, which you accessed previously > Click Refresh > Select the policy you just created from the list (you can save yourself time by searching for it by name) > Click Next: Review:
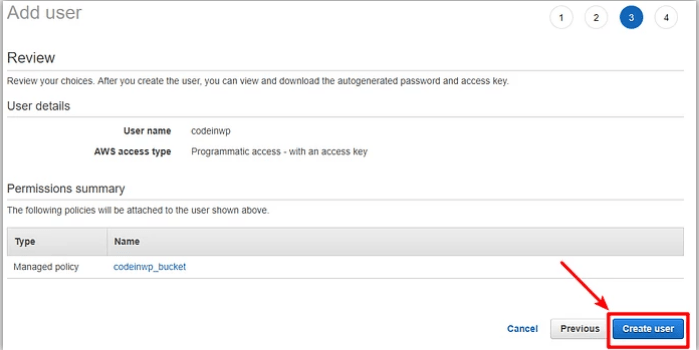
On the next screen, click Create user:
You should be able to see these on the next screen:
Access key ID
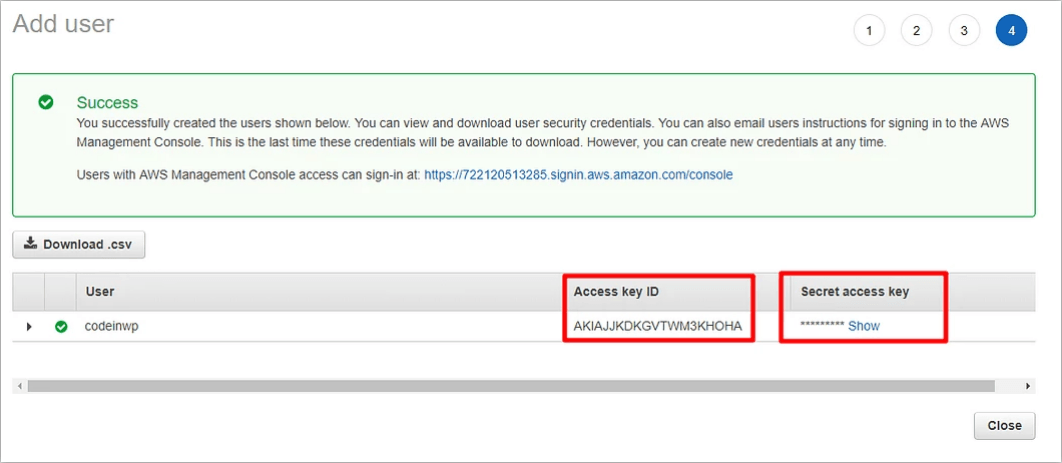
- Secret access key (if you want to see the secret key, click Show)
Tip: You might want to keep both these values handy, as you will need them in the next step.
Step 5: Add access keys to the wp-config.php file
Now, when you are done with the AWS interface, you can land back to your WordPress site for easy configurations.
Here, you need to work on your wp-config.php file. There are two ways to go about it- via FTP or cPanel file manager.
Add the following code snippet to your wp-config.php file. Don’t forget to replace the asterisks with your actual keys from the previous step (the ones we told you keep handy):
define( ‘AS3CF_AWS_ACCESS_KEY_ID’, ‘********************’ );
define( ‘AS3CF_AWS_SECRET_ACCESS_KEY’, ‘*********************’ );
This is how it looks in my website’s wp-config.php file:

Don’t forget to save the changes you have made.
Step 6: Select S3 bucket in WP Media Folder and WP Offload media
Go to Settings → Offload S3.
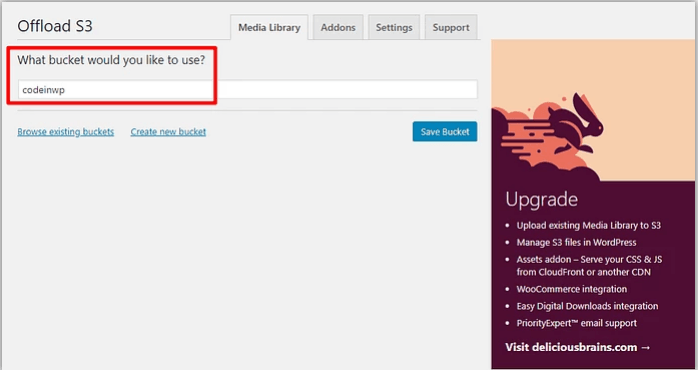
You will be prompted to give the name of your bucket as: What bucket would you like to use? Fill in the name of your S3 bucket (XYZ) in the field and click Save Bucket:
You can see the full plugin’s interface, after saving the changes:
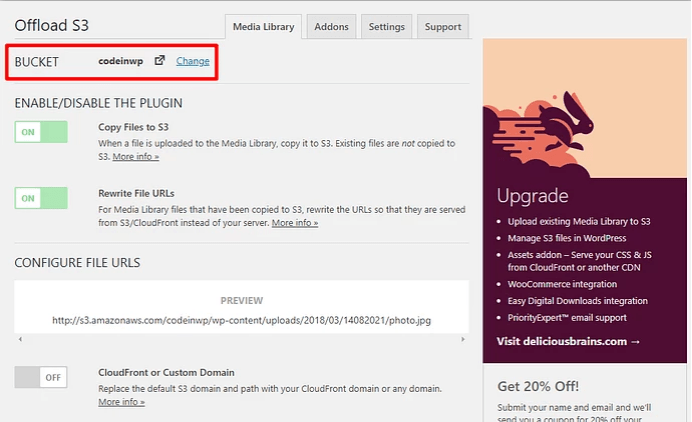
Note: The buttons to search for existing buckets or Create new bucket will not work because of the IAM user policy setup.
Step 7: Configure Offload S3 settings (optional)
So far, you are pretty much done setting up. All your new uploads will automatically be offloaded to Amazon S3. Also, the plugin will automatically rewrite the file URLs for those files. This way, the file is sent from
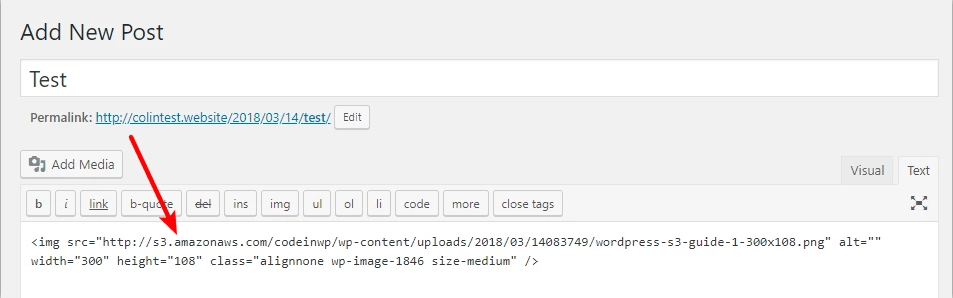
Amazon S3 instead of your server.
For uploading the existing files to Amazon S3, you’ll need the premium version.
You can play around with the plugin’s functionality if you wish to change anything in particular. However, for most situations, the default settings are great.
Benefits of using Amazon S3 for WordPress site
- Lesser requests to the server
As your files are not housed at the server, the server will have reduced load because it is no longer responsible for serving media files or potential assets. This loads the page way more faster.
- Affordable storage
if you are afraid of running out of your host’s storage limits, S3’s offers the cheapest solution for this.
- Detached media
As the large media files are kept sommmewheeere eeelse from your site, it is a lot easier to upgrade or move around WordPress site (like between hosts). While moving, you are only moving the PHP files, which are very light and easy to move.
- Scalability
Amazon S3 powers a major portion of the Internet. This means if Amazon scales up, your website will also be getting scaled.
- Free fist year
Amazon S3 is free for the first year (up to 5GB storage).
Conclusion
You can easily offload your large media files using a WordPress Amazon S3 plugin.and also benefit from Amazon Web Services’ infrastructure. The whole process doesn’t take more than 30 minutes. Once you have integrated WordPress with Amazon S3, your website will be more efficient and quick- and your visitors will be happier.


Harika bir yazı olmuş, bunu birzat kendi sitemiz üzerinde denedik ve oldukça uygun maliyetli ve daha hızlı bir internet sitesine sahip olduk.