
The internet has allowed us to share our work with the whole of the world. However, it has also allowed content theft to become easier and more common. As such, if you are a photographer or even a digital artist, it becomes very important to properly protect your original work. This is where watermarks come in handy.
A watermark allows you to superimpose your images with a logo, stamp, or signature. That way, even if someone steals your work, they won’t be able to share it online as the watermark will let the viewer know that it’s actually your work.
And don’t worry, watermarks won’t ruin the viewing experience of your images either. You get to control the transparency of the message that you watermark. As such, it is only visible when examined up close.
Here is an example of an watermarked image:

As you can see a semi-transparent Holdersing logo is watermarked to the bottom right corner in an un-intrusive manner.
Now, if you are a WordPress user and you want to protect the images you upload with watermarks as we have done here, then you have come to the right place. Here we will show you a simple and easy way to automatically watermark any and all images on your WordPress website using the WP Media Folder plugin.
Table of Content
- WP Media Folder – A Media Library Plugin with Watermark System
- WP Media Folder: Watermark Features
- How Does the Watermark Feature Work?
- How to Add Watermarks Using WP Media Folder?
- Step 1: Installing the Plugin
- Step 2: Create the Watermark
- Step 3: Configure Watermark Settings
- (Optional) Step 4: How to Remove Watermark Created with WP Media Folder
- Other Benefits of Using WP Media Folder Plugin if You Are a Photographer
- Wrapping Up
WP Media Folder – A Media Library Plugin with Watermark System

WP Media Folder is a powerful plugin from JoomUnited that gives you tons of advanced features and options to get complete control over your WordPress media. One of these features is the ability to add non-removable watermarks to your images.
The plugin gives you the option to apply the watermark on your whole image library, or on a selection of images. Furthermore, it comes with additional options and settings to let you control the margin, opacity, position, and scale of the watermark.
Here is a look at some of the main watermarking features provided by the plugin.
WP Media Folder: Watermark Features
- Option to automatically apply the watermark to all images as soon as they are uploaded.
- Bulk-apply the watermark to all your existing images.
- Create physical media folders to store your images and then apply the watermark to all images in that specific folder.
- Option to tweak the scale, opacity, and position of the watermark.
How Does the Watermark Feature Work?
First, you need to upload a watermark image containing the logo, or signature, or message you wish to use. Then, using the plugin you can combine the watermark image with your actual media images to imprint the watermark. Once both the images have been combined, the process can’t be reversed and thereby you have a non-removable watermark on your images.
The plugin allows you to control the opacity/transparency from 0-100% of the watermark, so you have control over how much the watermark is visible.
How to Add Watermarks Using WP Media Folder?
Now that you know all the watermarking features offered by the plugin, here is a detailed guide on how to use the WP Media Folder plugin to add watermarks to your images.
Step 1: Installing the Plugin
WP Media Folder is a premium plugin and you need to purchase a license for it to work on your system.
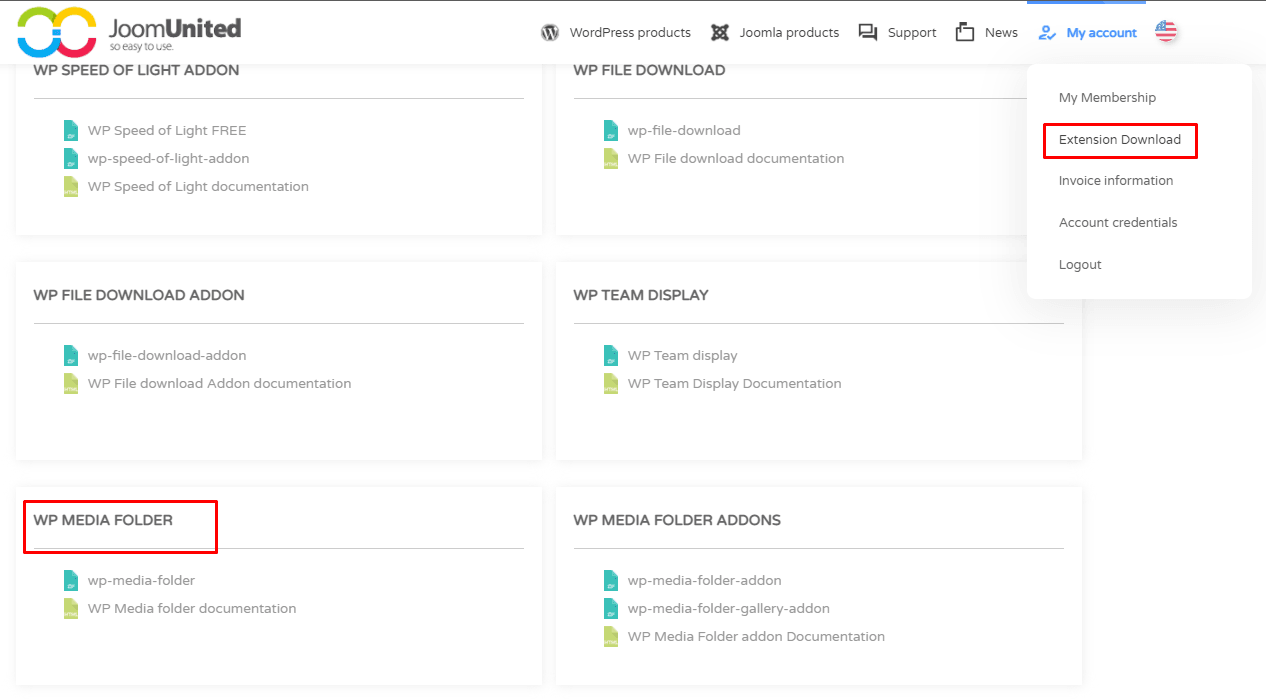
After you have bought the plugin, login to your JoomUnited account, click on the Extension Download button as shown in the image below, and then click on WP Media Folder. This will download the plugin on your desktop.
Now it’s time to log in to your WordPress dashboard. From there, navigate to Plugins > Add New from the lefthand sidebar and click on the Upload Plugin button followed by Choose File as shown in the image below.
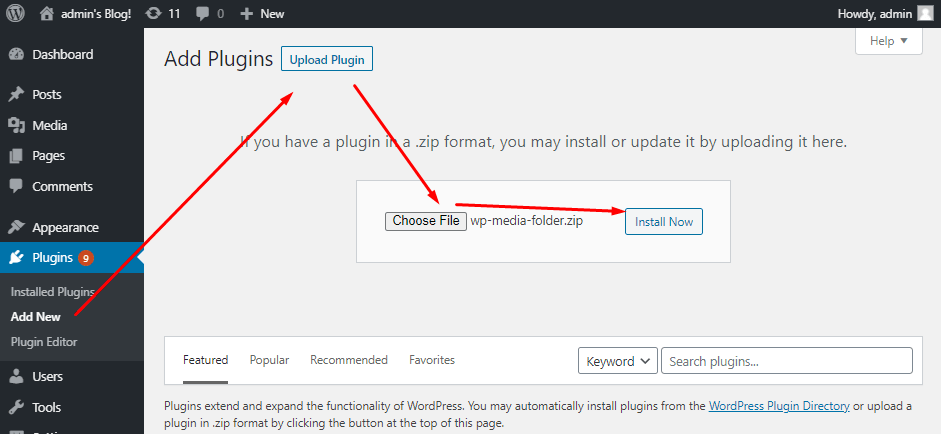
This is going to bring up a browser window from where you are going to select the wp-media-folder.zip file that you recently downloaded. Once done, click on Install Now and then wait for a couple of seconds for the plugin to get installed.
After the plugin is installed, click on Activate Plugin as shown in the image.
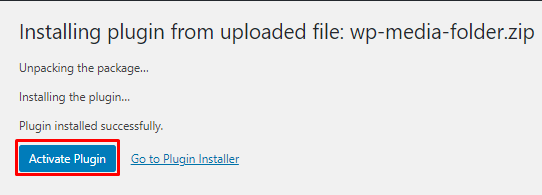
And voila! WP Media Folder is now installed on your WordPress website.
Now let’s move on to creating our watermark.
Step 2: Create the Watermark
To create the watermark, go to your WordPress dashboard, and from the left-hand sidebar navigate to Settings > WP Media Folder > Rename & Watermark as shown in the image.
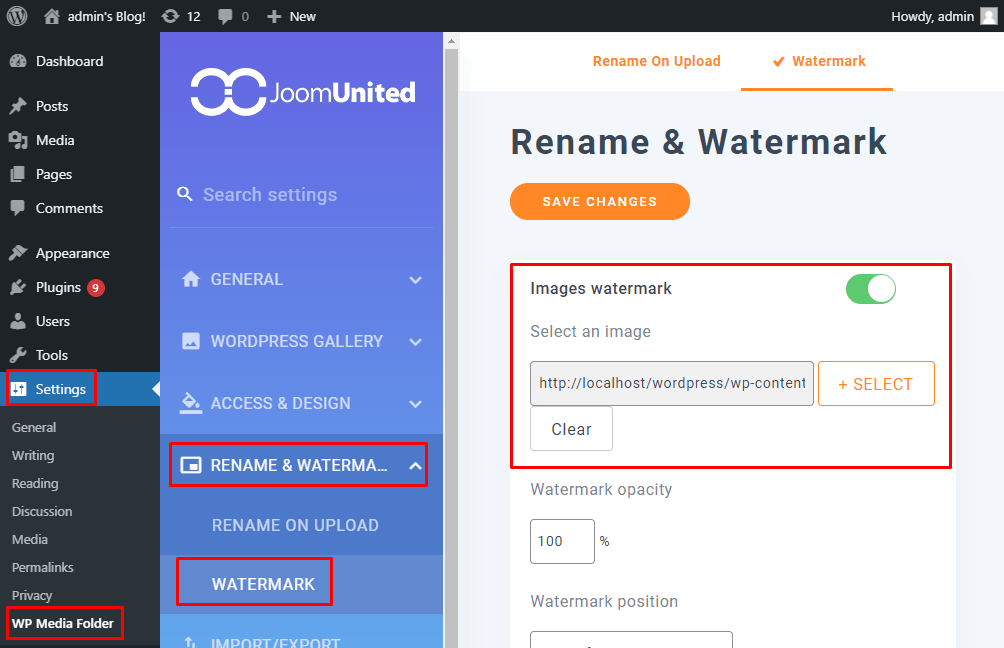
To enable the watermark functionality, toggle on the Images Watermark pill.
Once you have done that, it’s time to select the image you are going to use as the watermark. To do this, click on the +SELECT button and pick out an image from the WordPress Media Gallery. This image will get combined with the other images to imprint the watermark.
For this tutorial, we will be using the Holdersing logo as the watermark image.
Once you are done with that, it’s time to move on to the next step.
Step 3: Configure Watermark Settings
After you have selected the image that you wish to use as the watermark, it is time to start tweaking the watermark settings.
Scrolling down the Rename & Watermark section you will come across a bunch of options to tweak the watermark opacity, position, size, and margin. Here is a look at the settings we are using for this tutorial.
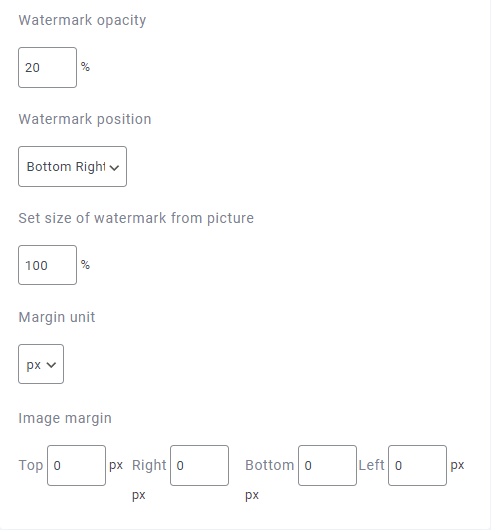
As you can see we have kept the opacity to 20%, the position to the Bottom-Right, and the size of the watermark to 100%.
Note: The only reason we have kept the size of the watermark to 100% is that the watermark image we selected is a logo and small compared to the original image. In case the watermark image you are using is as large as the other images on your media library, then you should set it to a smaller size. As a rule of thumb, the watermark should only cover 10% of the image to retain visibility.
Other than this, we have kept the margin to the default 0 value. However, if you want to increase the space surrounding the watermark relative to the base image, then you can tweak this setting.
Once you are done configuring the watermark settings hit the Save Changes button and scroll down. In the following section, you will get to choose on which images you wish to apply the watermark.
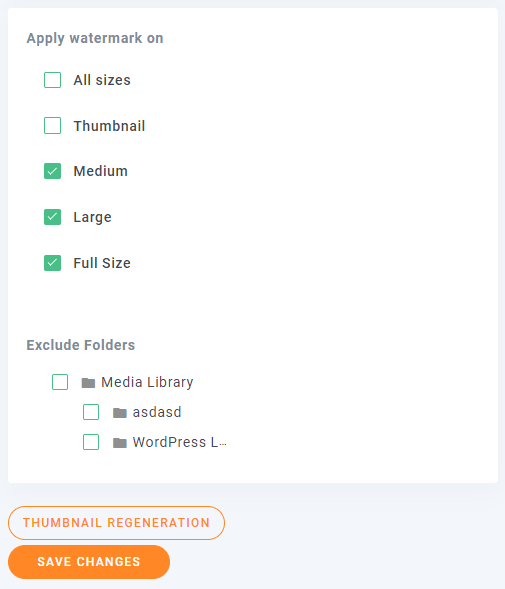
First, you will have to choose the images based on the image size. It is advised that you skip the watermark on Thumbnails and apply it to all other images.
Next, you can exclude certain media folders from the watermarking process. That way, images inside those folders won’t be watermarked.
Note: In case you are thinking “what folder?,” well, the WP Media Folder plugin allows you to create folders to organize your media content. As you can see, we have created two folders (technically sub-folders inside the main Media Library folder) named asdasd, and WordPress Logos.
All such folders and sub-folders will show up under this section and you will get to exclude certain folders where you don’t wish to apply the watermark settings.
Once you have configured the watermark settings and selected on which images you wish to apply the watermark, hit the THUMBNAIL REGENERATION button followed by SAVE CHANGES.
And that’s it, you have successfully watermarked your WordPress images.
(Optional) Step 4: How to Remove Watermark Created with WP Media Folder
To remove watermarks from your images, head on over to Settings > WP Media Folder > RENAME & WATERMARK and then select the Watermark tab. From here, click on the Images Watermark pill and turn it off. Next, click on the Clear button to remove the selected watermark image and Save Changes.
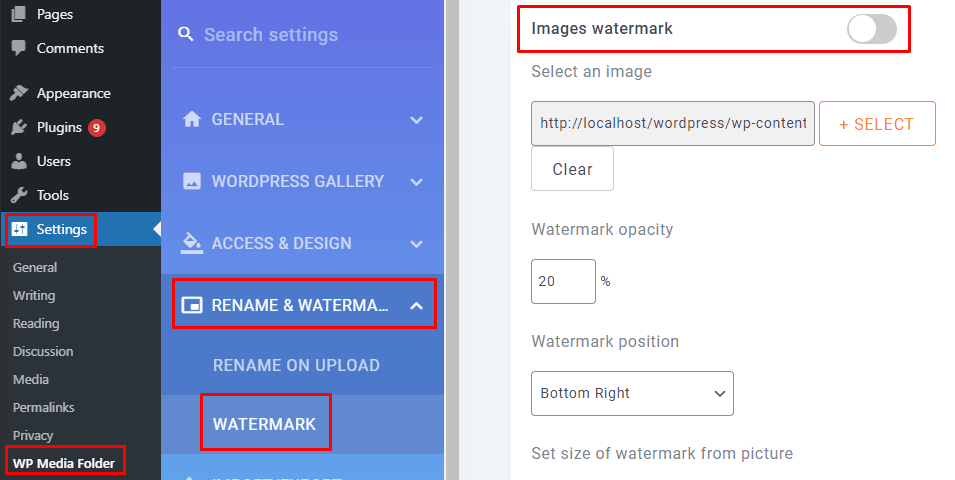
Now, scroll down and click on the Thumbnail Regeneration button followed by Save Changes.
This is going to remove the watermark from all images in your WordPress Media Library that you applied using this plugin.
Other Benefits of Using WP Media Folder Plugin if You Are a Photographer
Apart from helping you to add watermarks to your images, the WP Media Folder offers many more bells and whistles.
Its main feature is to help you create physical folders to better manage your media. You can use it to create different folders for your image collection that are specific to a particular project, location, or timing. This helps you to better organize all your photographs.
Other than this, the plugin comes with advanced sorting and filtering options that will help you easily find the image/media you are looking for in a matter of seconds.
There is also full integration with cloud platforms like Google Drive, One Drive, Dropbox, and Amazon S3. This will allow you to have your images stored and backed up to various places for additional security.
And if that’s not all, the plugin also has WooCommerce support which makes it super simple if you are planning to sell your images.
So as you can clearly see, WP Media Folder is a powerful, feature-packed plugin, well-worth its premium pricing. And if you wish to learn more about everything you can do with this plugin, you can check out our collection of useful guides, tutorials, and how-tos using WP Media Folder.
Wrapping Up
So this was our quick step-by-step tutorial on how to use WP Media Folder to watermark images on your WordPress website. We hope you found this useful and that it helped you in protecting your original work from cyber theft.
Now with that being said, if you ran into any sort of issues while adding/removing the watermarks then feel free to mention it in the comments below. We are always willing to help out our readers and ensure all their WordPress questions are answered and troubles resolved.


Interesante plugin, voy a probarlo