
If the homepage of a business does not include a short explainer video, it is considered as outdated and bland. It is very rare these days to come across a website that does not has a short video on it. The inclusion of short videos calls for the need for this article because this article discusses how to manage videos in Elementor. In this article, we have expanded the video widget and video background options.
- Self-hosted and Dailymotion video support
- Benefits of self-hosted videos:
- Start and End Time for Video Widget & Background
- Modest Branding
- Add a Video Background to Elementor
- Improved Mobile Editing
- Change Mobile and Tablet Breakpoints
- WP CLI Integration
- Gutenberg Inclusion
- Sticky Video by UAE
- How to make a video sticky?
- Video Size
- Sticky Alignment
- Video Spacing
- Background Size and Style
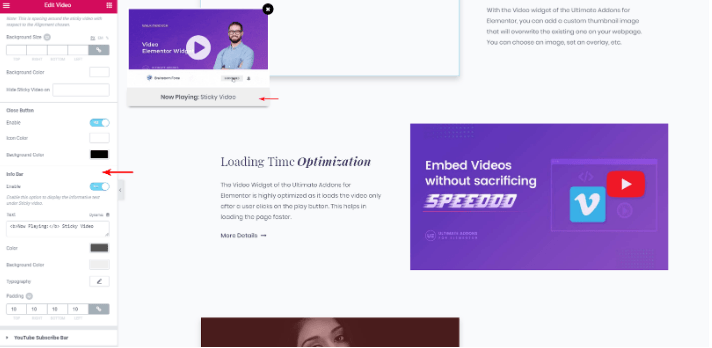
- Info Bar
- Manage Sticky Video on Responsive Devices
- Drag Anywhere on Screen
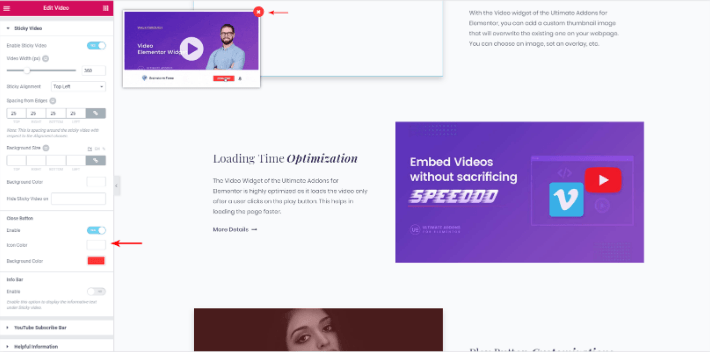
- Close Button
- Conclusion
Self-hosted and Dailymotion video support
In Elementor, you can embed not only videos from YouTube and Vimeo, but you can now also include self-hosted HTML5 and Dailymotion videos.
Benefits of self-hosted videos:
- Privacy and control: With the GDPR and other privacy-related issues, this has become all the more important to have self-hosted videos. You can have control over the content of these videos.
- Ownership: having self-hosted videos help you from relying on content that others make. With your video, you are 100% certain that there will be no issues of copyrights. Also, there is no risk of video getting deleted.
- Personalization: with self-hosting, your video will not feature any logos or external links. This will help you include quality content, which looks more professional. Your videos can be very helpful in engaging the visitors on your site.
- UX: self- hosted videos will ensure that your visitors will not be shown ads or suggested videos. They will not be distracted or redirected to your competitors (through suggested/recommended videos).
Start and End Time for Video Widget & Background
You can set a start and endpoint for the video widget on supported platforms. You can also get to pick the video background so that only the selected part of the video is played. With the help of this feature, you can loop the relevant part of the video very easily. You can display the selected content to your visitors in a loop.
Modest Branding
Say, if you have embedded a video from youtube, but you want to hide the youtube logo from it, you can select ‘Modest Branding’ to hide the logo from embedded Youtube video.
Add a Video Background to Elementor
In this section, we will guide you on how to add a video to Elementor:
Hit the Elementor editor, and navigate to the panel. From here, search ‘video’ and drag in the video widget.
- Elementor > panel > search ‘video’ > drag ‘video widget’
- Under Video > Source, choose either ‘YouTube’, ‘Dailymotion’, ‘Vimeo’ or self-hosted.
- Next, add a link to the video. If the video is self-hosted, then you can either upload it y browsing the media library or by using an external URL.
- If you want a specific portion of the video to play, you can choose a start time and an end time.
- You can also add a thumbnail of your choice by adding an image overlay.
Improved Mobile Editing
Change Mobile and Tablet Breakpoints

For a long time, people have wanted to have the liberty to have breakpoint values for videos on mobile and tablets. Good news!! The solution is here.
After adding the video, as shown in the above section, you can change the values of tablet and mobile breakpoints for Elementor. With the help of revolutionary breakpoints feature, you can customize your site to adjust on widescreen computers, laptops, tablets or small mobile screens.
To change the breakpoint values, navigate to:
Elementor Dashboard > Settings > Style and enter the new values for ‘Tablet Breakpoint’ and ‘Mobile Breakpoint.’
And voila!!!
You have done it in the nick of time.
WP CLI Integration
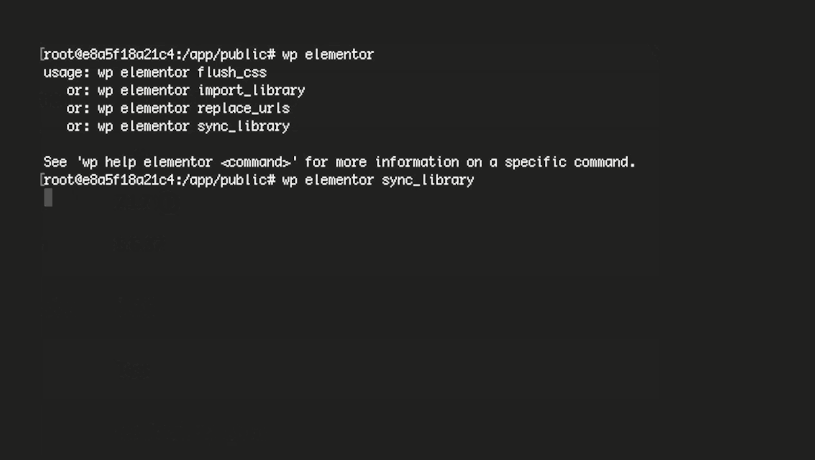
The Command-Line Interface for WordPress, WP-CLI, is an open-source project that provides a command-line interface for a variety of actions you might perform in the WordPress admin. Developers are pretty familiar with it.
So, with a WP-CLI, you can perform a long list of tasks from a random terminal. This way, you will not have to login to the admin terminal.
Elementor now comes with integrated WP-CLI. And this integration of WP-CLI allows you to perform the following tasks via the command line:
- flush_css – Flush the Elementor Page Builder CSS Cache
- sync-library – Sync Elementor Library
- replace-URLs – Replace old URLs with new URLs in all Elementor pages
- Activate or deactivate license – Activate or deactivate your Pro license
- import-library – Import template files to the Library
More CLI commands will keep adding on for Elementor in the future.
Gutenberg Inclusion
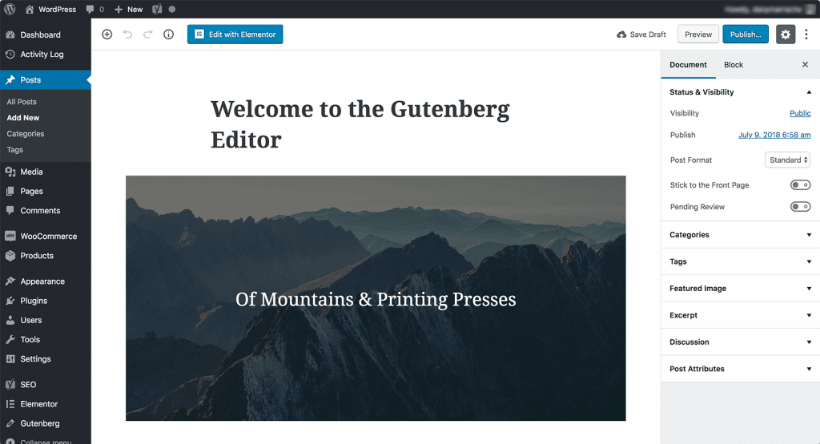
In the coming months, Gutenberg will also be added to the core, which makes Elementor a full package.
With the launch of Gutenberg, Elementor will work even smoothly for all elementor users.
It is easy to switch between Gutenberg and Elementor with Version 2.1 because you will be using the ever familiar button ‘Edit with Elementor’ within Gutenberg.
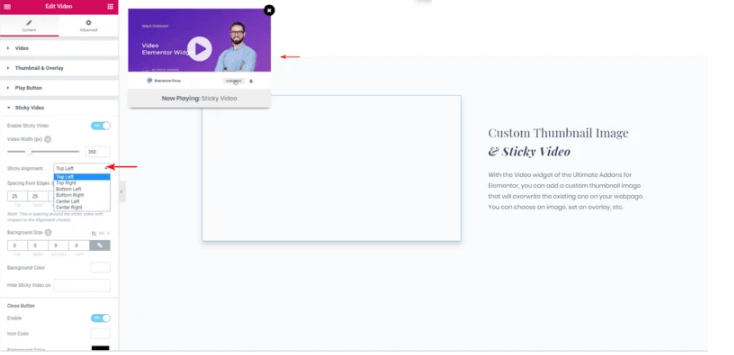
Sticky Video by UAE
Imagine if you are scrolling a page, and the video content flings left or right, or simply remains unmovable.
It must be a frustrating sight.
But, not anymore. Because the amazing feature of UAE’s Sticky Video makes the video stick to the page while you scroll, this means that your video will float along the left or right side of the browser window. With sticky video feature, as the visitor scrolls to read the content, the video along with text content will stay in focus.
How to make a video sticky?
UAE’s feature has made this functionality elegant and simple. To make the video sticky, you can simply enable the Sticky Video to toggle under content (tab) > Sticky Video setting.
There are various alignments options for the video in a sticky video feature. Navigate to the Action Bar and settings to control every aspect of the sticky video. The key features are given below:
- Video Size
- A variety of alignment options for sticky video across the edges
- Manage the video spacing and style.
- Add a background for the video
- Display the description for the video with the help of info bar
- Responsive support
- Drag sticky video across the window in the frontend
- Close button customizations
Video Size
You can adjust the height and width of the video by specifying the width of the Video in px. The video display will apply as per the Aspect Ratio set for the video. You can control the aspect ratio for video from Content (tab) > Video.
e.g. – If you have set a ratio of 16:9, then the sticky video dimensions will apply as per the selected ratio.
Sticky Alignment
You can manage the alignment i-e the position of the sticky video across the edges of the window. The video can be positioned as:
- Top Right
- Top Left
- Bottom Right
- Bottom Left
- Center Right
- Center Left
Video Spacing
You can change the spacing from the edge to control the spacing around the video. The spacing will be applied according to the selected sticky alignment.
e.g., for Bottom Left alignment, the spacing will apply only from the bottom and the left edges of the video.
Background Size and Style
The best part about UAE sticky video is that you can add the background of your choice to the video. You can also select the size and color of the background.

Info Bar
There is a small description given about each video- metadata kind of thing. With UAE sticky video option, you can add informative text under the sticky video. You can describe each sticky video, which will display the information about the currently playing video.
With the info bar, you can also control the color, background color, typography and padding of the video. The text field supports HTML content. You can also apply the custom style to the Info Bar content.
Manage Sticky Video on Responsive Devices
There is an option to Hide the Sticky Video on responsive devices. You can select different devices on which you want to hide the sticky video.
Drag Anywhere on Screen
You can drag the video screen anywhere using this feature. You can simply click on the video and drag it to place it anywhere within the viewport. The UAE sticky video supports the functionality to drag it anywhere, by default.
Note: Mobile devices and the backend editor of the Elementor does not support the drag functionality.
Close Button
You can Enable/Disable the close button for the sticky video. There are also controls available to manage the style of the close button.
Conclusion
With the help of UAE sticky video features, you can style and modify your sticky videos as per your preference. The plugin makes the whole procedure pretty easy. It is a very elegant solution to enrich the graphic content of your site. Keep creating amazing sticky videos on your website, and engage your visitors on your webpage even when they are scrolling your pages.


