
Do you need to send your data back and forth between WordPress and MS Excel – where you capture & present data using WordPress, but need to process & analyze it using Excel? In that case, the WP Table Manager plugin can help you sync and import Excel files as tables in WordPress.
Here we have a detailed guide showcasing how you can seamlessly import and export your table data to and from Excel documents. Not just that, but the WP Table Manager plugin can also help you sync your WordPress tables with Office 365 Excel for a more dynamic workflow.
So without further ado, let’s get started:
Table of Content:
- What is WP Table Manager?
- WP Table Manager: Features for Importing and Synchronizing Excel Data
- WP Table Manager: Pricing
- Import Excel Files as Tables Using WP Table Manager: A Detailed Walkthrough
- Step 1: Install and Set-Up WP Table Manager
- Step 2: Create a New Table
- Step 3: Sync WordPress Table with Excel Data
- How to import data from an Excel file on your PC?
- How to Sync a Table with a remote Excel file?
- How to Sync Tables with Office 365 Excel?
- Wrapping Up
What is WP Table Manager?
WP Table Manager is a premium and powerful WordPress plugin that gives you a full spreadsheet interface for managing the tables on your website.
The plugin is optimized for creating large tables (although you can also use it to create smaller tables as well) with support for custom filtering and data sorting. You also have the option to insert images, shortcodes, and custom HTML code right into the table cells – it’s that powerful!
And despite having access to some awesome features, it’s super intuitive and easy to use. Editing the tables is as easy as it gets. Just click on one of the cells and start editing the data. You have support for both data editing with or without a visual text editor – whatever makes you comfortable.
However, one of its most impressive features and the one we will be focusing on here is its ability to synchronize and import/export data from Excel files stored on your local system as well as from Office 365.
Here is a look at some of the main WP Table Manager features in regards to importing Excel data.
WP Table Manager: Features for Importing and Synchronizing Excel Data
- Option to import Excel data only or import the Excel file with its Style. The second option will transform the Excel file into an editable HTML table.
- Use the data from an Excel file as a source for a WordPress table by uploading it to either the WordPress Media Library or via an FTP client.
- Support for auto-sync between your Excel file and WordPress table. You can set the sync delay anywhere between 1 min to 1 day. There is even the option to delay syncing on publicly accessible tables if someone is viewing it and/or to save server resources in case it’s a large Excel file.
- The uploaded/synced data on your WordPress websites are simple HTML tables. You can easily edit them.
- Just like importing Excel files, the plugin will also let you export your WordPress tables in .xlsx file format.
All of this is just a fraction of the many features offered by the plugin.
Check out the official WP Table Manager features page to learn more about the various bells and whistles that come with the plugin.
WP Table Manager: Pricing
WP Table Manager is a premium WordPress plugin developed by JoomUnited. There are no free versions or free trials for the plugin, but it’s available for an extremely reasonable price.
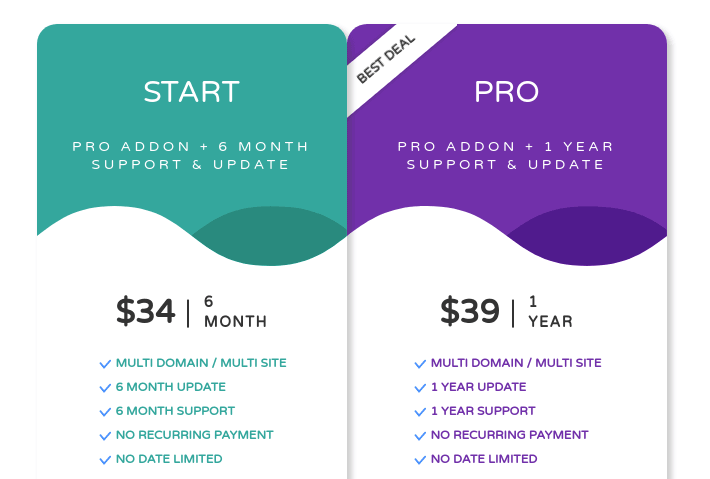
The Pro plan gives you a license to use WP Table Manager on unlimited websites with support for 1 year of updates and technical support, all at $39.
There’s also a more affordable Start plan at $34, but it reduces access to technical support and plugin updates to just 6 months and it’s not a good deal in our opinion.
But want to know what’s a good great deal? Well, it’s the JoomUnited WordPress Bundle that costs $179 and gives you access to all 8 JoomUnited WordPress plugins including WP Table Manager.
Import Excel Files as Tables Using WP Table Manager: A Detailed Walkthrough
Now that you know how the WP Tables Manager plugin can help you import and sync Excel files, it’s time to see things in action.
Here is a thorough step-by-step guide to walk you through the entire process – starting with the plugin installation & set-up, and ending with you seeing your Excel data on your WordPress website.
Step 1: Install and Set-Up WP Table Manager
After buying the WP Table Manager plugin, you will need to log in to your JoomUnited account, and from there go to the Extension Download area. Here you will find all the JoomUnited plugins you own – including WP Table Manager.
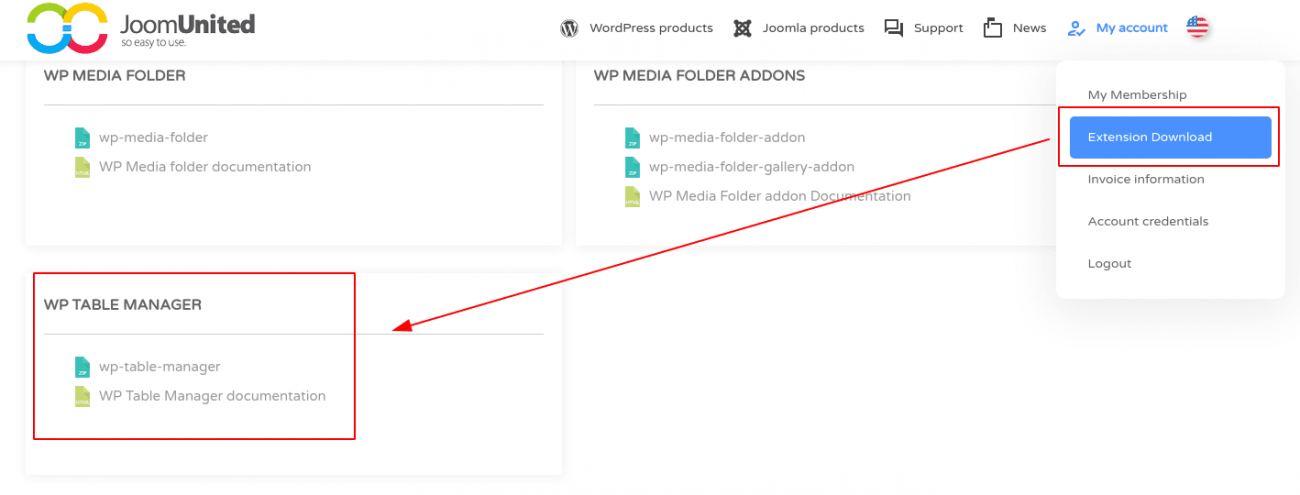
Click on the plugin to download the .zip file on your computer.
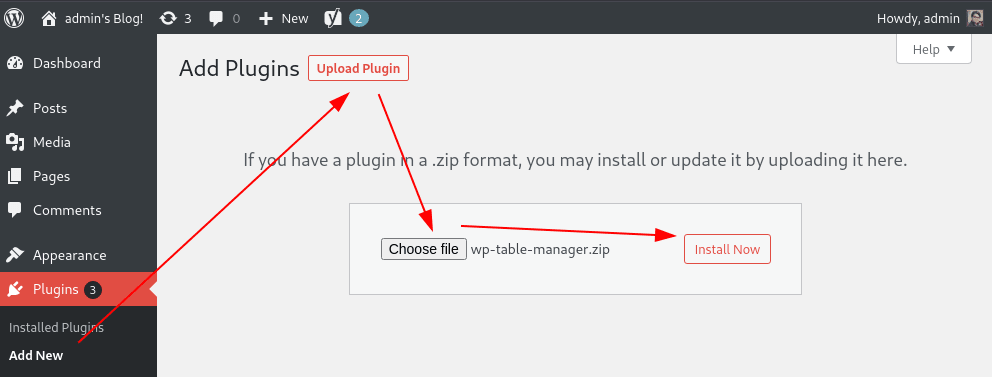
Now, log in to your WordPress dashboard and from the left-hand sidebar go to Plugins > Add New and click on the Upload Plugin button. This is going to bring up an area asking you to choose the plugin file from your local machine. Click on it, and a browser window will appear.
Locate the “wp-table-manager.zip” file you just downloaded and open it. Now click on Install Now as shown in the image.
Wait for a couple of seconds till the installation process is finished. Then click on Activate Plugin.
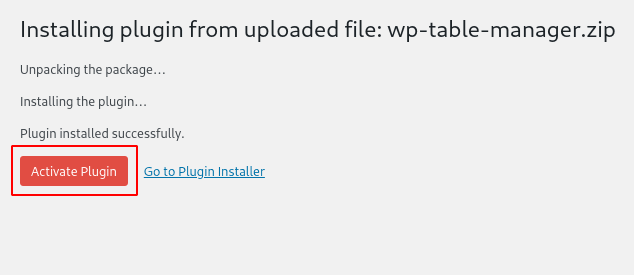
And that’s it, you have successfully installed and activated WP Table Manager plugin on your WordPress website.
You should now see a new Tables Manager option available in your WordPress Sidebar. From here you will be able to create new tables and configure the plugin settings. Let’s do that right now!
Head on over to Tables Manager > Configuration > Main Settings and then click on the Main Settings tab. Under it you will find the option “Enable import/export Excel.”
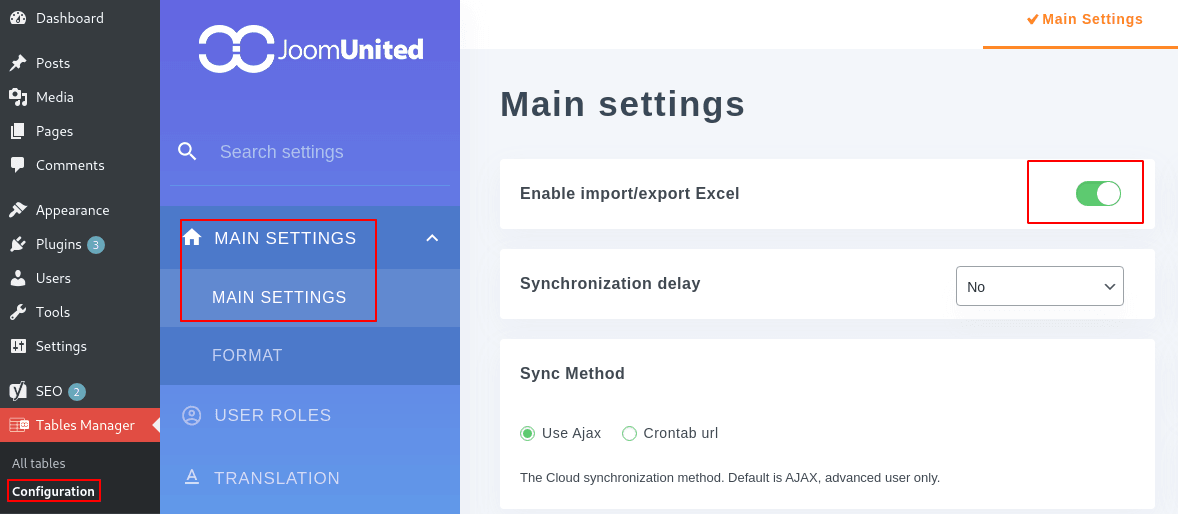
Just turn it on and you’re all set to start syncing Excel files with your WordPress tables.
Step 2: Create a New Table
Before we can start syncing Excel files with the WordPress tables, we first need to create a few WordPress tables. Now, WP Tables Manager already gives you a blank table by default. However, we will be creating a new table just to showcase the process.
First, navigate to Tables Manager > All tables from the WordPress sidebar and click on the + Create New button on the top-left corner of the screen. This is going to bring up three options – Category, Table, and Database Table as shown in the image.
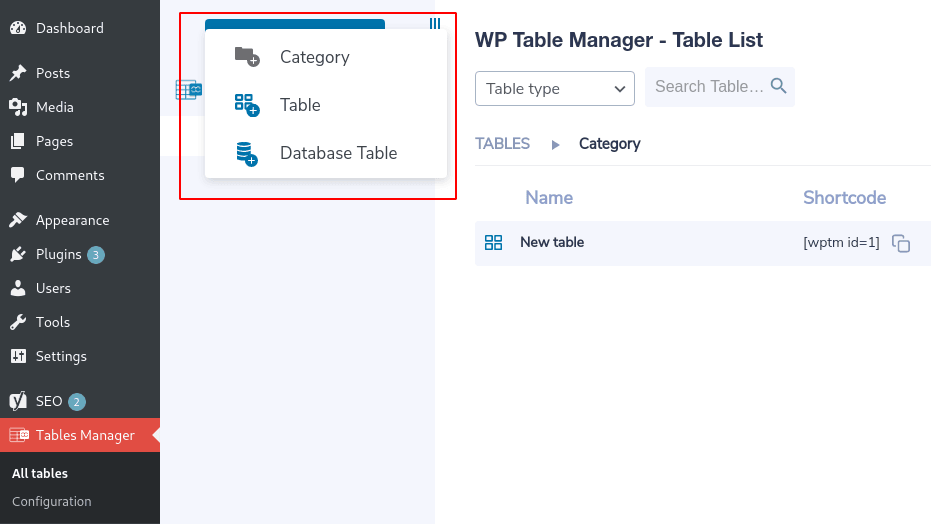
Click on the ‘Table’ option.
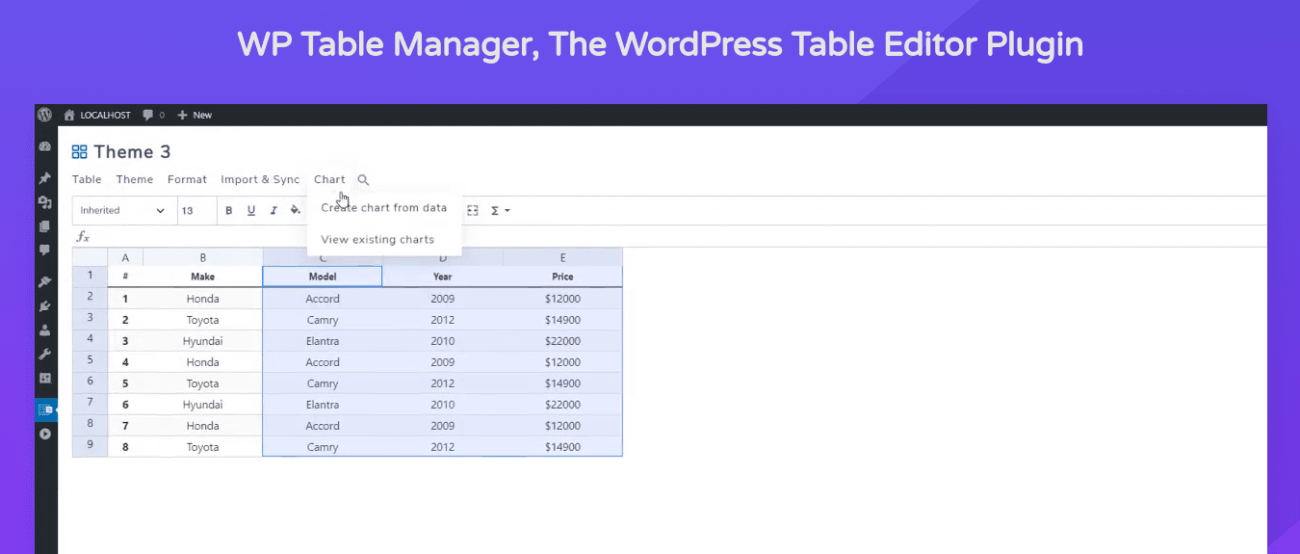
This is going to create a spreadsheet like table as you can see here.
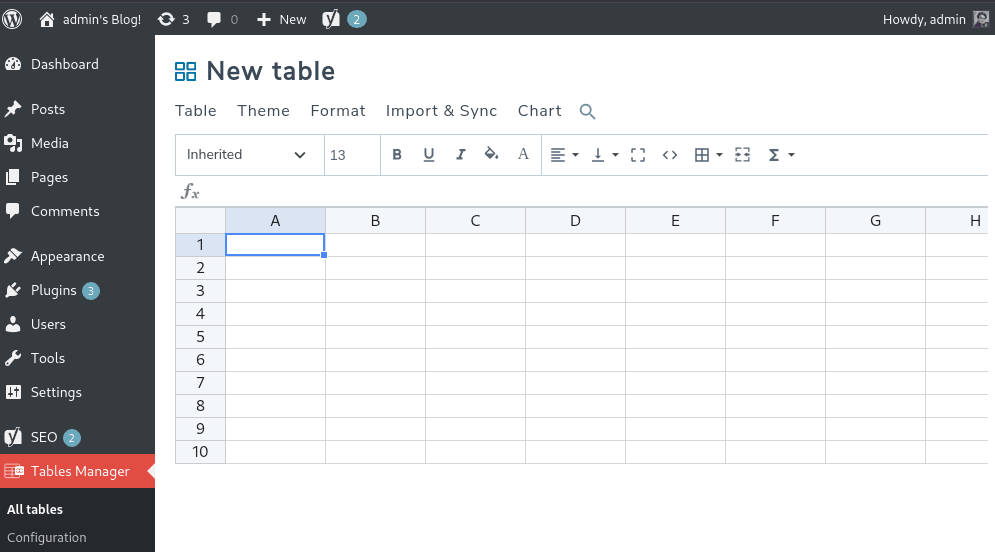
As you can see, you are presented with a lot of options like search functionality, formatting settings, fx function support, theming options, and much more. To name this table, double click on the title and enter a name.
Step 3: Sync WordPress Table with Excel Data
After creating a new table, click on the “Import & Sync” button on the top toolbar. This is going to present you with the following options:
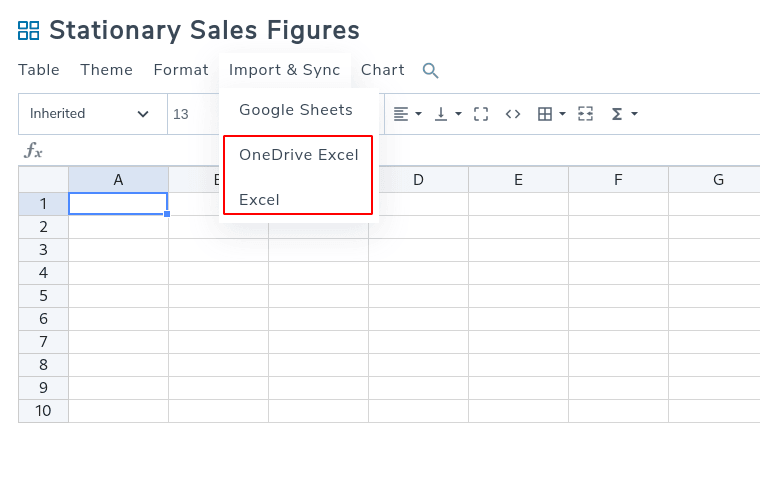
- Google Sheets
- OneDrive Excel
- Excel
In this tutorial, we will only focus on the “OneDrive Excel” and the “Excel” options.
Excel: Allows you to synchronize and/or import data from an offline excel file.
OneDrive Excel: Allows you to synchronize excel files stored in your OneDrive / Office 365.
Let’s go over them one by one.
How to import data from an Excel file on your PC?
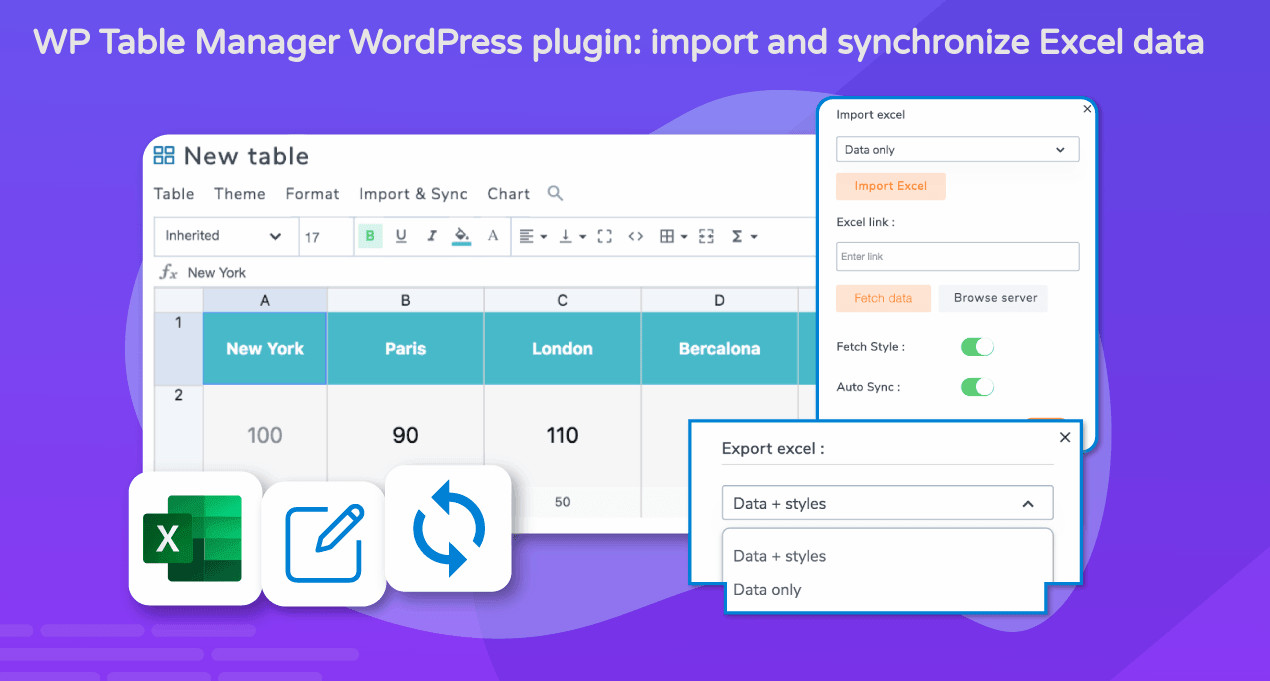
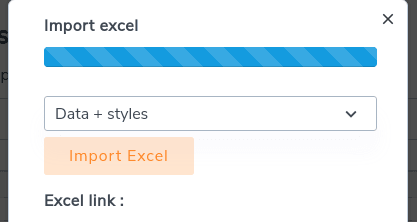
Open the table where you wish to import the excel data, click on Import & Sync as shown in the last image, and select the last option – “Excel.” This is going to bring up the following pop-up window with the Import Excel option:
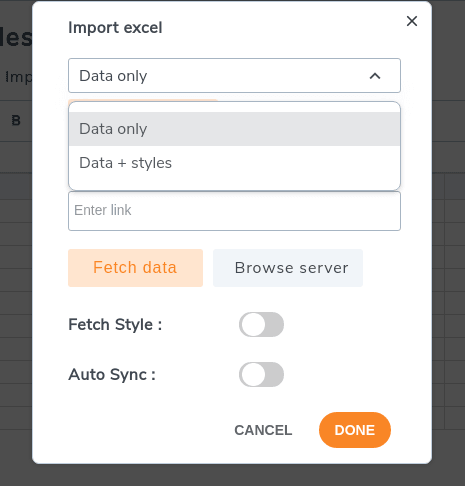
As you can see, there are two options in the drop-down menu: “Data only” – which is going to import only the table data, and “Data + styles” – which is going to import both the table data and the Excel styling by converting it to an HTML table.
For this tutorial, we will be selecting the “Data + styles” option and then click on the Import Excel button. This is going to bring up a browser window from where you will need to select the Excel file and click “open.”
This will start the importing process.
Note: You may need to wait from a couple of seconds to even minutes depending on how large the Excel file is.
And that’s it. You have successfully imported the data and styling of a local Excel file on your PC to a table on your WordPress website.

How to Sync a Table with a remote Excel file?
The WP Table Manager plugin also makes it possible to sync a WordPress table with an Excel file located anywhere on your WordPress server. To do this, instead of clicking on “Import Excel” we need to use the “Fetch Data” or the “Browse server” option.
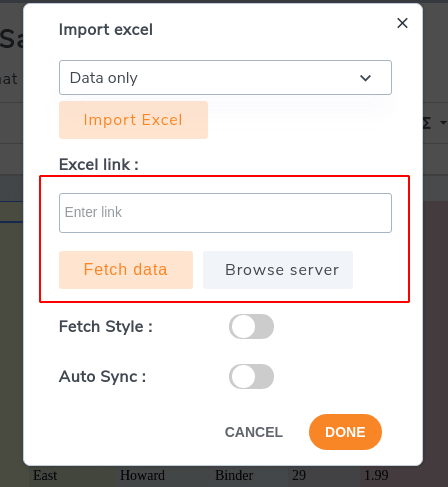
You can either enter the exact URL for the Excel file located on your server in the Excel Link field and then click on Fetch Data. This will import the data from the Excel file to the WordPress table you are working on.
Alternatively, you can click the Browse Server button. This is going to open a browser window letting you browse the content on your WordPress server:
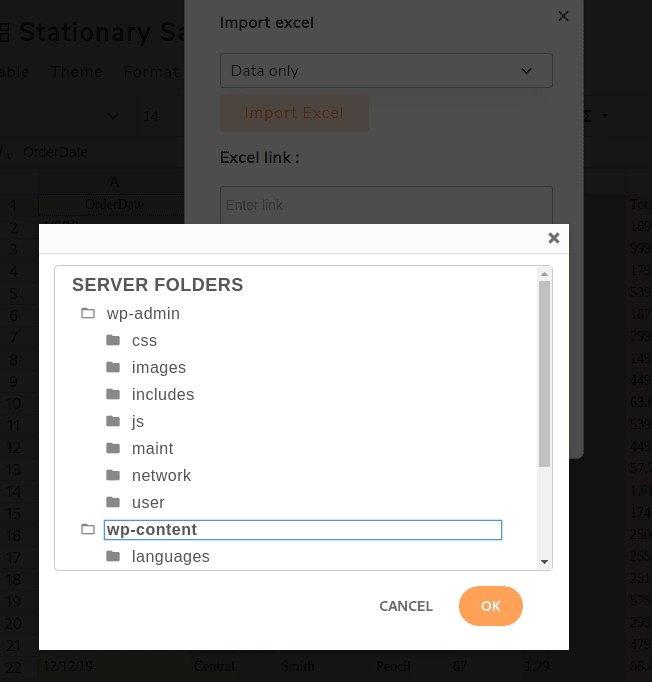
From here, just find the Excel file you want to import and click on OK.
This option is useful if you want to manage your tables through Excel and yet seamlessly transfer the data to your WordPress tables.
You can also have “Auto Sync” enabled which will periodically sync the Excel file with your WordPress tables without you having to lift a finger.
How to Sync Tables with Office 365 Excel?
If you want to sync an Office 365 Excel file with your current WordPress table, then click on the Import & Sync button just like before, but this time select the OneDrive Excel option.
This is going to bring up the following popup window:
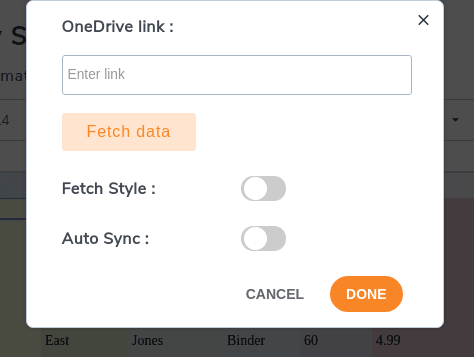
Now in the “OneDrive Link” field, you will need to paste the “embed link” for the Office 365 Excel file you want to import. Where can you find this link?
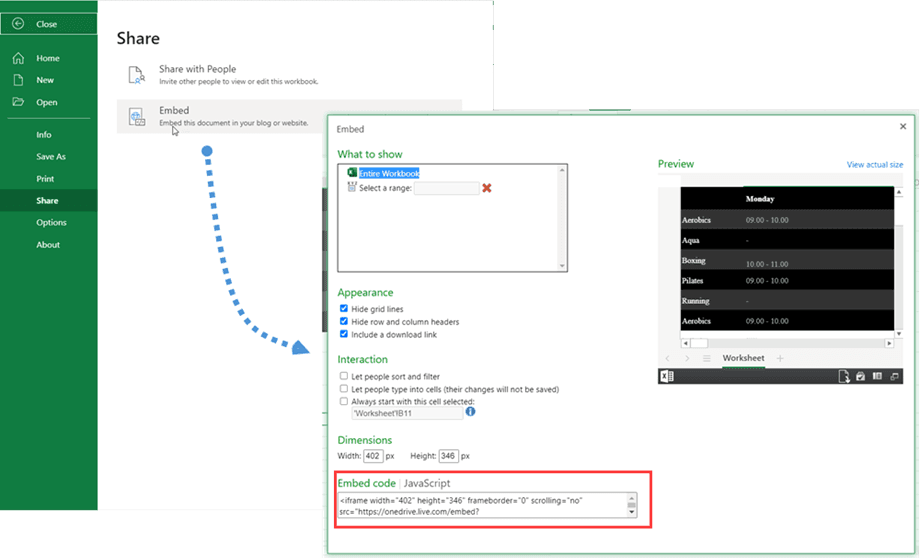
Well, if you have a OneDrive Personal account, then open the Excel file you want to import and go to File> Share > Embed. You will find the Embed link at the bottom of the pop-up window as shown in the image below:
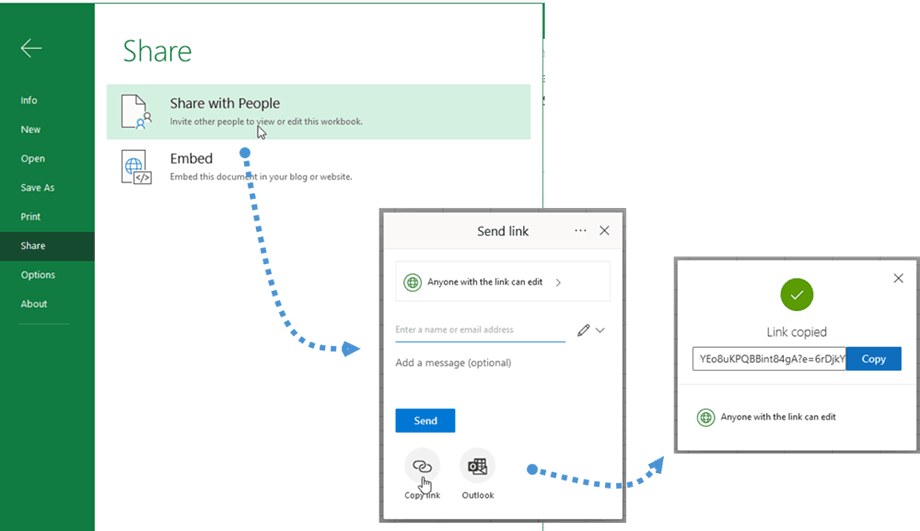
Alternatively, if you have a OneDrive Business account, then open the Excel file and go to File > Share > Share with People. Now click on Copy Link on the new Send Link pop-up window, and you will get the embed link for the Excel file.
Now that you have the embed link for the Office 365 Excel file, head back to your WordPress website and paste it inside the OneDrive Link field, click Done, and that’s it.
You have successfully synced your WordPress table with a Office 365 Excel file.
Wrapping Up
So this was our quick step-by-step guide on how to Import Excel Files as Tables in WordPress. We hope you found this useful and that it helped improve your workflow.
If you have any further questions about how the plugin works, or faced any issues while following this guide then feel free to write to us in the comments below. We will be happy to help you out.


